

MrBadExxample
-
Posts
4,762 -
Joined
-
Last visited
Content Type
Profiles
Forums
Gallery
Events
Everything posted by MrBadExxample
-

Nelson Riggs bags now with pics
MrBadExxample replied to SGT Ski's topic in Useful Product Links & Vendor Reviews
Plenty of photos ar their website: NelsonRigg Also New Enough sells Nelson Rigg products, and they take thier own photos. -
Thanks...................and Shut Up. Is there anyone else out there? Someone smarter preferably. Sadly, Only fully-intoxicated suburbanites with a partial understanding of metallurgy and current flow are available this evening.
-
In my semi-intoxicated stupor, I think you'll be fine. Disconnecting the battery is a good precaution. A potential problem might be melting items around the subframe - fender liner, wiring harness or the relays behind the battery. If you do that, be sure to get some good pix.
-
Jeez, get it over with, change the fucking R/R.
-
If the part number is the same, then yes it should work.
-
Regulator/Rectifier OEM Comparison Photo
MrBadExxample replied to MrBadExxample's topic in The Garage
I'm thinking I should have ordered the R1 R/R, no biggie. Yes University Motors rocks, I love those guys. My original R/R (one on the left) was fine, but I was concerned 49K miles) so I ordered the new one. I installed the new one and carry the original one as a spare. -
As many of y'all know the original carbed bird R/R has been superseded. Since I recently ordered a replacement for my 97 XX, I thought I'd post of photos to show the differences. In hindsight I probably would have ordered the Yahama R1 R/R (Yamaha Part No. 4JH-81960-01-00), since it is less than half the price of the Honda R/R. On the left is the original R/R that came with the 97-98 XX (part # 31600-MY7-600). On the right is the superseded OEM R/R (part # 31600-MY7-305) Both are made by Shindengen. The Shindengen part of the original is SH638-12, the superseded one is SH701-12.
-
Ok, got the SS brake lines for the front,, how to install?
MrBadExxample replied to TuffguyF4i's topic in The Garage
Post up some photos when you're finished. I wouldn't mind seeing how it came out. -
Ok, got the SS brake lines for the front,, how to install?
MrBadExxample replied to TuffguyF4i's topic in The Garage
Dave, I'll also give you the option of returning the kit for a full refund. Like I said I didn't research how the kit integrated into the LBS. I'd feel bad if I sold you a kit you don't use. -
Thanks for the update. I'm glad they sent you a replacement, even if they subtly implied it was your fault.
-
You have an email, Paul. Good job guys. I really, really hope this happens.
-
Ok, got the SS brake lines for the front,, how to install?
MrBadExxample replied to TuffguyF4i's topic in The Garage
Dave, I never opened the kit or researched the installation of it, but if I recall correctly one of the banjo bolts in the kit is actually a double banjo. However I'm not sure if that double banjo goes on the front master cylinder or the union. I wish I could be more useful. -
I'm not familluar with those.......... do tell. Or point me in the right direction.. please. At first I figured Stan was feeding us a West Texas stool sample. So enter The Google. Best I can tell a cyclone anti reversion header is legit. I'm still not sure about the Honda free radical engine. I think Stan might be joking us.....
-
Unbelieveable. Nature's locktite strikes again. I would need therapy after that ordeal.
-
Tim, don't ever get rid of that gallery. I see you marked the inward side of the intake camshaft, that makes sense. I'm gonna do that too.
-
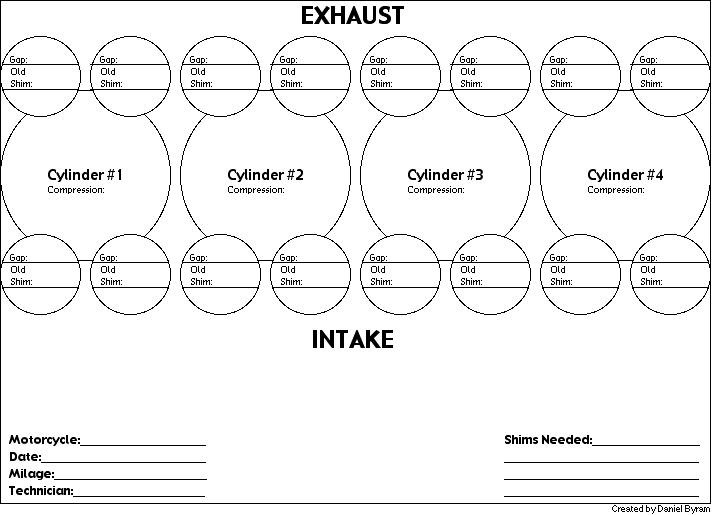
I'm in the middle of a valve adjustment procedure. Specifically, I'm in the phase where you wait for shims to arrive, since my local Honda dealer apparently has no room to keep valve shims in stock. I digress..... Anyhow the intake valve clearances were all within spec, actually the intake valve clearances were all identical and right in the middle of the range. This is on a 49K mile 97 XX. I love you Honda. However half the exhaust valves were too tight, so I removed the exhaust camshaft. Once the shims arrive I'll install it. I have a couple questions about the installation: 1. How the heck does one view the alignment marks on the intake camshaft? There's this thing called a "frame" that's in the way. Using my dental mirror I can view the sprocket's reflection, but I'd prefer to view it directly. Removing some engine mounts and tilting the engine forward seems the only viable alternative. Cutting a viewport in the frame didn't seem like a good idea. I suppose I'll just trust the reflection in the mirror. Has anyone done the engine tilt? 2. I assume locking the CCT rod is to prevent the camchain/crankshaft/camshafts from moving. Locking down the CCT rod increases the tension on the cam chain, correct? 3. But, if the tension on the cam chain is maxed (via locking the CCT rod) how does one get the camchain back on the camshaft sprocket and/or the sprocket back on the installed camshaft. The tension on the camchain will make this awfully tough. I was think the tension on the cam chain needs to be relieved to be installed and then reapplied. Perhaps by removing the CCT, then installing the camchain on the sprocket and the sprocket on the camshaft. I have the OEM manual, but it doesn't offer muich in the way of camshaft installation techniques. Thank You In Advance.....
-
Was it a Honda part? It was a JT Sprocket (steel). I forget the exact verbiage between me and the parts guy. I said something about wanting to stay with the stock gearing in the rear, but adding a tooth up front (to 18T). He suggested saving a few dollars by going with the JT Steel Sprockets. I probably should have explicitly stated I wanted a 45T sprocket. I haven't heard anything bad about the JT Sprockets, other than the front won't have the cush drive like the OEM one. To their credit, University Motors is sending me a 45T rear sprocket and won't charge me for it. Unless I don't return the 44T one within 30 days.
-
I used this image by posting it into a MS word document. EDIT: It looks funny as an attachment, but once enlarged it's fine.
-
Like Joe eluded to, I think the 44T is a stock rear sprocket outside of North America. Last week I ordered a stock rear sprocket from a Honda dealer. They sent me a 44T.
-
You are correct the stock setup is Chain: 530 - 110 link Front Sprocket: 17T Rear Sprocket: 45T Funny that the chain you ordered is already cut to 110 links. The DID chains I've bought come as 120 links, which I have to cut down. That's probably just DID chains. Did you really order a chrome chain? Do have a link to share. I've never heard of something so silly.
-
fucking oil. I like the sound of that, yummy.
-
Troubleshooting a Motorcycle Charging System
-
Will these longer ones (3.25") fit behind the header pipes? I use the PL14612 (2.5") which fits fine, but seems fairly close to the headers.
-
Chain Lube - Hypoid Gear Oil + Lucas Oil Stabilizer
MrBadExxample replied to MrBadExxample's topic in The Garage
I too like the hypoid gear oil 80-90w and won't change anytime soon. But I think adding the stabilizer will help it stick even better, or maybe I should put less on, hmmmmm..... -
I wonder if adding oil stabilizer to hypoid gear oil will help it adhere to a chain better (less fling-off)? I'm gonna try this. The oil stabilizer I have is really sticky stuff, think of hot mozzarella cheese. Personally I think Lucas's claims about their oil stabilizer are horse crap, but it does seem to help oil stick better. Which, for a chain, is a good thing.