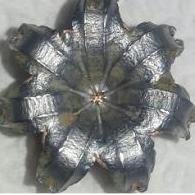
Redbird Posted November 28, 2004 Share Posted November 28, 2004 A couple pics, in case anyone is considering this. Thanks to JRed for the excellent suggestion of putting a piece of wire through there, made deciding where to drill much easier. I marked it in the wrong spot initially, that's the small spot of bare metal right above the actual hole. No more ugly little link lines, whoo-hoo...... Quote Link to comment Share on other sites More sharing options...
testrider Posted November 28, 2004 Share Posted November 28, 2004 What's the purpose of drilling the caliper? Quote Link to comment Share on other sites More sharing options...
Redbird Posted November 28, 2004 Author Share Posted November 28, 2004 De-linking, or more accurately, linking. With the linked system two lines are requires to each front caliper to activate all three pistons on each side. You lose one of these lines on each side when you de-link, necessating some sort of exterior jumper to get the fluid to the center pistons. Drilling the center piston to connect it to the passage between to two outer pistons gets around this. Quote Link to comment Share on other sites More sharing options...
Pete in PA Posted November 28, 2004 Share Posted November 28, 2004 Wow! that's cheap, easy, and awesome! Let us know how it brakes. Quote Link to comment Share on other sites More sharing options...
Redbird Posted November 28, 2004 Author Share Posted November 28, 2004 Don't expect the braking will be much different, I've been de-linked for around two years. I'll probably attribute any difference there is to the caliper rebuild and the new pads that'll go in when I'm done more than the slight change of plumbing. Quote Link to comment Share on other sites More sharing options...
Red J Posted November 29, 2004 Share Posted November 29, 2004 And the suggestion to drill the front calipers instead of resorting to link lines, was presented to me by Northman. J. Quote Link to comment Share on other sites More sharing options...
Byrdman Posted November 29, 2004 Share Posted November 29, 2004 Hey Tim, Have you bled the system since your drilling? I have a set of drilled XX calipers on a cafe racer project I'm building and I can't get all of the air bled out for the life of me. If you try and bleed the front calipers while they are mounted on the bike the center piston can't evacuate the air because the drilled hole is in the center. Any air above that hole is kind of suck in the cylinder. The only way I got any air out at all was when I had the caliper in hand and bled it in a horizontal orientation. I believe the black arrow all the way to the left is the main bleed line for the two outer pistons. The black arrow in the center is the bleed line for the inner piston. Any air to the left of the black line in the middle is a bitch to get out. Jeff Quote Link to comment Share on other sites More sharing options...
Red J Posted November 29, 2004 Share Posted November 29, 2004 I believe the black arrow all the way to the left is the main bleed line for the two outer pistons. The black arrow in the center is the bleed line for the inner piston. Any air to the left of the black line in the middle is a bitch to get out. Jeff Jeff, Most air to the left of the black line can be removed by the inner piston's bleeder port (right black arrow), much as it's done in the stock (linked brakes) condition. That said, I agree that the center piston seems to trap some air, at least I've been able to bleed more air out of the center after removing the caliper and bleeding in different positions. I've also had better luck bleeding the pistons with the rear of the bike jacked up, such as when the centerstand is deployed, on a 2x4, with the front wheel on the ground. --- Another tip, sent to me by xrdracer, is to bleed the brakes with the right clip-on removed, so that you can evacuate any trapped air at the master banjo bolt. Dunno if this is common knowledge, but it did help me. J. Quote Link to comment Share on other sites More sharing options...
Redbird Posted November 29, 2004 Author Share Posted November 29, 2004 Mmmm.....I initially had the same problem bleeding with the little link lines installed, solved it the same way, dismounted the calipers and all was fine. I'll let you know how I fair as soon as the new seals come in, thanks for the heads up. Quote Link to comment Share on other sites More sharing options...
UncleJake Posted November 29, 2004 Share Posted November 29, 2004 How the hell did you get in there with a bit?? Do you have to drill them at an angle?? Or do you have a very, very tiny Stewart Little Tool Set? -UJ Quote Link to comment Share on other sites More sharing options...
Redbird Posted November 29, 2004 Author Share Posted November 29, 2004 There's absolutely no problem with space for drilling. Look at the pics, you're looking staight into the hole that was drilled. Nothing in the way once the calipers are disassembled and the pistons removed. Quote Link to comment Share on other sites More sharing options...
UncleJake Posted November 29, 2004 Share Posted November 29, 2004 Ahhhh, 1 and 3 are already linked, I get it. Doh. -UJ Quote Link to comment Share on other sites More sharing options...
demon Posted November 29, 2004 Share Posted November 29, 2004 So once you drill the caliper, you block off and remove the line from the center piston, right? Did you do the same with the rear and remove the secondary master on the left side of the forks and all the lines associated with the secondary master and the center pistons on the front? Sounds like an easy way that looks more "factory" than the little link hoses. Quote Link to comment Share on other sites More sharing options...
Redbird Posted November 29, 2004 Author Share Posted November 29, 2004 So once you drill the caliper, you block off and remove the line from the center piston, right? Yep. Did you do the same with the rear No, I have a double line coming off the rear master to both banjo bolts on the rear caliper. That's how the delinking kit I installed two years ago was set up. JRed drilled his rear, saves the cost of a line. Another option would be to just plug the hole for the center rear piston, I think two in back would be sufficient once delinked. ....and remove the secondary master on the left side of the forks and all the lines associated with the secondary master and the center pistons on the front? Yes. Turns out you can delink for the cost of three brakelines and the associated hardware, assuming you can come up with something to replace the secondary master on the fork leg. An Idea I had (after I bought the kit :roll: ) was to simply use the secondary master as the "delink bracket". You could plug the line hole and let it pivot a bit as before, or maybe fill it with JB weld for a solid mounting similar to what you get with the available brackets. Not as slick, but I think it'd work. Quote Link to comment Share on other sites More sharing options...
demon Posted November 29, 2004 Share Posted November 29, 2004 Think I smell a winter project coming on. I have some 1/4" stainless that would make a nice bracket on the front. Quote Link to comment Share on other sites More sharing options...
Red J Posted November 29, 2004 Share Posted November 29, 2004 No, I have a double line coming off the rear master to both banjo bolts on the rear caliper. That's how the delinking kit I installed two years ago was set up. JRed drilled his rear, saves the cost of a line. Actually, saves the cost of two lines. I'm using a single stock line in the rear. After reading about a few guys thinking that the stock rear master is a bit oversized for the job, I didn't want to make the feel any firmer, hence the stock rear line. Not to hijack, but I did mine with: 1 front Galfer line set for XX, standard kit. 1 front master cylinder from Japanese CB400SF (bigger bore). 1 front lever for master. 1 front fork master substitute bracket. 3 bolts to cap off calipers. 1 reused rear brake line. 3 drilled calipers. J. Quote Link to comment Share on other sites More sharing options...
Byrdman Posted November 29, 2004 Share Posted November 29, 2004 I pulled the secondary master cylinder off of the fork and pulled it apart. I took the internal diaphram and the guts out and installed a correct length bolt. Then I re-assembleed the banjo bolt flush. The inner bolt holds the piston open and makes the master cylinder as solid as a rock. I might someday machine a bracket to delink it correctly but so far it works fine the way it is. Quote Link to comment Share on other sites More sharing options...
Redbird Posted November 30, 2004 Author Share Posted November 30, 2004 I pulled the secondary master cylinder off of the fork and pulled it apart. I took the internal diaphram and the guts out and installed a correct length bolt. Then I re-assembleed the banjo bolt flush. The inner bolt holds the piston open and makes the master cylinder as solid as a rock. Miles ahead of me again, dammit :razz: Quote Link to comment Share on other sites More sharing options...
Recommended Posts
Join the conversation
You can post now and register later. If you have an account, sign in now to post with your account.