

RedEye
-
Posts
170 -
Joined
-
Last visited
Content Type
Profiles
Forums
Gallery
Events
Posts posted by RedEye
-
-
Repackaged, but the horn itself says Nautilus by Stebel. Sale ends Wednesday, but better late than never. Some guys on the other forum are saying there's another horn with the same stock # that comes in a white box, but you want the one in the blister pack. The white box is the regular non-compact version AFAIK.
-
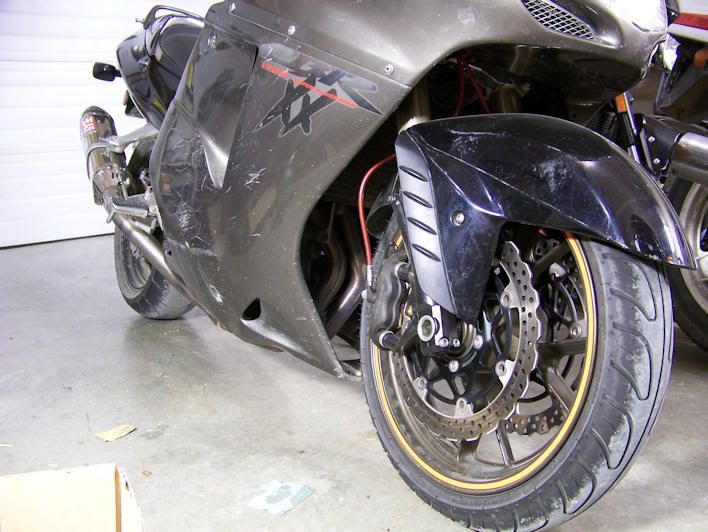
I don't think the ZX-14 fender affects airflow too much, the XX fender obstructs the rad just about as much. Most of the airflow through the rad comes from lower down, deflected off the center section of the lower cowl.
-
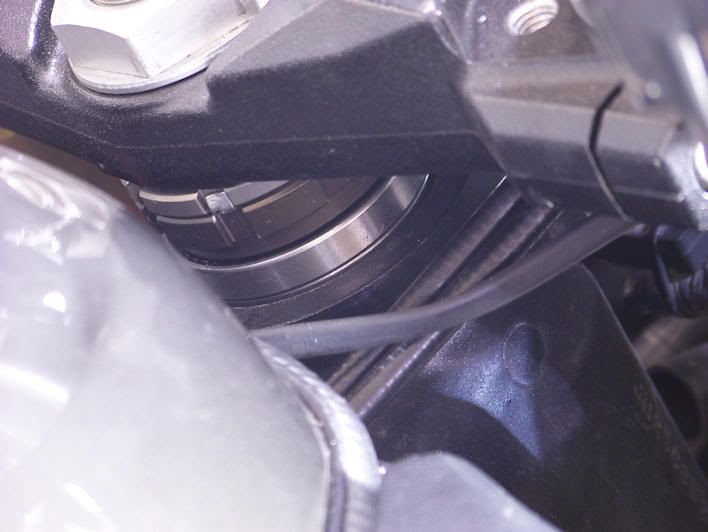
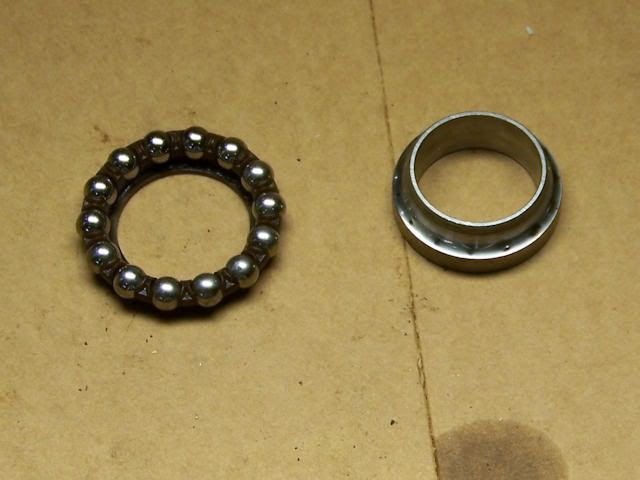
The ZX bottom bearing isn't the same -- the outer diameter is the same (or it wouldn't fit in the XX stem) but the ZX stem is wider and so the inner diameter is bigger. 35x55x15 is the size of the tapered bearing, I think you'll find the ball bearing if you search 35x55x17. In either case searching the size will turn up a standard bearing number that you can also search for. For some reason most of the suppliers of name brand Japanese made bearings that I found were in the UK . . . their google-fu must be better. I paid about $30 shipped for the single, sealed tapered roller I mistakenly ordered in the standard CBR size. I'm sure I could have found it cheaper elsewhere, even special ordered it locally, but I hate people and a few extra bucks is a small price to pay to avoid calling around, driving into town, and having to physically deal with some shambling proto-human across the counter at a shop

The rationale for using tapered rollers is that they are sturdier and will last longer . . . however of course most of the rave reviews are from people who replaced clapped-out high mileage ball bearings, so anything would have been a big improvement. I bought the tapered rollers because I had to get bearings anyway; my front end was brand new, but the outer races were still pressed into the steering stem of the donor bike, not much help to me

As for the top bearings, I just went with whatever was cheapest shipped here. There isn't a huge variety of choice in that size anyway.
-
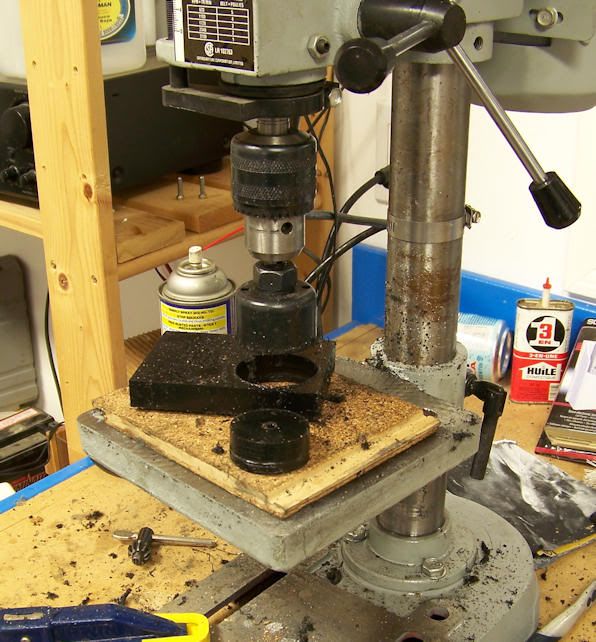
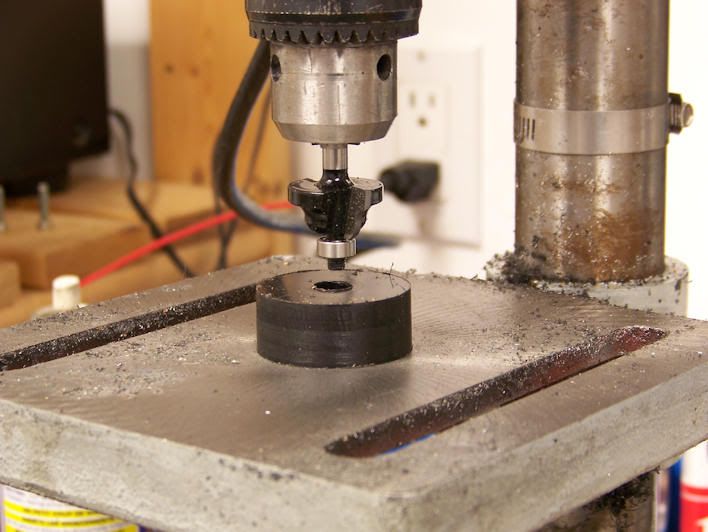
Icepick's project has reminded me that I never did update this log with details of the build. Probably because of the traumatic nature of the memories, due entirely to not having the right tools for the job. I wanted to make my steering stem spacer from a stock ZX bearing race because it was exactly the right diameter and shape, but I was having a hell of a time figuring out how to make a perfectly straight cut in such hard material. Finally, necessity being the motherfucker of invention, I used my World's Crappiest Drill Press as the World's Crappiest Milling Machine.
I locked the drill press at the right height, tried a few different approaches and finally settled on a Dremel diamond wheel as the least of the worst. I held the bearing race down and turned it by hand, scoring a progressively deeper cut. Since drill press bearings don't stand up very well to side loads very light pressure was required; also the drill press' max speed is about 1/8 of a Dremel's. As you can imagine, this took awhile.
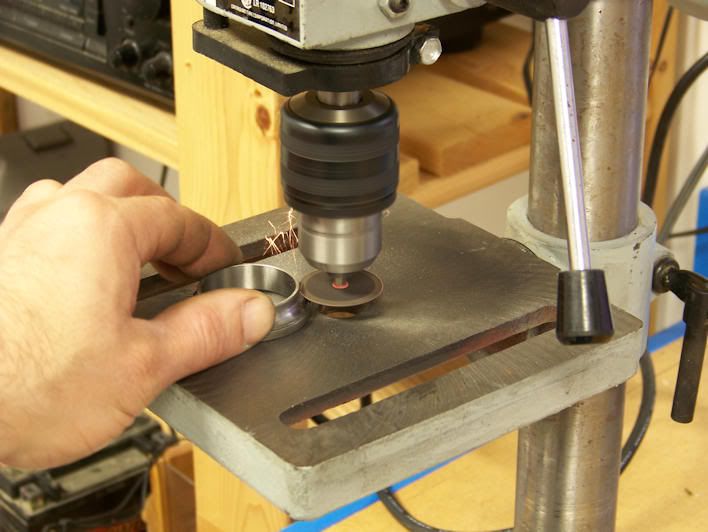
Eventually I had this:
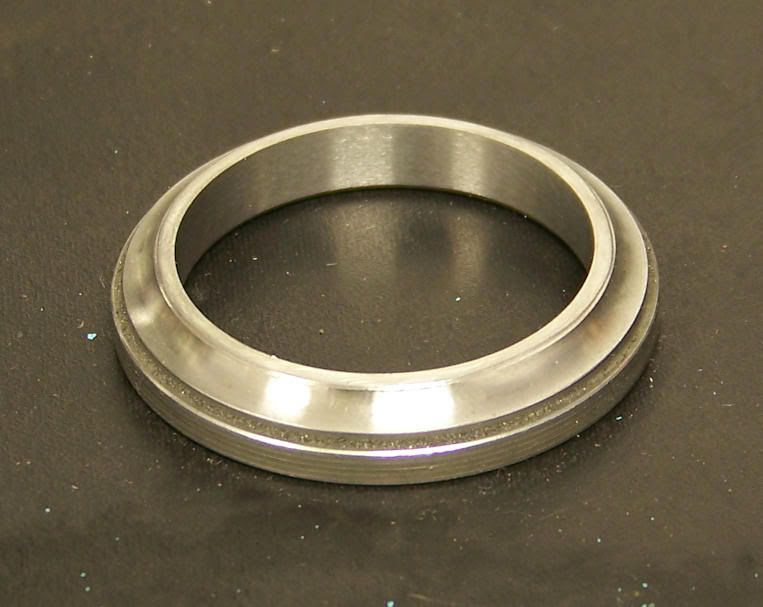
And then, as I mentioned in Icepick's thread, I had to do it all over again because I failed to consider the 3mm difference between the stock lower bearing and the tapered roller

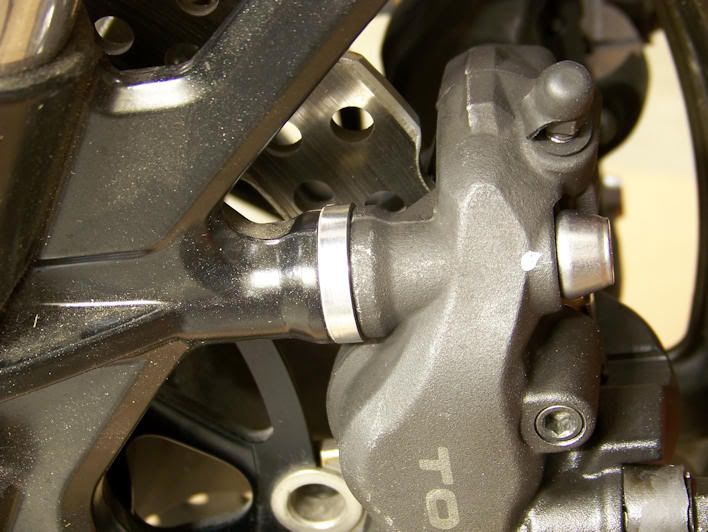
I did the caliper spacers the same way, using a spare bit of billet aluminum from work:
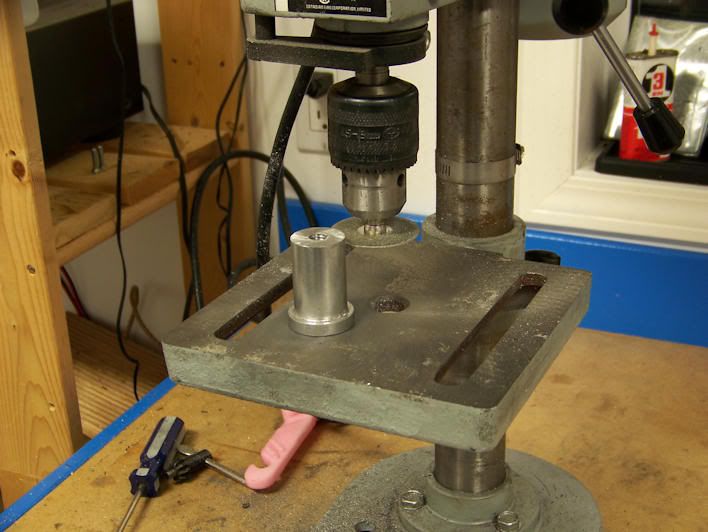
Partial cut:
These were a lot easier to cut than the bearing spacer (durrrrr).
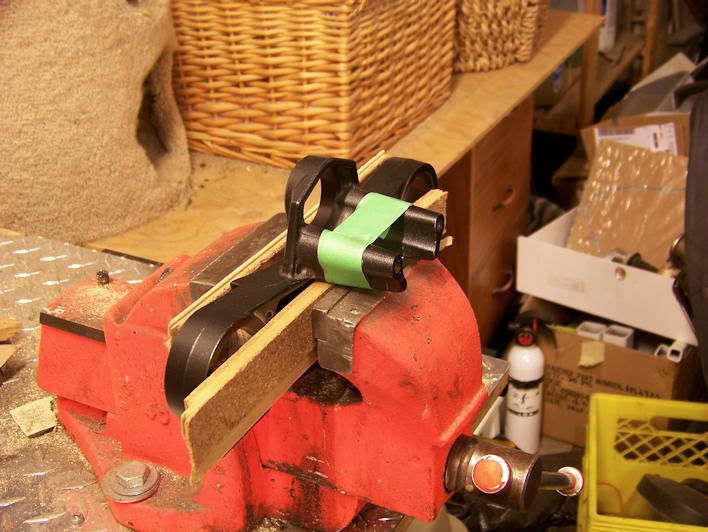
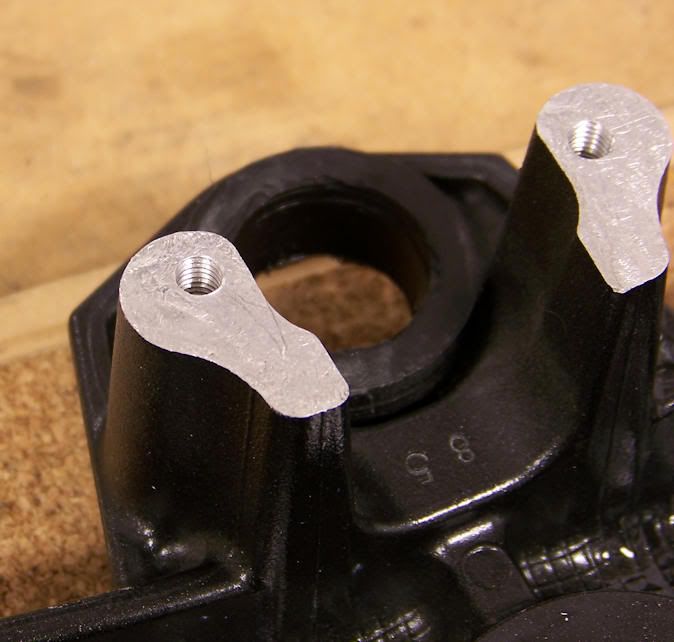
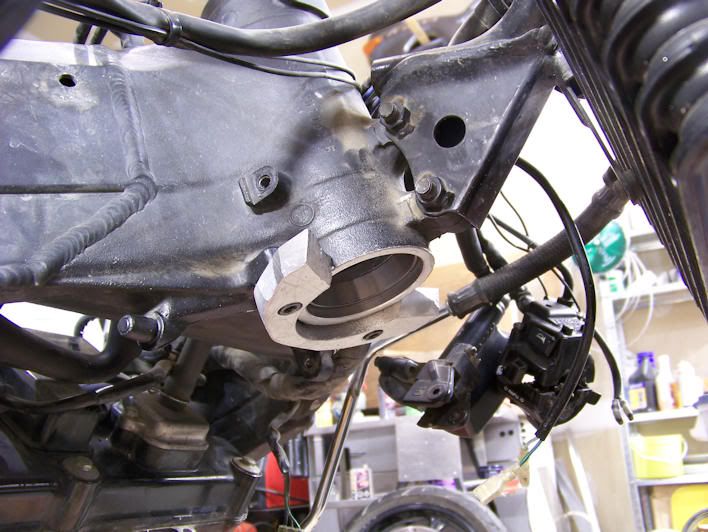
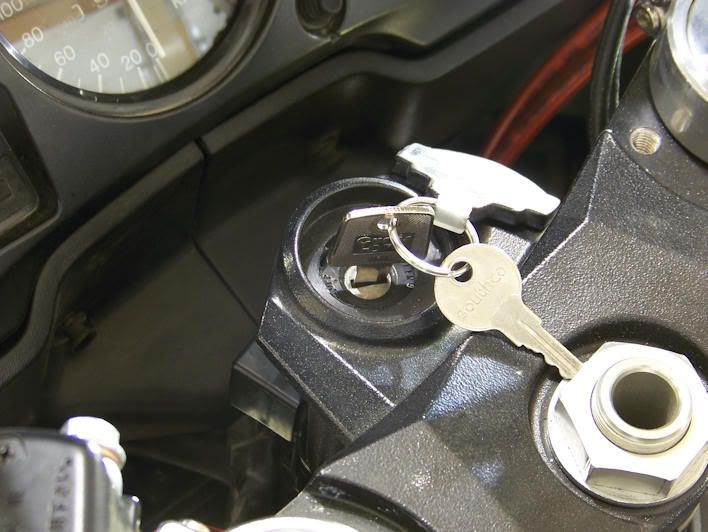
Ignition cylinder: Multiple issues here. The hole in the triple is much bigger than the XX cylinder, the mount arms on the bottom of the triple are longer and slanted on the ends, and the bolt spacing is different. Simplest option would be to just use a ZX ignition, wire it into the XX harness, and suffer with separate keys for the ignition and everything else. But why do that when you can hack up brand new parts?
First order of business, cut down the mounts at the proper height so the steering lock still works. Using the cutoff wheel in the drill press was too much of a pain and not necessary here, so I marked the triple and did a rough cut with the angle grinder:
I don't have a pic, but I smoothed and levelled the surface using an HSS rotary file as an endmill in the drill press.
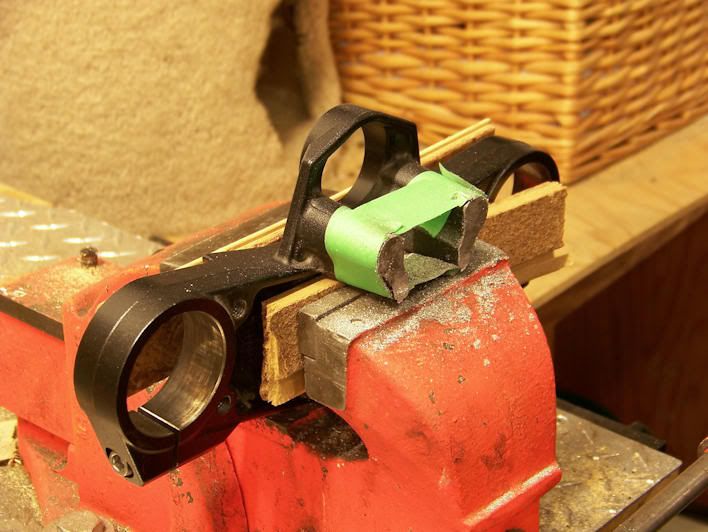
Next was centering the ignition in the triple. I have some blocks of 5/8" HDPE laying around that seemed like a good choice. I cut a plug with a holesaw:
Then made the inner hole for the ignition cylinder using a router bit of all things, all I had in the right size.
Now I could install the XX ignition perfectly centered in the ZX triple and mark the locations for mounting holes, drill, tap, and eureka!
-
Can't help you there, I just unplugged the connector and removed the 2 bolts holding the ignition assembly to the triple, I didn't touch any tamper resistant torx bolt or do any further dismantling.
-
Finally an evening that finds me coherent enough after work to use a keyboard. Here's my 2 cents, keeping in mind that I haven't modded the rear end. For pics and details on the top bearing refer to my build thread here . . .
As far as I know, any 1st gen ZX front end will work. The 2012 might work too, you'd have to check the ZX community and see if the basic dimensions of the main parts have changed.
The stock XX master cyl is inadequate, but you don't necessarily need to use the ZX-14 front brakes either. The great thing about radial brakes is that you can use any calipers with the same mounting bolt spacing, which is shared by all Japanese bikes as far as I know. Different rotor sizes can be accommodated by putting a spacer between the caliper and the mount on the fork leg -- you can buy the spacers online or make your own. People have even used a stack of washers; a little ghetto even for me but you don't need anything fancy here. When I was gathering parts, ZX-14 brakes were rare and expensive, but last-gen CBR1000RR calipers were cheap and plentiful. I got the calipers and master cylinder for around $70 and made the required 5mm spacers from a bar of scrap aluminum. If I was going to spend $200 on used ZX-14 calipers . . . I'd probably find the extra hundred bucks or so it would take to get a pair of used Brembos.
The downside of using non-ZX brake hardware is that the brake lines will be too short -- that's why we're using the ZX parts in the first place, because we need forks that are longer than normal sportbike bits. Good excuse to install some custom SS lines; I got a 5 line kit from apexbrakes.com for around $120 shipped: separate front lines, clutch line, and 2 lines to de-link the rear. That last bit won't matter to you if you're replacing the rear end as well.
Another thing to keep in mind is that the banjo bolt on a radial master is not oriented like the one on a stock XX front master cylinder, and may interfere with your throttle cables where they enter (or exit, I suppose) the switch housing. I was able to get clearance by leaving some space between the master cylinder and switch pod, but a proper fix will require either a different switch housing with the cables oriented differently, or a different master cylinder.
Bearings: the ZX bottom bearing will work. I found a sealed tapered roller for the bottom, then picked the wrong number from my cross-reference list and ordered a stock XX sized bearing by mistake. When I discovered my mistake I lowered my standards and ordered an All Balls ZX-14 set just because I was out of patience and it was the simplest, quickest option. Stock ZX upper and lower steering head bearings are the same so now I have an extra lower bearing. The ZX roller bearing is something like 3mm thinner than the Honda lower bearing (and thinner than the stock ZX ball bearing as well); on the VFR forums it seems like standard practice to use a 3mm spacer here but I found it unnecessary as the shape of the bottom of the ZX-14 stem where it joins the lower triple allows it to ride up that 3 mm farther without the triple hitting the bottom of the steering head.
Top bearing . . . The 47mm x whatever bearing is cheap and easy to find, no worries about 2 bearings @ a hundred bucks a pop. In fact, you don't even need 2 bearings. The actual machined surface the outer race will be seated in is only as tall as one of those thin-section bearings, above that it widens out by about 1mm so the 2nd bearing is just acting as a spacer. It's a very nice spacer, being exactly the right diameter to fit snugly on the steering stem, but it's not actually contacting the inside of the steering head. 2 bearings will come just about exactly even with the top of the steering head. You'll need an additional spacer of some sort to make up for the extra ZX stem length, and if you're going to use a tapered roller on the bottom make sure you install that before you measure for your spacer. I did mine with the stock ZX ball bearing still installed and then found my spacer was suddenly 3mm too short after I installed the tapered roller.
The big issue with the non-standard top bearing is preload, as Skull mentioned. Well, to me the issue isn't precisely preload, it's the fact that a radial ball bearing, especially a thin one, cannot take much force in the wrong direction (ie, along the stem). As Stan mentioned in my thread you don't have to worry about that in normal circumstances because if you look at the way the steering head works, there's no way for forces from below to be transferred to that top bearing. The front suspension can only put an axial load on the top bearing under rebound (or when the front wheel is off the ground). Other than that, the top bearing is only there to center the stem which involves radial loads like it's designed for.
Pre-load shouldn't be an issue, in that the required preload is only a few lb-ft and won't harm the bearing (fingers crossed). But before you can preload you have to seat the bearings, and the force required there is potentially enough to deform or destroy that skinny little upper bearing if you're not careful. If you had thrust bearings top and bottom you could just torque the adjuster nut, back it off, preload, and you're done. But with this setup remember that your adjuster nut and spacer are only contacting the inner race of that skinny radial bearing, which is unsupported in that direction. Put 46 lb-ft (or whatever the Kawi manual calls for) on the adjuster and you'll press the inner race right out of the bearing, or at least distort the cage. To seat the bearings you have to transfer the force from the adjuster nut to the outer race of the top bearing, so you're pushing the outer race into its seat instead of pushing on the unsupported inner race. If you look at a thrust bearing, the design of it does exactly that -- transfer axial load from the inner race to the outer. Since my spacer was conveniently shaped I just flipped it upside down with the narrow part against the nut and the wide part on the top bearing's outer race. Failing that, you could just put a stack of really heavy duty washers or chunk of pipe in place of the spacer while you apply the seating torque.
Once the bearings are seated preload can be done the old-fashioned way, by feel (which is how most people do it anyway, not many people use a spring scale setup to measure the torque, and people who check such things say the preload on brand new bikes is often fucked up anyway). I tightened a little bit, yanked on the forks like a frenzied ape, tightened a teeny bit more until I couldn't hear or feel any play. I was only concerned with eliminating play in the stem, not with the effort required to turn the bars like a lot of writeups mention. With the stem torqued to where I couldn't hear any clicking no matter how hard I pulled on the forks, the bars required a great deal of effort of turn, but the steering did not feel heavy at all when actually riding. If I'd gone by the "bars should go to opposite lock with a tap" type criteria I think there would have been a ton of slop in the bearings. Remember that a tapered roller will have a heavier feel than the stock thrust bearing, and a sealed bearing more friction than unsealed so don't be alarmed if the bars end up being hard to turn at this point. I tried with single and double top bearings, and 2 bearings definitely required more force to turn the bars when preloaded to the "no-clicky" point. I did end up using 2 top bearings because I didn't feel like making yet another spacer, and despite the extra friction being apparent with bare forks and the front end off the ground, it wasn't noticeable on the road or even wheeling the bike around the garage. So again, I'll stress that IMHO you just need to worry about dialing the play out of the stem when you're preloading. FWIW, the range from bars moving freely, lots of free play --> bars getting stiff, stem still clicking when pulling on forks --> bars feeling quite stiff but no audible play was all in a small fraction of a turn of the adjuster.
Parts prices . . . shipping to Canada is a bitch on heavy and/or bulky items, shouldn't be a problem for you. When I was sourcing parts I found a few complete front fork setups with the triples, bars, controls, calipers and master cylinders for around $400, but shipping here was either prohibitive or not available so for an extra $200 or so I got brand new forks from a bike that was an engine donor for some other project. The sweetness of the deals you can find are directly proportional to your patience and consistency when searching
 As always, keep an eye on the classifieds of any ZX-14 or general Kawi forums. I think I paid around $200 + shipping for a front wheel with rotors. There are lots of brake and suspension swaps within the Kawi community, if you can't find a decent deal on a wheel with rotors you might be able to find other late-model Kawi rotors that will fit.
 -
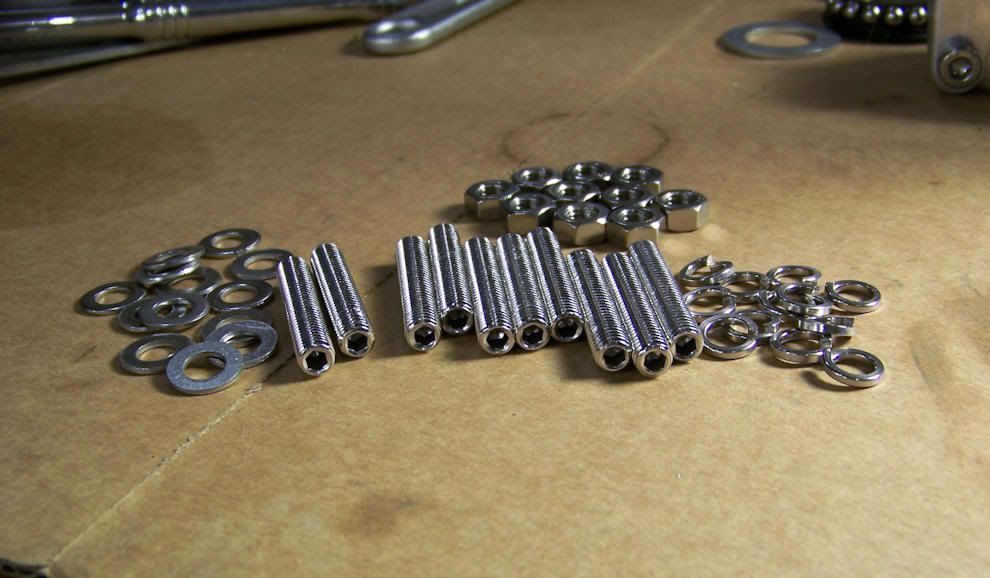
My studs were in bad shape when I upgraded my exhaust last fall so I replaced them with stainless internal hex bolts for just a few bucks more than stock hardware. The stepdown from 8mm to 7mm doesn't seem to be necessary, 8mm fits the holes in the flanges just fine. I also used antiseize, just remember to retorque after they've been through a few heat cycles.
-
Does it have to be an XX switch? You can use pretty much anything with some rewiring . . . maybe not even that with Honda controls. Not sure if your XX is carb or FI, but there are billion of cheap F3, F4, F4i etc switch pods out there.
-
Finally completed my application form and joined the prestigious ZXXX Club

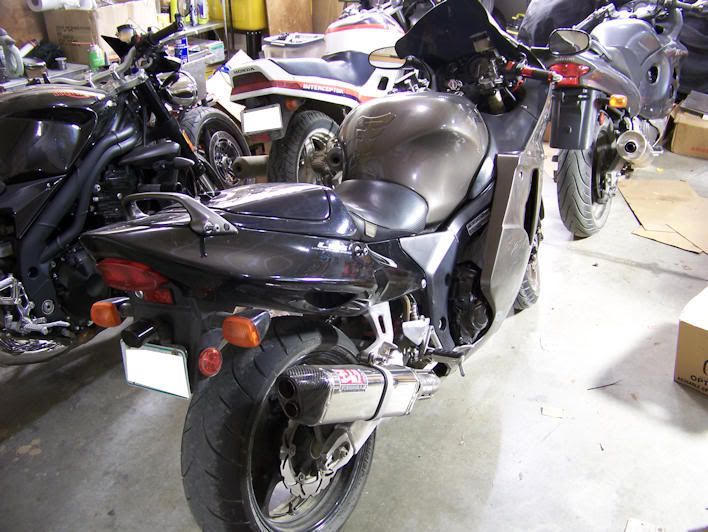
It's still very much a work in progress, but it's the last week of October. In Saskatchewan. So basic functionality will have to do for the few riding days left, while I try to finish the critical yard work I neglected while I worked on the bike :icon_shifty: For now, here's a few highlights:
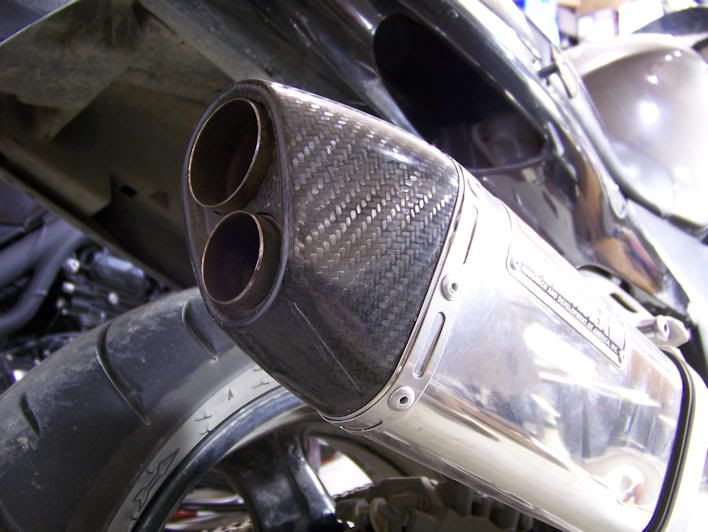
The inner beauty of the ZXXX, featuring a $100 Akrapovic stainless header
 The muffler looked like it was roundhouse kicked by Chuck Norris, but as you can see I found a substitute.
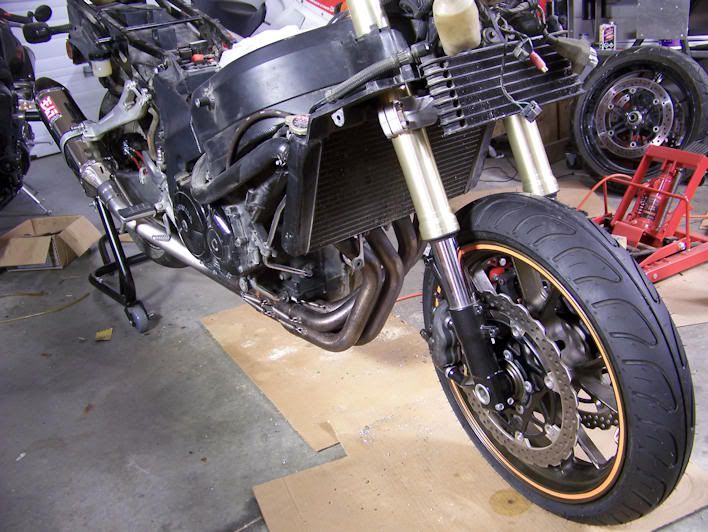
My $125 TRC-D can. It has some serious rash but almost entirely on the trim that rivets on. Eventually I'll replace those parts, fix a few dents and ceramic coat it as well.
Poor old thing. I'd hoped to have time to fix the bodywork and repaint this year. Didn't happen. All it needs is a pair of Frankenbolts in the neck to complete the image.
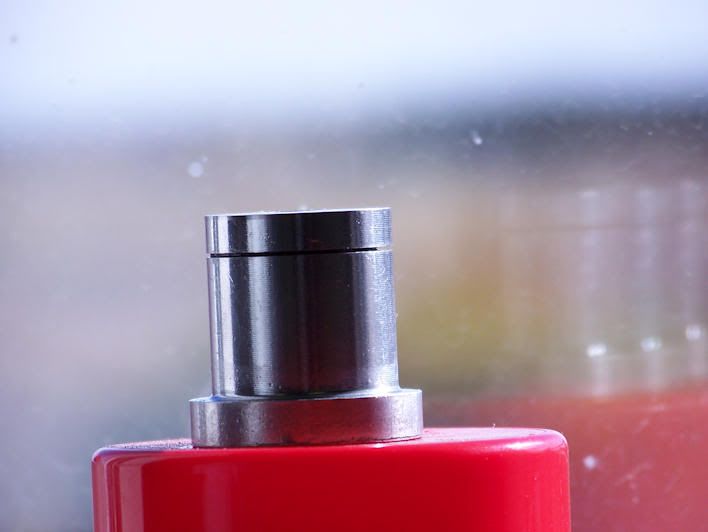
Some DIY caliper spacers:
The ZX steering stops barely made contact with the fairing stay; they didn't seem strong enough to survive a tipover in the garage much less something serious. So I cobbled up this beefier setup from 1/2" aluminum:
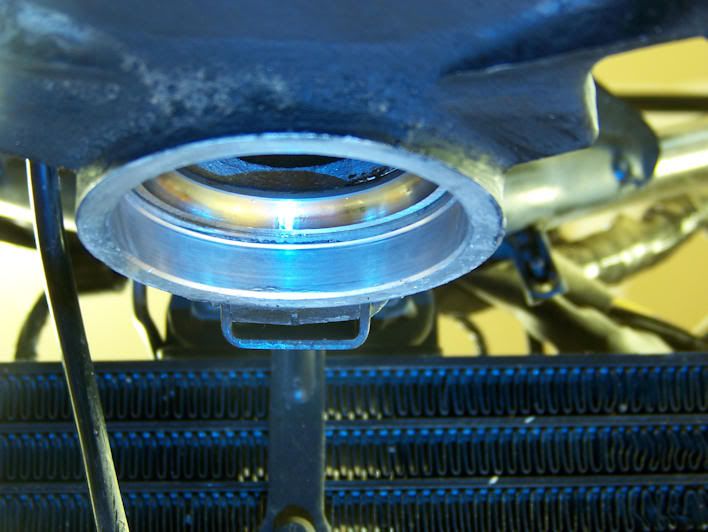
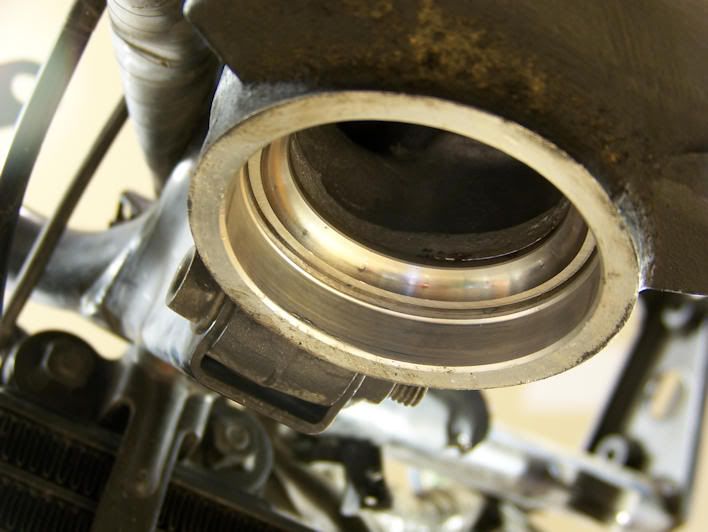
Since the 2nd 47mm O.D. top bearing was actually sitting above the 47mm portion of the steering head and functioning solely as a vertical spacer, I moved it above the additional spacer for a cleaner look:
Ignition cylinder spacer made from 5/8" HDPE:
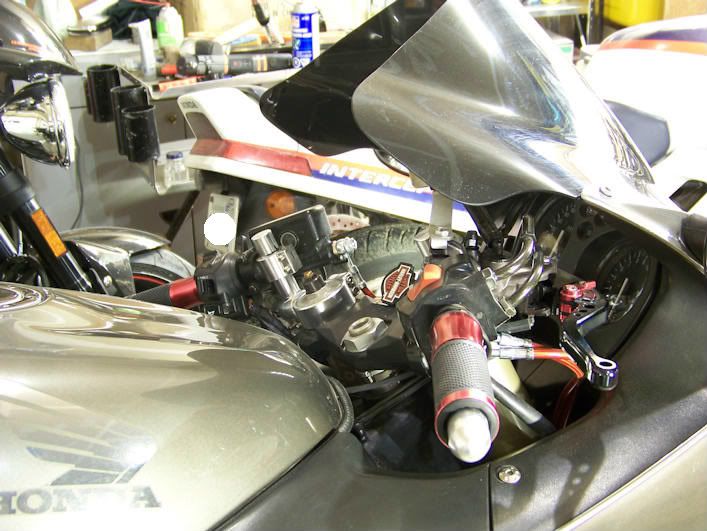
Danmoto 3d clipons -- there's no way in hell I could've made the stock throttle and switchgear co-exist with a radial master and double banjo without these uber-adjustable bars. Further work is necessary but it's functional for now.
Mods list for this round:
What's new:
ZX-14 forks, triples, front wheel and fender
CBR1000RR calipers and master, new Galfer pads, Pazzo knockoff shorty lever
Apex red SS brake and clutch lines
Factory Pro adjustable advancer and jet kit
Akrapovic Supersport 4-2-1 stainless header, Volksbolts SS exhaust studs and nuts
Yoshimura TRC-D muffler
Red & black "CNC aluminum grips" from ebay. Don't work well in this application and will be replaced.
Replaced existing grip heaters with dual-element Symtecs
Danmoto 3d clipons
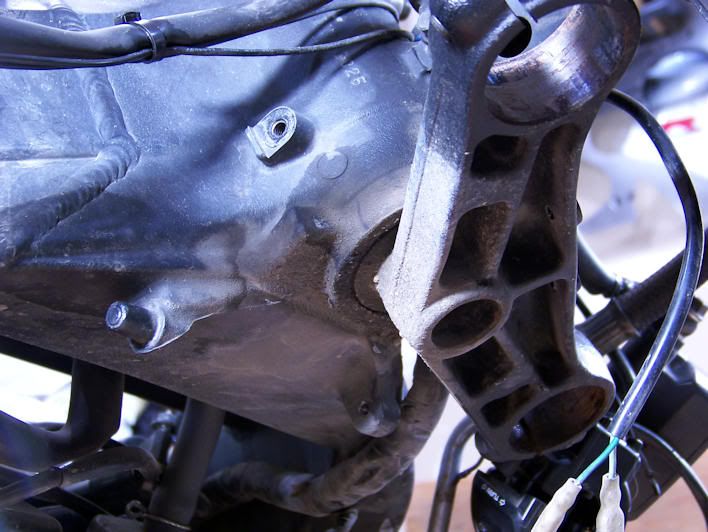
Custom fabbed: steering stops, ignition cylinder mount, exhaust hanger, caliper spacers, steering stem spacer. Lack of proper tools made this part take forever.
Weight reduction: about 80 yards of linked brake lines, proportioning valve, secondary master . .. amazing how much easier working on the bike is without those friggin hardlines in the way. Passenger pegs, left side peg bracket, and center stand are also gone, as are the indestructible but gigantic MX missile bodies Honda used as stock muffers. Assuming the Corbin Smuggler cancels out the weight saving from the lithium battery, I'd say it's 30-35 lbs lighter than stock, depending on how much lighter the whole ZX front end is compared to the original.
-
However, I would look into converting the secondary master cylinder into a solid piece. I did this with my street-going bird and am much happier with the look and the fit.
That was my intention, get rid of any and all extra junk on the left fork leg. I just wasn't sure how a half inch slab of 6061 compares strengthwise to the oem cast aluminum bits with their more complex shapes, varying thickness, and the benefit of wily little Japanese men bearing slide rules.
-
I'm thinking of throwing my surplus XX front end on my old Viffer as a free interim suspension upgrade to replace the utterly clapped out originals (25 years and 114,000 km have not been kind to a setup that was pretty sketchy when new). Would 1/2" thick 6061 aluminum be strong enough for a diy bracket? I can get free scrap from work.
-
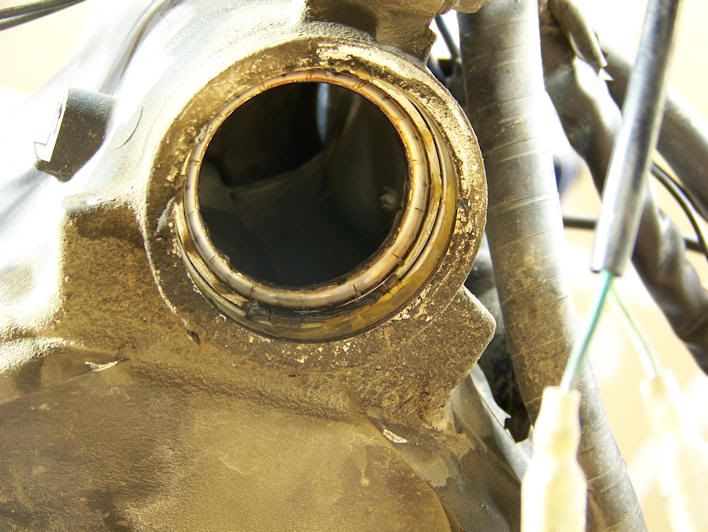
So last night I finally had time to do some more work on the XX, which has been sitting stripped down to nothing much but the engine and frame since July. I took the ZX lower triple out of the freezer (I kind of forgot it there for a few weeks, oops) and all I can say is hallelujah for the thermal contraction of aluminum. The lower bearing race and seal practically fell off by themselves. I imagine the freezer trick doesn't work so slick with a steel stem.
Removing the stock bearing race went so well that I was feeling pretty smug as I began to install the new tapered roller bearing . . . right up until the point where it didn't fit over the stem. I mean, not even remotely close. And then I realized -- I'M RETARDED. After about 3 seconds of actually using my goddamn brain, I figured out that I had accidentally ordered the tapered roller replacement for the XX bottom bearing, not the ZX bottom bearing. The outer diameter is the same, but not the inner. Damn. It. That's what happens when you have 3 dozen tabs open at once looking at bearings and cross references. And naturally, the proper bearing is a lot less common. Everyone makes it, no one stocks it except, of course, in the form of the ubiquitous All Balls kits. I couldn't find a brand name bearing cheaper than thirty bucks so I finally gave up and just ordered the All Balls kit to get a pair of mediocre bearings for the price of one good one. I figure if I screw up the preload and notch it prematurely I'll have a spare. And the nice sealed tapered roller that doesn't fit will be put to good use later when finally get around to putting the 2005 F4i front end that's been gathering dust for over a year onto my '89 Hurricane 600.
Meanwhile, the mail just coughed up the exhaust studs I ordered an eternity ago so I guess I can do the exhaust and carbs while I'm waiting for the bearings.
Oh, just remembered: I weighed the triples, stems, and related junk. The complete assemblies (minus upper bearing and seal, couldn't find the old XX stocker) came to:
XX -- 2786 grams
ZX -- 2384 grams
The steel XX lower triple and that fancy stem nut are much, much heavier than the aluminum ZX equivalents, while the aluminum ZX upper triple is vastly beefier than the aluminum XX counterpart. ZX ftw by nearly a pound overall.
-
Aw crap, I was going to respond back when you first posted and then forgot all about it. Yes, the wiring for the flash-to-pass is dead simple. In my case, the physical install was the problem. The Euro switch I bought turned out to be total crap. It was smashed beyond being usable (good working order, my ass), and since I'd had a guy in the UK buy it on ebay there and forward it to me there wasn't much I could do. I had to take the trigger out of the Euro switch and install it in mine, which would have been a matter of minutes except that the olde-style mechanical switch mechanism was twisted out of shape.
It took a couple hours to get it to where it would fit in the housing and move without binding . . . and then the trigger's pivot broke off. For those who haven't done this mod, the trigger attaches to the innards of the switch via a pin that goes through a hole in a metal tab that sticks out of the back of the plastic trigger. And being a mechanical switch, this tab also completes the circuit and carries current when the trigger is pulled. That was the point where I should have tossed it in the trash, but having already invested (wasted) so much time on it I spent another evening fabricating another tiny metal tab and attaching it to the back of the trigger.
-
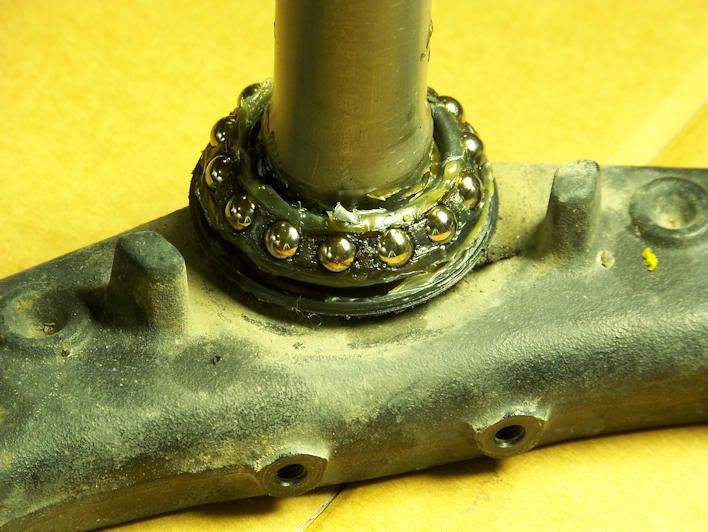
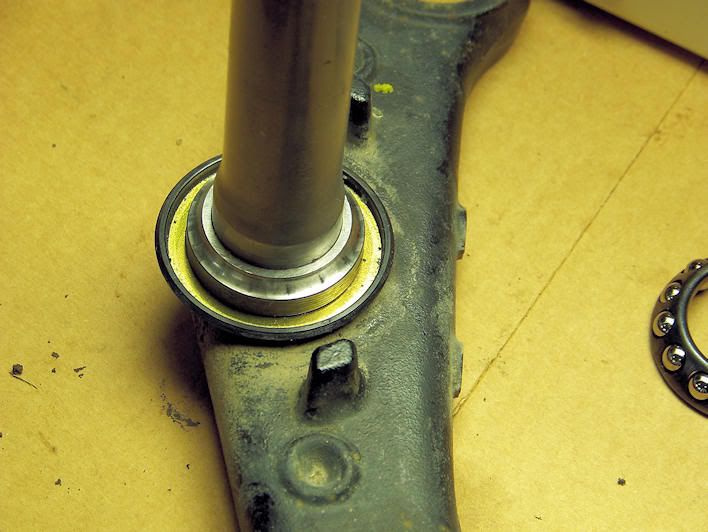
Okay, put the top bearings in. The 2nd bearing doesn't press in, it sits above the 47mm portion of the steering head -- there's about a half millimeter space around it. Looks like it's just about exactly flush with the top of the frame. Now I need the spacer from the top bearing to the adjuster nut, roughly 1/4 inch. Now that we know these bearings can be had for nine bucks, is there any reason a 3rd one couldn't be used there? Just in case I can't find anything else of suitable size. Making a spacer would be trivial if I had a lathe; I was actually going to buy a metal lathe but then I spent my lathe budget on the VFR
Of course if I had the lathe we'd be having a different discussion because I'd be making myself an adapter and not using these bearings. The inner race from the stock ZX ball bearing would be perfect as a spacer except that it's too tall -- the top triple can't come down far enough to seat properly. I need to shave 5mm off it somehow without making it uneven. But if I leave the adjuster nut off and just use the locknut to hold the stem in place it'll do for now so I can work on the ignition cylinder mount and steering stops.Something else that occurred to me: the spacer could be eliminated by cutting more threads into the stem so the adjuster nut could be screwed down far enough to press directly on the top bearing It looks like the stem is necked down very slightly at the threaded portion so the stem would have to be pressed out and machined a bit.
-
Finally got to the point of actually removing the stem so it's time for some pic whoring! A bit of a spoiler: after this experience, I am physically terrified by the thought of looking at the Viffer's bearings. They're twice as old with twice the mileage. After I removed the forks and noticed the whopping great notch on center I took a closer look and I could tell it wasn't going to be pretty:
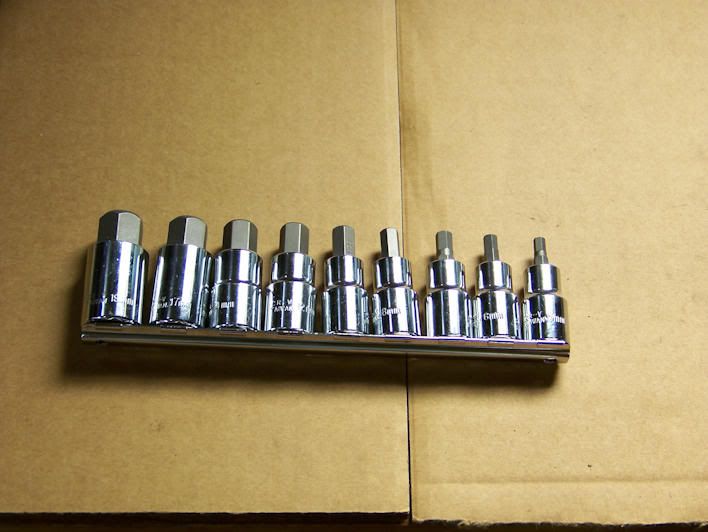
First, I had to go into town for a tool to get the stem nut off. I don't have a 12mm Allen key (who does?) and when I tried using a double-nutted bolt with a 12mm head it quickly became apparent that the stem nut torque was more than any suitable bolt I had on hand could take. So I went to Princess Auto and found a set of 1/2" drive metric Allen sockets, 5mm to a whopping 19mm. On sale too, half price
 :
:
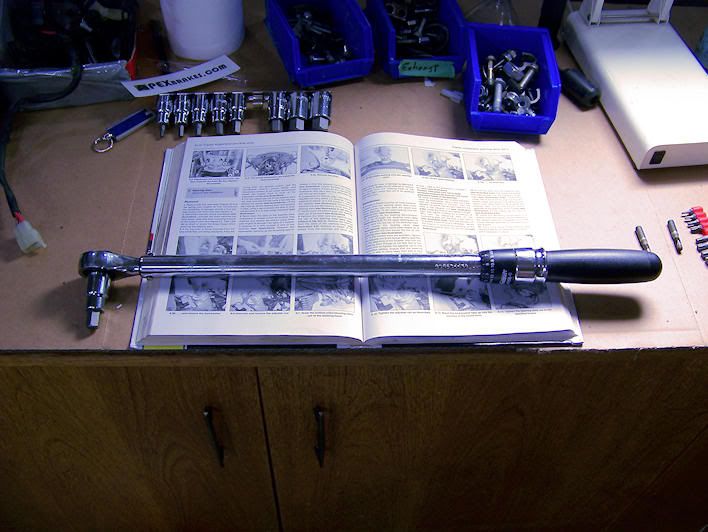
The other half of the team, a half inch torque wrench makes a nice breaker bar:
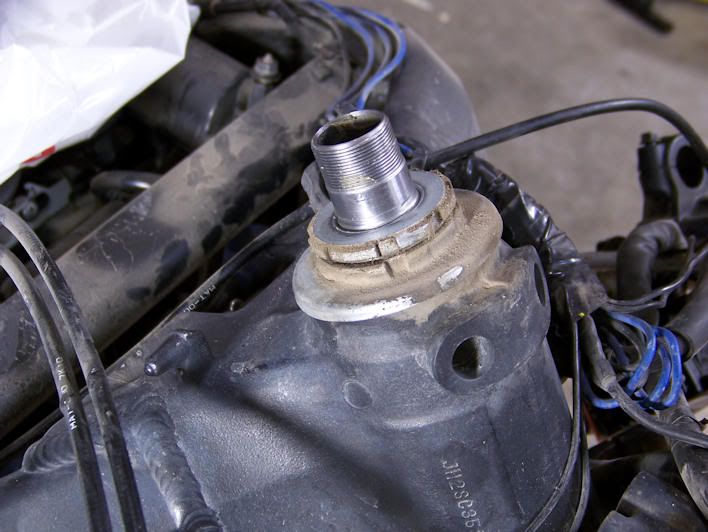
The stem nut came off nicely, followed by the top triple.
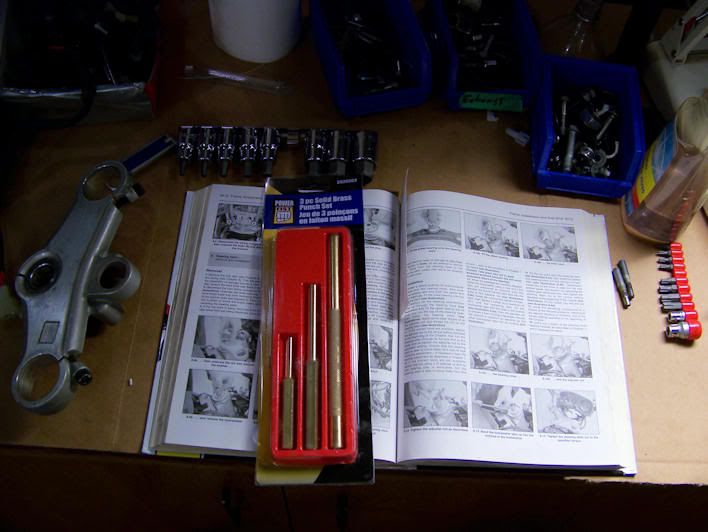
The adjuster nut was another story. It showed signs of previous abuse and, though I admit I have zero experience in estimating torque values while using a drift to loosen nuts, it seemed a hell of a lot tighter than the 18 lb-ft the manual calls for. Even with a brass punch (Princess Auto again) it looked considerably worse for wear when it was finally off. I'll definitely be making a socket for the shiny new ZX nuts.
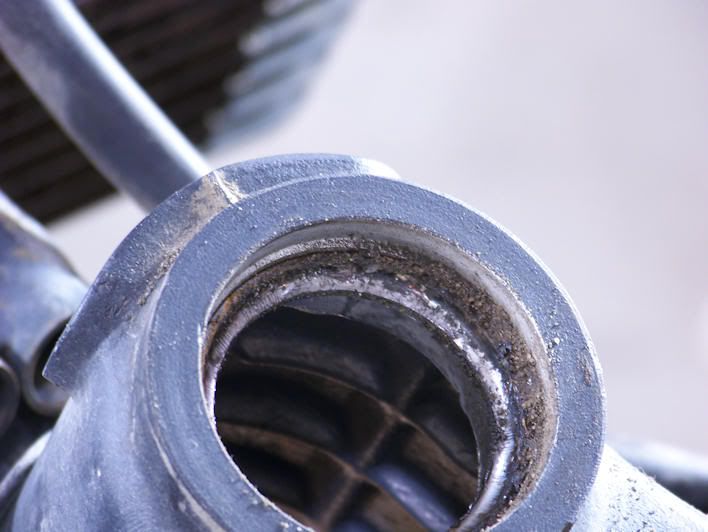
Finally I got the the stem de-nutted and the bottom triple off. Oh, the horror
 There was a lot of crud at the top of the stem:
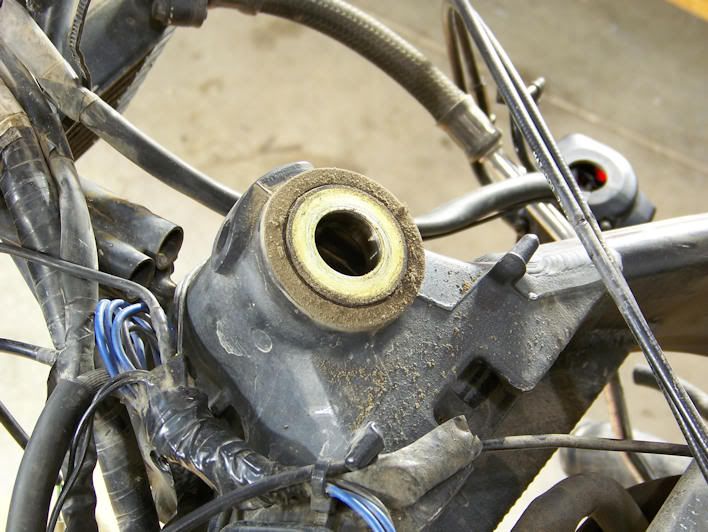
Apparently the dust seal had failed. Craptacular!
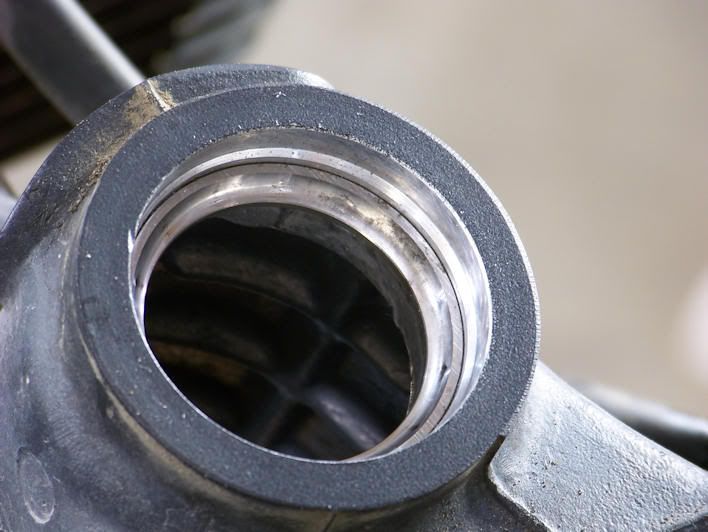
After cleaning, you can clearly see the dents in the outer race:
The balls and inner race as they came out:
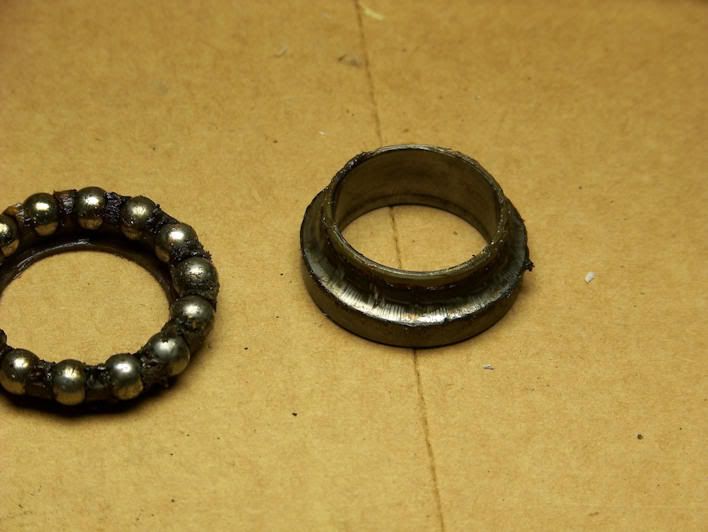
Cleaned up. Even from this distance they don't look so good.
The inner race is nicely dented:
And the balls are starting to disintegrate:
Things are going so well, I can't wait to look at the bottom bearing

Yuck:
And then some:
Cleaned up:
More adventures to follow.
-
That's not actually the place I ordered from, they just had a better pic
Price looks about the same though. Funny how all the shops with quality Japanese bike bearings seem to be in the UK. I'm not complaining (at least not while the exchange rate is decent); for some reason Royal Mail service to Canada is a lot faster than getting mail from the US, and if the seller charges actual shipping (ie, isn't an asshole) it's pretty cheap too. -
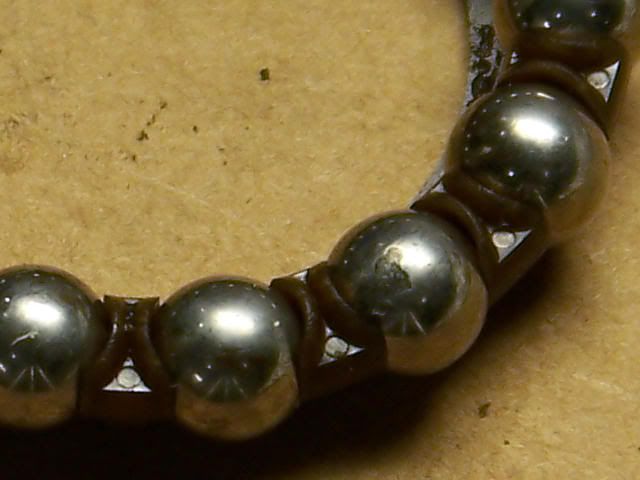
32006 JRRS Sealed Tapered Roller Bearing
Pic is generic, but you get the idea.
-
Very nice ride! Give us the details and what year is it?
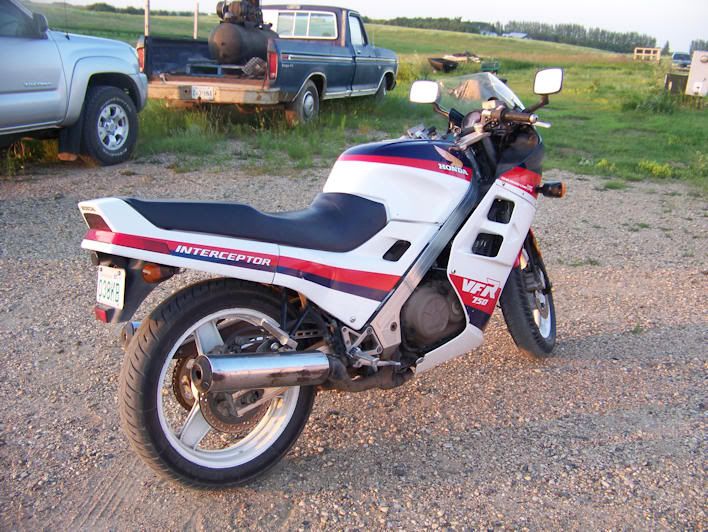
1986 VFR750F, 112,000 km. Gear driven cams, fairings beat up but mostly intact, bald tires, wouldn't idle. K&N filter completely clogged with mouse turds, fur, and seed husks. Cleaning it fixed the idle
 I just ordered new tires in the stock 16" front/18" rear sizes -- bias ply BT45s as AFAIK there are no radials that fit. I'm already researching suspension swaps to fit modern 17" rims but since I bought this specifically to ride as is and not make a project out of, I'm hoping that having a new set of rubber to use up will help me restrain myself for a while.
The speedo is way out to lunch, reading over 20% high. The front tire is one size wider than stock, which makes it too wide for the wheel and messes up the profile. I really hope that putting the proper size tire back on helps because it's driving me nuts. Having a speedohealer on the Bird has spoiled me. But the Viffer has sufficient grunt, sounds great, and overall feels more like a supercharged Ninja 250 than a big bike. Nimble to the point of feeling weightless compared to the XX, although I'm sure the new head bearings (and the rest of the new front end) plus putting a 180 rear back on after I finish killing the present 190 will liven the old bird up considerably. Getting rid of about 30 lbs of stock mufflers, centerstand and linked brake crap can't hurt either.
-
I found a Japanese made Koyo Seiko sealed tapered roller for $25 shipped, think I'll go with that. Most of the others I found seem to be made in China or <shudder> India.
-
Okay, finally got started on this several weeks behind schedule (fuck you very much Canada Post). Lots of fun with corroded parts that haven't been touched in 13 years; I'm doing the exhaust as well and 3 header studs came out with the nuts (no big deal) and one nut came off fine but brought the threads from the stud along for the ride (d'oh!) Thank goodness for Honda's passion for re-using the same part as much as possible, the studs are common to so many bikes that I may actually be able to get one locally.
Anyway, a few weeks ago I shimmed the new 50mm Danmoto clipons and put them on the XX forks to test fit them and new brake hardware. I had the front wheel off the ground and must've turned the bars lock to lock a hundred times. The head bearings felt fine. Well, last night I stripped it down to the bare triples and without the weight of the forks and wheel there's a very pronounced center detent -- it feels spring-loaded the way it snaps to center. I haven't taken the stem out yet (daytime is for yard work, night is for projects, sleep is optional) but I'm sure I'll need a new lower race. The ZX lower bearing and the race on the bottom of the stem are brand new I don't need the upper races so I find myself in need of one freakin outer race for the lower bearing.
This seems like a good opportunity to upgrade the bottom to tapered roller but I'd like to avoid the All Balls kit; too many negative reports plus that would leave me with a top bearing I don't need. As far as I can tell the correct tapered roller replacement for the bottom bearing is a 32006 (55x30x17). Before I order one can anyone confirm that?
I guess I'll have plenty of time to get the stripped stud out while I wait for a new bearing to arrive. Good thing I anticipated this project stretching out and planned ahead -- last week I bought this so I'd have something to ride while the XX was down:

-
Thanks for the input guys. For now I'll be using the stock ZX bottom bearing -- my front end is brand new so any abnormal wear pattern should be obvious. I start my holidays July 13 so that's when I'll be starting this mod, unless I get one of my other bikes on the road first. For now the XX is my only ride to work except for my 1975 F100, but the way it goes through gas I might as well just stay home rather than using it as a commuter.
I'm sure I'll have a million questions once I start, but one thing that occurs to me now -- do you need to use a seal at the top, when the bearings are already sealed? I'm guessing there's no stock seal that fits.
-
The bearing plot thickens . . . here's some more input on that 6807 bearing:
those look like roller bearings meant to go in wheels. Not a bearing meant to handle a load in a perpendicular manner. The correct bearing would look like this when looked at in profile:^ - race - steering neck
O - bearing - steering neck
v - race - steering neck
If this were the upper bearing set, then the lower race would be pressed into the frame, while the bearings would either sit loose or be held by a cheap plastic cage, and the upper race would sit loose on top of the bearings and be clamped into place by the adjuster nuts under the upper triple.
The bearings the OP is looking at buying are like this in profile
[O] - steering neck (same height as above, but asci pics suck.)
Race - bearing - race. This means the bearings will be axial or "side loaded" the entire time there is force on them. Considering the fact that every bump will transfer force from the steering stem into the inner race, then the bearings and finally the outer race I don't think they will last very long. You're going to be hammering the shit out of those retainers with every bump or wheelie.
If you want a perfect example, those are wheel bearings, what do you do after you've hammered out a wheel bearing? You throw it out, I don't care what kind of condition you think they were in before you've likely galled the retainers by pounding on the inner race to remove it. And every bump you hit is doing exactly that.
Plainly put, I think you've picked the wrong bearing.
So, Stan (or whoever has his ZXXX now) and Skull: I'm guessing you haven't noticed any serious deterioration in the bearings. Can you give me a rough idea of the mileage you've put on since the swap?
-
-
The ends are solid and rounded, no provision for weights.
DON'T DO IT
in The Garage
Posted
I needed a new rear tire on short notice very late in the season 2 years ago and ended up getting a used Sportmax 190 because it was local and cheap. The bike never did feel right with it, not only did it turn in like a cement truck but it never felt planted when leaned over. I finally killed the Dunlop (got a screw through it the same day the center tread wore through, fuck yeah) and replaced it with a BT-016 180 today (also used, bought as a spare last year).
What a difference. The ZX-14 front end (with new head bearings and a 120/60 tire) helped restore the bike's agility to near normal even with the old single-compound 190 worn flat in the center from commuting . . . with a lightly used 016 in the proper size, it's like the XX suddenly lost a couple hundred pounds. When I'm stuck behind a slow moving vehicle on a cloverleaf I usually amuse myself by using the full width of the lane and weaving around potholes and patches. I found myself constantly correcting my line after getting a lot more turn with a lot less effort than I was used to. Good times