
rockmeupto125
-
Posts
11,175 -
Joined
-
Last visited
-
Days Won
41
Content Type
Profiles
Forums
Gallery
Events
Everything posted by rockmeupto125
-

Speedo gauge not working after installing a mod
rockmeupto125 replied to MR. WOMO's topic in The Garage
If the odometer works, you are getting signal from the speed sensor. I'd be concerned that the indicator needle is binding on your Illumiglo installation. -
Ah hell, maybe. I know it doesn't work at least one way, and I'm too lazy to go out in the garage and check.
-
The Honda OEM pads have different part numbers, are physically different, and do not interchange. Aftermarket pads are the same front and rear, fit the same, work the same.
-
Ahh. We're calling that a bushing. Honda calls it a collar.
-
Help - Bolt binding/galling on removal from frame
rockmeupto125 replied to Warp11XX's topic in The Garage
Situations like this tend to get worse rapidly with intervention, so you need to plot your course cautiously. I'm not familiar with the bike. If you have clearance around the bolt head, you have many options. Pipe wrench, vice-grips, etc. I'll assume this is not the case. For removing a bolt with a rounded off head and minimal clearance, you still have many other options, especially if its still loose enough to be turned by hand. Remember, lubricant is your friend...just not on surfaces you are trying to establish a frictional relationship with. *First, you could investigate as to whether a misaligned component is binding the bolt, and if that component could be be temporarily persuaded back into alignment with a prying tool, easing the resistance to extrication of the damaged bolt enough so that the standard drive device doesn't slip against the resistance. *Second, a quick fix is to force an undersized socket onto the bolt through use of a briskly accelerated mass on the end of a stick. *Third, there are sockets with left handed helical gripping surfaces called bolt extractors...performing roughly the same job as the second choice, but with a touch of elegance. *Fourth, if you have rear access to the bolt, you can break off the head, and thread the remaining stud forward. *Fifth.....a whole bunch of other unusual and situation specific fixes that might pop into your head. *Sixth....the miracle of oxy-acetylene.
-
I've only had one coffee yet today. What's a standoff washer?
-
The underneath mount should have the exact same rubber mount and bushing as the rear exhaust hangers. The rear supposedly uses a basic 8mm washer inboard and outboard, although I don't recall one under the flanged nut. Underneath uses an 8x45 bolt. Any old thing in functional shape will do, and the only reason to see the dealer is if you're missing some of the "cosmetically correct" pieces.
-
So how fast were you able to stop with the OEM setup versus your present configuration? Are you substantiating this in distance, or time, or both?
-
Well, unless you're a member of the Geritol generation, its the device used to balance with the throttle to keep the front end up at the right angle.
-
It is different. Some folks don't like it. Most do. Takes a bit to get used to it. It works well....even the people who don't like it will admit to that much.
-
You're probably fine, but no one can tell from a distance if you have or don't have air in the system. The back brake exerts force on only the center piston of the rear caliper. The front brakes exert force on the outer two pistons of the rear caliper. If you have applied the front brakes, and apply the rear brake as well, the back should lock up.
-
Help - Bolt binding/galling on removal from frame
rockmeupto125 replied to Warp11XX's topic in The Garage
Damn Kawasakis, anyhow.... -
Sold my bird extras must go
rockmeupto125 replied to seeten1's topic in The Sales Floor -- For Sale/Wanted
Bottom line...its a good bike, but just a bike. Its the people that count. Don't be a stranger. -
Its in the middle of a panel. No way to get a clamp on it. Once its put back in its original position, I do not believe it will be necessary to secure it. The most I would do would be to run a bead of glue along the backside of it purely on principle.
-
HOW TO: Replace Chain and front sprocket
rockmeupto125 replied to Hobicus's topic in Important/Useful Threads
In the past I've found that information on a small note contained within the packet the masterlink parts are secured within. A quick check of my stock reveals that none of the masterlink packs I have contains that information, and I can't find it with a quick search online, either. Perhaps another may have a secret source bookmarked. Its pretty ignorant that these suppliers can't provide that information that's important to the safe and appropriate installation/use of their product. Guess I'll stick with my previous....measure the width, match it, and rivet to 110-115% of original pin diameter. -
I have a crack in a flat fairing area a couple of inches long. The crack is diagonal through the thickness of the fairing. It is mid panel, and does not communicate to an edge....otherwise manipulating it would be a relatively easy task. When the insult occured, the force placed the pieces opposite each other in relationship to the crack, so that the plastic remains displaced. To put the plastic back into its original position, the longer sides of the break must be passed over each other. Once that is done, I believe the crack will be nearly imperceptible, particularly if its reinforced from the back side. However, I'm loath to attempt to force the plastic edges past each other for fear of causing more damage in the form or extending the crack, creating a different crack, or taking part of the edge the cracked piece off so that the two portions no longer match ups completely. I've made a crude drawing to illustrate this. The upper portion is a cross section of how I'd like the cracked area to look when its repaired, and the bottom portion is how the damage looks now from the same perspective. Has anyone been able to reduce this type of damage, and if so, how? Big balls and brute force? Screwdrivers to pry with? Heat gun? Help!
-
HOW TO: Replace Chain and front sprocket
rockmeupto125 replied to Hobicus's topic in Important/Useful Threads
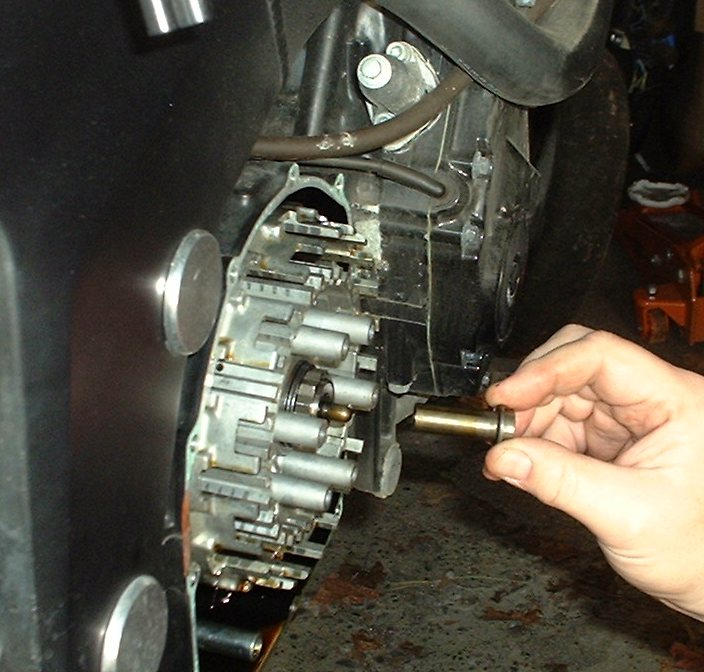
Nice writeup, Rich. Thank you. I'd like to add a little bit if I could. Not to criticize your methods, but to offer alternatives, and perhaps better understanding of the procedure by benefit of two different viewpoints. Its possible to perform this procedure without removing the fairing. Its tighter of course, and you can't remove the clutch actuating rod. If you do elect to leave the fairing in place, be sure to protect the fairing edge with some duct or masking tape. Also, pull the clutch rod as far out as you can, clean it, and put some lubricant on it. A strap of 400-600 grit sandpaper or some crocus cloth may be handy to get the hardened gunk off the rod, and while the rod doesn't require lubricant in those areas, it will decrease the corrosion. I usually leave the slave cylinder in place on the cover. Its one less bolt to remove, and keeps the slave cylinder in capture against the possibility of something bumping the clutch lever and leaving you needing to bleed the system, and worse yet cleaning up hydraulic fluid that hopefully didn't get on your paint. When installing master links, there is a specific width you should install the sideplate to. The manufacturer will supply that in either overall width of the link that the sideplate should be pressed, or the length of pin extending past the sideplate. Additionally, they should specify the minimum and maximum diameter the pin should be expanded to. If you absolutely have no data, measure another link, press the sideplate to the same width as other links, and expand the pin 10 to 15% more than the pin diameter. Many folks know I rant about cleaning the clutch rod...but they often don't understand the relationship of the parts. Here are a couple photos to perhaps clear up any uncertainty in anyone's mind. The first picture shows the cap over the clutch rod that presses into the throwout bearing of the clutch assembly on the right hand side of the engine, and the second pic shows the end of the rod with the cap removed. Its important that a bit of grease go on the end of the clutch rod if you completely remove and clean it.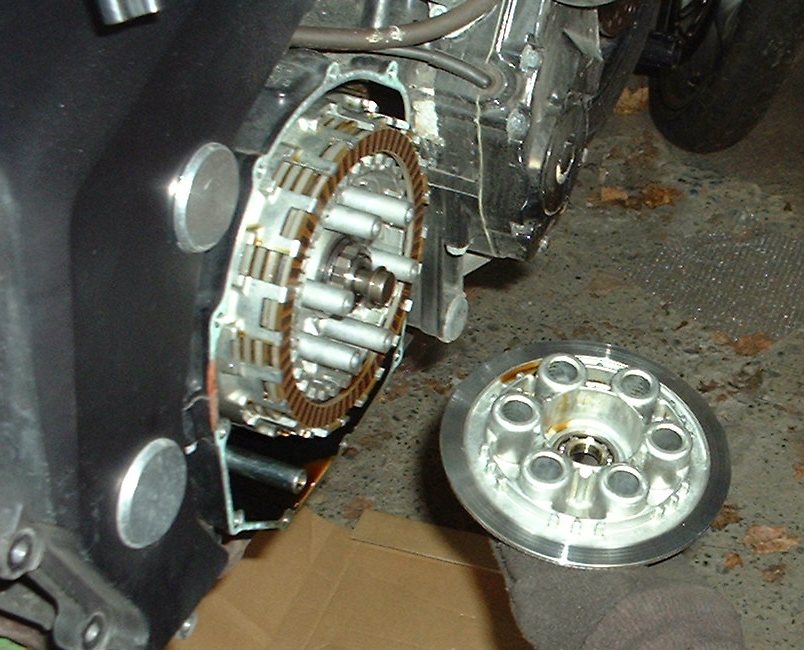
-
Nice. Anybody got a good Connie for sale real cheap?
-
Question for our dealer guys and others that are in the know.
rockmeupto125 replied to spicholy's topic in The Garage
Montana is correct, but just to expand on what he said. As noted elsewhere, the meds are kicking in today. Its a common and understandable misconception that the reason a valve changes adjustment is because the area of actuation gets worn down. By this, I mean the stem, or round cylindrical end that makes contact with the cam follower..outside the combustion chamber. If this area were to be worn down through repeated usage, it would indeed make the valve clearance looser. However, wear on the cam side of the valve is almost nonexistant unless there is a big problem. There are several reasons for this. One is the extremely tough hardening procedures of the metal of the cam lobe face and the follower bucket...the "can" that sets over the end of the valve/spring assembly. Another is the relatively large contact area these components have that greatly reduce the the load over area squared. Excellent temperature management of newer engines help to preserve the hardening treatment of these components, and better science in lubricating oils have given us greater surface tension and protection even from cold startups. So if your clearances are changing on the top end, you've got a heat problem or an oiling problem that has led to deteriation of the hardening treatment of the valve actuation components, and that ain't good...in fact, you've got a very sick engine. What really happens in a healthy engine.....that is to say, one living an untarnished life....is considered to be just normal wear. The valve bells out in the combustion chamber to cover the hole that allows air and gas either in or out. The edge of that bell is machined to match the valve seat and creates such a fine match that it seals the combustion chamber nearly perfectly against the flow of gas...keeping compression and combustion contained. So what cause the wear here? Very simple, in a complicated way. If you take a flat hammer, and hit a flat piece of strong metal in perfect alinement 100 million times, some of the metal is going to wear off (3500rpm=210,000rphx1000hrs to a theoretical 60,000 miles, valves open and close every other revolution). Well that sucks. How about we put some oil on that instead...after all, isn't that what we do to the other end of the valve to prevent wear? Actually we do put oil in there. In the old days, we used tetraethyl lead to lubricate valves. Now its some other additive that we put into gas before its sent to consumers.....and we'd notice it pretty quick if that wasn't in there. Okay, that end is covered. Why don't we soften that hammer blow? Why do we have to have a hammer blow at all? If you set a machined head on a workbench upside down with the valves set in the cylinders, without springs or cams or valve seals or anything, and pour oil in the in the cylinder head over the valves.....you'd expect to see all that oil still in the cylinders when you came out to the garage the next morning....or you'd know the head and valves ain't machined right. So if valves seal so good all by themselves, why do we have that hammer blow thing going on? (I told you it got complicated) That hammer blow comes from the springs on the valve that make it retract into the cylinder head when the cam stops holding the valve open. As we all know, those springs are pretty stiff...and designed to make that valve close fast----real fast.....because that's how to make more power, right...more rpm? At 11,000 rpm (you know...the rpm where you DON'T want your valves staying open and wacking up against a busy piston), that valve has to accelerate from a dead stop and move roughly 10mm in less than 0.0018 seconds....repeated 91 times a second. It takes a hell of a spring that makes a hell of a hammer blow to that valve/seat combination to do that. BTW, we can make engines that don't have any particular method (springs, air, mechanical actuation) other than cylinder pressure to close the valve...but they're highly inefficient. So we can't get away from this hammer blow, at least not at the current state of technology. We've lubricated the valve as best we can, and are resigned to the fact that we're going to have valve wear. But we still have choices. If we make the valve and the valve seat that the bell of the valve seals against out of different materials, could we influence the wear patterns? Certainly! So the choice is to make the valve seat out of a soft material, and the valve out of a hard material. Now why is that? Okay......last concept. The valve in design has a sharply defined edge. Its thin and light as we can make it, because its a moving part, takes power from the engine to make it move. If we make it lighter, we can use less powerful and lighter valve springs, have less wear on the cam and followers, and the world will be a better place. The thin edge of the valve is its weakest point, and at least one of the valves in any given cylinder (two in the XX) has fire and brimstone of over 1200 degrees flowing past the edge every time it opens. That valve has some incredible heat treatment on it, and we want to absolutely minimize the amount of wear on that very thin treatment area of that very thin piece of metal....and the way to do that is make sure the metal we slam it into is so much softer than the valve that it won't ever damage it. That material is the valve seat, and that's what gets worn away in the engine to protect the valve from wearing. There's your overview. As that valve seat gets worn away, Montana said the valve then recede deeper into the head, sticking further out the top towards the camshaft, and DECREASING the valve clearance. When the valve clearance decreases enough so that at some combination of rpm, heat, and stress, the clearance is less than zero and the valve stays open the most minimal amount, superheated combustion gas will blast out around the valve, destroying the heat treatment of the valve, and breaking down the metal quickly. But wait.........doesn't the hot gas go out around the valve anyway when its normally open? Nope......not like that. Normally, the valve opens as most of the combustion has already occured and heat has been transferred to the cylinder wall and piston..diffused throughout the combustion chamber and weakened due to the expanstion of the combustion space. The hot gas that passes by a valve held marginally open on the combustion stroke of the engine is much hotter (2400 degrees F---a thousand degrees hotter than "normal" exhaust valve flow) and experiencing active combustion...not to mention being concentrated on a very small portion of the valve...the area with the easiest flow. Think of a gas stove and a frying pan. Not a problem, right? Well, fire up your gas cutting rig, point it at that pan, and half a second later, there's a hole in it. That's what happens when your valve clearance reaches zero. Exhaust valves are the valves that have the most problems, but you'll still damage an intake valve that gets tight, because the exhaust can blow around any valve in the cylinder. The intake valves are a different material and heat treating because they aren't supposed to be dealing with exhaust gas....so they'll actually fail sooner than an exhaust valve once the clearances are too far out. I hope I've at least stimulated some thought, understanding, and a desire to make sure your valves are in spec. One last expectoration.....as clearances decrease, valve actuation more closely follows the cam profile. For most performance based engines, that means higher horsepower. If you set the valves toward the loose end of the range, you won't get as much power....that's why performance guys are always checking their valves...they've been set tight and require a greater frequency of inspection. On the other hand, if you set them a bit loose, you'll get more torque, and perhaps won't need to be as diligent with your valve checks. Thanks for listening! -
Don'tcha have a ruler?
-
Lowering pegs for sale
rockmeupto125 replied to rockmeupto125's topic in The Sales Floor -- For Sale/Wanted
Got a set saved for you, Mack. -
Just about anyplace that sells sprockets can get them (18 tooth sprawketz). JT or Sunstar sprockets are available most places that sell accessories, including online and even eGay. Sprocket Specialists and White Buffalo Racing are a couple places I've gotten them from. Pretty sure you'd need to go up a link on the chain to handle a 19. Never tried it.
-
DJ...you wouldn't be in Australia, would you? I know that the 44 tooth rear was supposedly a dealer option there in past years. No option here in the states.
-
SELL IT!
-
Lowering pegs for sale
rockmeupto125 replied to rockmeupto125's topic in The Sales Floor -- For Sale/Wanted
You'd have better luck ording two mainstep rubbers 50661-MBW-000 and the two setting plates 50609-MBW-000 from a Honda dealer, and then picking up the two required 5x14 bolts from a local hardware store. Or you might even consider putting up a wanted to buy ad here....somebody probably has a set lying in their garage.