FiXXation
-
Posts
692 -
Joined
-
Last visited
Content Type
Profiles
Forums
Gallery
Events
Everything posted by FiXXation
-
You might look at this link: Aiming the Headlights
-
I've seen Easy Off oven cleaner and acetone suggested on other forums, but I haven't had to try them yet. Don't get either one on any paint or plastic, though.
-
I've found that a little patience with some warm water and a clean micro fiber cloth will do wonders on dried bug juice; then follow up with some Honda Polish. The fibers in the micro fiber cloth "grab" the stuff better than just a cotton terry towel. Of course, it also helps if you preceeded the trip with some Honda Polish.
-
This was true on the Michelin Pilot Road I just mounted. To verify, I first balanced just the rear wheel with the disk and sprocket on it, then with the tire mounted, it used the same weights. The worn out Pilot Road I had just dismounted also used the same weights. In contrast, an Avon 46 mounted up a week earlier for another bike had a very noticable lump inside where the belts were overlapped, and it took quite a bit of lead to balance it, even after breaking it back down to spin it on his rim.
-
I agree with Joe on the experimentation timing. Also, have you checked the clearances around the brake caliper opening, looking for some additional drag in that area as you get to the specified torque? Running loose without needed bearing preload could cause a little wheel wobble when everything is hot, wearing the bearings and seals and pushing the pads back into the caliper where they might not work the first time they are needed.
-
Pretty much the same story here. Both sets of Roads I've mounted had the offset molding lines. So far as the balance is concerned, I took the time to balance the bare rear wheel with the sprocket and brake disk mounted, and both rear tires were actually true, with the only required weight being that to balance just the wheel assembly. By the time I get to the front, I am usually ready to get through, so I haven't taken time to check the balance of that wheel by itself, but it has taken a couple of the OEM center rib pinch on weights both times to balance(not marked as to their weight), always close to the same area on the wheel.
-
For one thing, a phillips head screwdriver would pop the lids and your helmets off pretty easily.
-
You are correct; the rear of the front fender is assymetrically offset about 1/2" to the right. In fact, the clearance is small enough on the left, that it will rub a Michelin Pilot Road if care is not taken to line the fender up right. On my '03, I had to square up (just a little) the two 90-degree metal to flexible brake line elbows to keep the left caliper's flexible line from pushing the fender into the tire. That line wore a groove through the paint and some of the plastic on the left rear side of the fender. I didn't know to check this clearance on the original Dunlop's, so I don't know if the Pilot Roads are just a little wider or not.
-
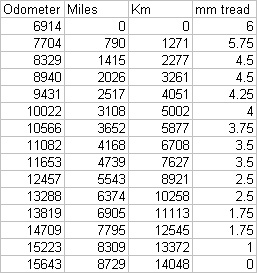
For what it is worth, I was just looking at the life of my last set of Pilot Roads, used on chip and sealed highways (rough and not many curves) for around town errands and speed limit touring, 42psiF/42psiR, 180lb rider. The initial tread depth was measured after the 150 mile or so "break-in", not the fresh from UPS 7mm or so before the rubber hits the road. These miles were year-round for pretty close to a calendar year (4/05 - 5/06). I also tried to avoid the wear bars when measuring. There was also some variation around the circumference of the tire, and I did not try to be exact about the measuring points from one measurement to the next. [attachmentid=950] [Man, it was hard to get this chart in here!] From 3 mm to end of life (past the wear bars just into the different rubber layers below the center tread grooves, but not quite to the belting fabric) was about 3000 miles (4800 Km). As the center flat spot went past the wear bars, the back tire would not hold it's line through a curve as it did earlier in it's life (I suspect because the thin part of the tire carcass did not support the sidewall as it should, letting it deform under stress too much). Also, looking at the tire after I demounted it, a larger danger would have been a quick flat from anything through the center part of the tire as there's not much there once you get past the tread rubber. Curves would change the equation a LOT. YMMV.

-
For one stop shopping for the 16" Motion Pro tire irons with the curved end for helping to work around the brake disk on the wheel, the stick-on Motion Pro 1/4 ounce weights, and K&L nylon rim savers (they work, but they ARE work, too): Motorcycle-Superstore No best price gurantees, though. Napa Auto Parts also carries gallon jugs of the real tire mounting lube (and cotton swab applicators), which dries in a sticky state, rather than a slick state like some soaps (which COULD allow the tire to slip on the rim in heavy braking or acceleration).
-
Have you already checked and cleaned or bypassed the wiring harness connector talked about in this thread? 1999-2000 Loom Problems - The Fixes.
-
If you can relate that "C" fuse to your bike, then you can start there to check voltage when you hit the horn, for instance, to see if it stays up or drops out. You would then need to find one of the ground points on that bus, and measure it to a good ground at the battery, to see if the ground plane voltage rises when you hit the horn (indicating a bad/coroded floating ground connection to the frame). There are, or were, others on this board who have actually troubleshot these kinds of problems and might be able to tell you just where the various connectors are physically located. Your first post on this problem, I think, indicated you have already done some wiring harness work on your bike. My 2003 (knock on wood) hasn't given me any trouble to have to get into it to that level.
-
I don't remember that anyone has asked about insurance rates in Fort Worth in the last couple of years. I don't know about there, but the rates in the Texas Panhandle are pretty high for the BlackBird. Just minimum liability with uninsured motorist and personal injury run me about $480 a year with State Farm, with no discounts for having everything with them. The quotes I got for full coverage from Progressive and State Farm were in the $2700/yr range, IIRC. BikeLine no longer insures CBR1100XX's at all according to their online questionaire. I think the Texas insurance companies must have found this web site.
-
If you look at the wiring diagram, which may eventually be obtained here (well, now, that's different :icon_shifty: ): Garage Sticky. you will see that all the functions you have found involved in the trouble apparently all use the same fuse "C", and go to the same common ground bus. If you don't/can't look at the wiring diagram, none of this will make sense.
-
Bike won't start after prolonged high op. temps!
FiXXation replied to BillyJoe's topic in The Garage
The XX's charging system will maintain a hot battery, but if you have been doing a lot of low RPM, low speed riding for a while now, your battery may have been slowly discharging, and finally dropped below a hot start threshold today. Idling and low RPM operation won't put much, if any, of a charge back into a low battery. Is your idle speed set up to 1050-1100 RPM?? -
It still sounds like you are either pulling current through a high-resistance connection in the wiring so that voltage is being drawn down to the ignition/ECU, or you are floating the voltage up on a bad ground that is common to the ignition/ECU, when you hit the horn. I'm just guessing ignition/ECU, if it stalls immediately when you hit the horn, but it could be the fuel pump losing voltage since it is FI (but I would think that would be a little more of a delay in the stalling). Any other symptoms like trip meter or clock reset? You would have to work with the wiring diagram, checking voltages under load, find what critical component is losing voltage, and work backwards from there. Sounds tough.
-
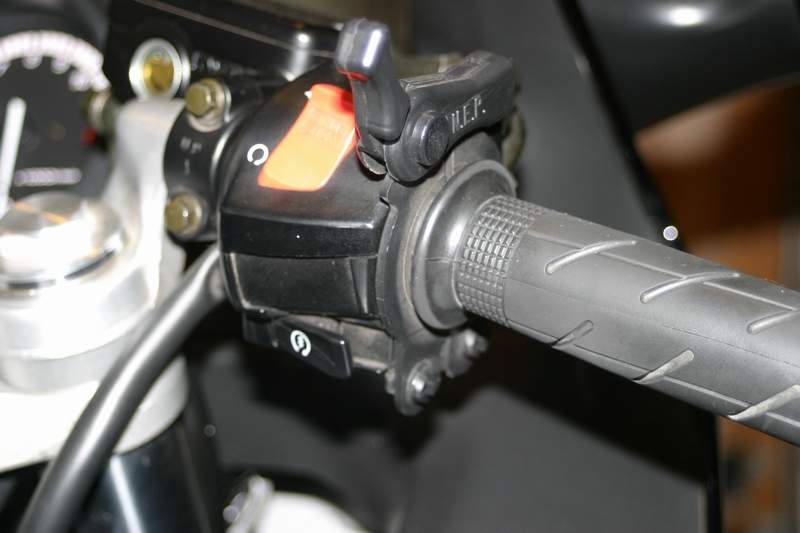
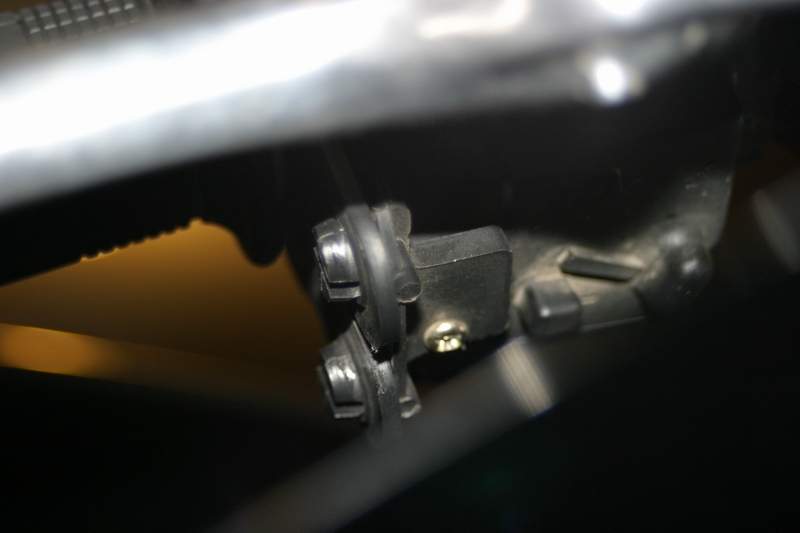
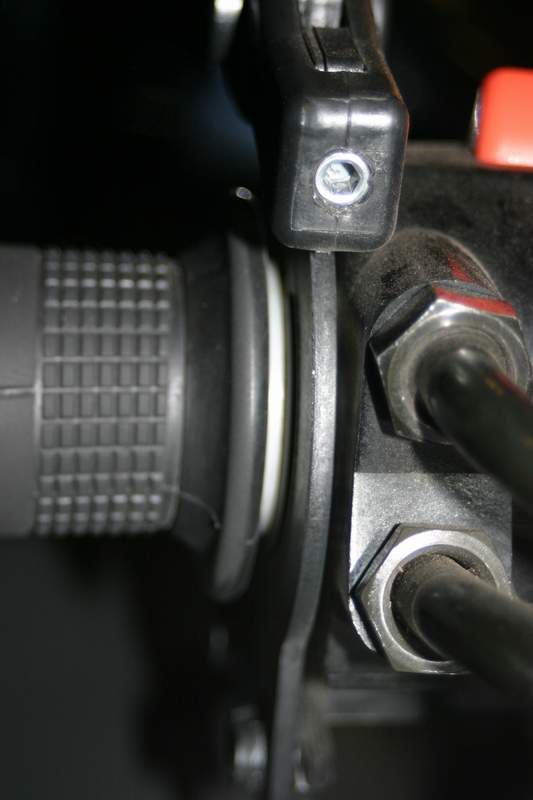
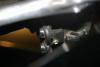
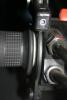
The NEP CC3 installed per suggestions found in other threads on this forum has not caused any throttle binding nor does it slip when levered on. It is also possible to override when necessary. [attachmentid=483] Orienting it with the mounting tab down underneath the starter switch box, with a small screw threaded into an also small hole, lined up with the switch box drain hole, allows both sides of the NEP pinchers to "take a set" when asked to hold the throttle. The same action allows the NEP to be overridden by relaxing it's set when necessary. As suggested, the screw should be smaller than the drain hole to allow a little slack in the mounting and to allow water to drain from the switch housing. [attachmentid=484] I also gently moved the inner OEM grip lip to the outside of the inner nylon grip stop ridge to remove any contact between the rubber grip and the side of the NEP pinchers. No lubrication necessary. [attachmentid=485]

-
You probably already know this, but be VERY careful with the sharp corner contours whether working by hand or with a buffer. It is really easy to go through the finish on the corners and creases while you are concentrating on the adjacent larger surfaces.
-
I don't remember whether Barry bought a California closed loop bike or not. If he did, does that change the tuning technique with the PC III? Never mind; found where his '02 is a 49-state model. :icon_silenced:
-
I didn't know this many people ever looked in the Garage any more.
-
I know I've seen this question discussed at length in one or more posts, but with the new Search Engine, I couldn't find it in more than an hour of looking. (Almost always ended up with 22 pages of stuff to look through with any combination of search arguments.) I think the downloadable shop manual actually contradicts itself as it says sidestand, but shows the centerstand down in the picture, then later tells you to rotate and freewheel the tire which would be a just a little more difficult on the sidestand. This is discussed on pages 3-22 and 3-23 of the PDF shop manual. My old brain recollects that the centerstand is correct and the sidestand is in error, although unless you carry a lot of static weight on the rear of the bike, I don't think it would really change much either way. On my '03 with the Beetlebags loaded with a bunch of day-to-day stuff, the rear suspension is fully extended to the top stop while on the sidestand.
-
Check the axle itself for signs of the left inner race spinning on the axle and scoring or gauling it. If it did and got hot in the process, you wouldn't want the axle to be the next thing to break due to metal fatigue. How many miles did it have on it??
-
According to www.hondanews.com: 2006 CBR1000RR Features The CBR1000RR's alternator puts out 350 watts @ 14V. I found the same number for the 2004 model, too.
-
Per: Alternator output. '97-'98 = 390 watts '99-?? = 460 watts (total, not extra)
-
This old post bangs all around on the "loosening chain syndrome" if you would like some history: Instant chain stretch?