Para045 Posted August 23, 2006 Share Posted August 23, 2006 If you have a digital camera, take lots of pics...may save your ass later :icon_doh: Thats alotta ass. He's gonna need a wide angle lens NBL ROFLMAO :icon_lmao: :icon_lmao: :icon_lmao: :icon_lmao: :icon_lmao: Not that I should talk I am 130 kg myself Quote Link to comment Share on other sites More sharing options...
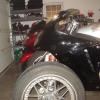
JB4XX Posted October 18, 2006 Author Share Posted October 18, 2006 Had the frame welded. Quote Link to comment Share on other sites More sharing options...
lois Posted October 18, 2006 Share Posted October 18, 2006 Had the frame welded. Nice repair job.....I'm a big bastard myself, better have a look at mine next time I'm down there... Quote Link to comment Share on other sites More sharing options...
Pete in PA Posted October 18, 2006 Share Posted October 18, 2006 Now THAT'S a naked bird! Great weld job. Hope she goes together smoothly now for you. Quote Link to comment Share on other sites More sharing options...
bartonmd Posted October 18, 2006 Share Posted October 18, 2006 Had the frame welded. http://i83.photobucket.com/albums/j285/JBo.../Picture309.jpg http://i83.photobucket.com/albums/j285/JBo.../Picture311.jpg http://i83.photobucket.com/albums/j285/JBo.../Picture310.jpg Nice repair job.....I'm a big bastard myself, better have a look at mine next time I'm down there... If you haven't caught it yet, he's got 2 'birds... this is the second one that he picked up from his buddy's insurance company, after his buddy lowsided it... Mike Quote Link to comment Share on other sites More sharing options...
Red J Posted October 18, 2006 Share Posted October 18, 2006 That ain't a naked bird... Looks like you got there, Josh. J. Quote Link to comment Share on other sites More sharing options...
partmonster Posted October 18, 2006 Share Posted October 18, 2006 Had the frame welded. Nice repair job.....I'm a big bastard myself, better have a look at mine next time I'm down there... Probably a day late and a dollar short but this might help others when doing a search. That is exactly where my frame broke on my bird two years ago. I mean exactly. It was also repaired with a full weld (all the way around) VS the partial weld from the factory. I would label that cross member the center stand/shock mount cross member. I used a Sears Craftsman 1 inch socket and cut it with a Dremel tool to look like below. Worked like a charm when removing the castle nuts for the engine. I cannot take credit for the idea. Someone from the forum gave me the idea back then. Quote Link to comment Share on other sites More sharing options...
JB4XX Posted October 18, 2006 Author Share Posted October 18, 2006 Louie, I just removed the nuts and drove out the engine mounts. The castle nutz are still in there. The removal only took maybe three hours from start of plastic removal to engine on the gayrage floor. To all my fellow chubs, my weight had nothing to do with the weld breaking. This bike belonged to a friend of mine who bought it brand new in 99. He hit a tree limb laying in a road at night and low-sided the bike. It appears the centerstand caused the dog-bone to twist breaking the frame mount at the welds. Anyone want to come to a bike building partay? Quote Link to comment Share on other sites More sharing options...
JB4XX Posted October 31, 2006 Author Share Posted October 31, 2006 Frankenbike lives!! Fired up after a few cranks. Now to decide what I am going to do with the exhaust, and start fitting the body back on her. Waiting for a RonAyers shipment that should have all the parts I need to make her complete. Quote Link to comment Share on other sites More sharing options...
Guest rockmeupto125 Posted October 31, 2006 Share Posted October 31, 2006 What's wrong with the exhaust? Quote Link to comment Share on other sites More sharing options...
JB4XX Posted October 31, 2006 Author Share Posted October 31, 2006 What's wrong with the exhaust? Header pipe got a little ding in one tube, afraid it will cause more restriction for one cylinder. Quote Link to comment Share on other sites More sharing options...
Red J Posted October 31, 2006 Share Posted October 31, 2006 Turbo. Quote Link to comment Share on other sites More sharing options...
JB4XX Posted October 31, 2006 Author Share Posted October 31, 2006 Was thinking NOS, but its a carbed bird. :icon_think: Quote Link to comment Share on other sites More sharing options...
Red J Posted October 31, 2006 Share Posted October 31, 2006 wet kit. Quote Link to comment Share on other sites More sharing options...
HERBXX Posted October 31, 2006 Share Posted October 31, 2006 Hi do you happen picture of teh weld before it painted ? or is the weld naturally dark ? I expected the weld to be aluminum colored ? I assume a Tig machine was used for the weld, do you have any details ? My brother is planning on buying a tig and i was lookig for more info . Thanks Herb Quote Link to comment Share on other sites More sharing options...
JB4XX Posted October 31, 2006 Author Share Posted October 31, 2006 Hi do you happen picture of teh weld before it painted ? or is the weld naturally dark ? I expected the weld to be aluminum colored ? I assume a Tig machine was used for the weld, do you have any details ? My brother is planning on buying a tig and i was lookig for more info . Thanks Herb I didnt take any pics of the weld before i sprayed it with some flat black. It was aluminum colored, not dark at all. It was done with a mig, as was the factory welds. Quote Link to comment Share on other sites More sharing options...
Recommended Posts
Join the conversation
You can post now and register later. If you have an account, sign in now to post with your account.