

testrider
-
Posts
479 -
Joined
-
Last visited
Content Type
Profiles
Forums
Gallery
Events
Posts posted by testrider
-
-
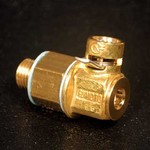
Just order 1 of these to replace the drain plug:
-
Anyone knows what the thread pitch is the oil drain plug? I know it's a 14mm bolt
but I'm not sure the thread pitch.
Thanks.
-mike
I think it's 14mm diameter x 1.5 thread pitch?
-
Anyone knows what the thread pitch is the oil drain plug? I know it's a 14mm bolt
but I'm not sure the thread pitch.
Thanks.
-mike
-
They are the flat type. I wasn't into changing them either, but now that I discovered them at the local parts store, I figured what the hell why not!
I even change the ones on the cages too

On my and my wife's car, I installed the Fumoto valve on the first oil change and
I never had to remove the oil drain plug again. On the XX, I kept forgetting
to measure the thread to order the correct one since motorcycles are not
on their application list but they do carry different diameter/thread (http://www.quickoildrainvalve.com).
-
Auto Zone carries 14mm aluminium crush washers for around 2 bucks a 4 pack. Been using them for the last 25,000 miles (5 oil changes) with no problems.
Thanks for the info. Are these aluminum crush washers that have a raised ring around the washer or are they the flat type?
You're supposed to change those things? Man...50+ oil changes, across 4 or 5 bikes, totalling over 100K miles and I've never changed the crush washer, or had one leak on me. Ever.I never changed mine either after 40k miles on my 97 XX but I think may be it's just about time
to throw in a new one once in a while... :-)
Yes, but be carful you might strip the thread's if you put to much torque on the bolt, there is not much material holding the thread's on the oil pan (couple people here have stripped them).Thanks.
-
Can I use any flat copper washer from autopart store or does it have to be crush washer?
Thanks.
-mike-
-
Have you tried to put the cover back on? It may look like it's too far out but it isn't.
I just replaced my front sprocket too and I pulled the rod all the way out of the engine, cleaned and lubricated it and pushed it back. It did look like it's sticking out too much but when you put the cover back on, it was fine.
-
Thanks for the reply.
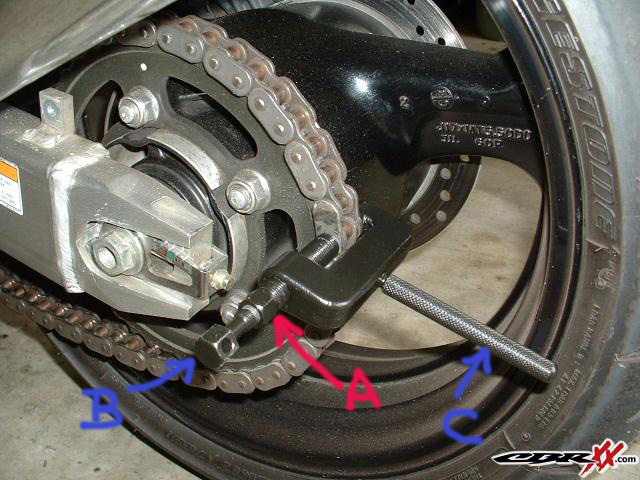
It's a counterintuitive pain in the ass the first time you use it, isn't it? Hopefully my recent experience will be somewhat helpful:1) the anvil is on the back against the pin head, correct?Yes, that's correct. Make sure it's there. It's very easy for it to fall on the floor when you're not looking. This happened to me, and I accidentally pushed the pin through the back and destroyed the master link.
2) now I screwed in the 'A' (red arrow) until it stops against the side plate?Yes. Make sure it's all the way to the stop. In one of your later posts, you attached a photo from webbikeworld where it is backed off an inch or two. I'm pretty sure this is wrong. I initially tried to do it this way, and I was having a heck of a time trying to flare the rivet because all of my energy was going into bending the rivet pin.
3) now I screwed in the rivet pin 'B'Yup.
4) While holding 'C', I keep tightening 'B', until the pin head is flared to the correct measurement, is this correct? Or am I supposed to hold 'A' while tightening 'B'?I'm pretty sure I held 'A' while tightening 'B'.
Kevin
I accidently pushed out the pin by holding 'A' while tightening 'B' and screwed up my 1st link.
It looked like while holding 'A' and tightening 'B', 'A' was retracted back into the C-clamp
and therefore push out the anvil leaving a gap in the back that I didn't know. I kept
turning in 'B' and found the pin backed out in the back!
-mike-
-
Depending on the brand of chain, it should be flared out to a specific dimension. The manual states DID=0.217--0.l228, RK=0.219--0.230.
Also, if you use a little high pressure (moly for example)lube in the dimple in the pin and on the tip of the tool it will help in not developing cracks in the flared pin ends---see the manual for what that will look like.
You also don't to get the side plate stacked too tight or it will cause a bind and part of the smoothness of the Bird will be gone. I know this from experience----shit.
Hope this helps----happy trails kel
Thanks for the reply. I appreciate it. However, which position is the correct
position to stake the pin, pic 1 or pic 2?
Thanks again.
-
Just saw this pic on webbikeworld.com and it didn't even
screw 'A' all the way down to the side plate. Is this incorrect
or is it ok too?
Thanks again.
-mike-
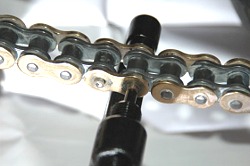
-
I have a little trouble using the Motion Pro chain tool to rivet the link. I already screwed up a master link. I pressed the side plate on just fine.
I have some questions in this picture:
1) the anvil is on the back against the pin head, correct?
2) now I screwed in the 'A' (red arrow) until it stops against the side plate?
3) now I screwed in the rivet pin 'B'
4) While holding 'C', I keep tightening 'B', until the pin head is flared to the correct measurement, is this correct? Or am I supposed to hold 'A' while tightening 'B'?
Thank you very much for any help!
-mike-
PS: is it better to position it on the rear sprocket like this pic or it doesn't matter?
I position it between the front & rear sprocket on the bottom.
-
Thanks. Wish you could line up the 2 chains (at the link pin) to show where
the difference is. Can't really tell where the difference was from the pic.
Yes, you can... I hadn't cut the extra of yet, but the opposite ends are lined up, and they are not a full link different. It lines up to the link that's right next to it. I stretched them out on the ground, and made sure they were flat. The old one is stretched something like 3/16" total.
Mike
I think I see what you were saying. The links that lined up weren't show in the picture, right?
If yes, then I can see your point. The one on the left was definitely longer.
Thanks for the pics. I think I need to replace mine now, even though it 'only' has 22k miles :-)
By the way, what size sprockets are you running with the new chain? The stock is 17/45 and I got
myself a set of 18/45 and a 112-link DVD ZVM2 chain. If you run 18/45, how many links of chain you use?
I ordered 110-link but it came package as a set together with 2 sprockets and 112 links. I may have to cut off 2 links myself.
-
Thanks. Wish you could line up the 2 chains (at the link pin) to show where
the difference is. Can't really tell where the difference was from the pic.
I have a DID ZVM2 that I'm about to install, while waiting
for the current one to go bad. The current one is
DID and has 22000 miles on it. Me too I lubed every 200-300 miles
and the current one still looks good.
-
That's the Fumoto valve and they have been around forever
(http://www.fumotovalve.com/).
I had one on every car and truck that I and my wife own.
It made oil change so much easier.
I had one on my Ford Bronco for 13 years before I sold it. I took the Bronco
off road from time to time and bang it up pretty good and the valve
never leaked a drop in 13 years that I owned that Bronco.
I don't have one on my XX yet but I will get one soon.
-
Gotta buy a new chain for the strom. Needing a 525
Really wanting a EK525 MVX-Z. Cheapest I have found is like $140.
Anyone know any pretty cheap places?
Is White Buffalo about the cheapest?
It's $105 at whitebuffaloracing.com and their service is fast.
http://www.whitebuffaloracing.com/shopexd.asp?id=1079
Also, if you buy a chain + 2 sprockets (front and rear) you'll get a 'chain set' discount. I recently bought a set for my XX from them.
-
Mityvac for sure. I have found that it does not work well when you have speed bleeders installed.
But if you have Speed Bleeders you don't need Mityvac, right?
-
I did. I put blue loctite on all the sprocket nuts (rear) and bolt (front).
-
My 97 has 36k miles and the clutch is still good...
-
Will a bearing puller like this works better than a screwdriver and hammer?
http://www.harborfreight.com/cpi/ctaf/disp...Itemnumber=5469
and a bearing installer?
http://www.harborfreight.com/cpi/ctaf/disp...temnumber=92387
Thanks.
-
146! Wow!
How did you drill out your baffles?
-
R/R died. Need a new one, but a little short on cash. Could use some help.
What year XX?
You could order a reg/rec for a 99 Yamaha R1 from University motors for around $50. There are numerous posts here on the subject along with the wiring diagrams.
Got a link for university motors?
Thanks.
-
Took my 2000 bird in for a fork oil change, it is now sitting in my garage and when I looked there is no spacer on the left side between the fork and the wheel. As dumb as I am mechanically me thinks there should be one there as there is on the right side (When sitting on bike). Correct???
Brian
I just looked at my 97XX and there is a spacer on both the left and right sides of the front wheel and they are not the same length.
-
Has anyone played with going down a tooth on the front sprocket? I'm aware of the ratio changes but curious about the results.
K
Hi Kev
I put a 18T sprocket on last year & I love it also.
I don't think that I will go back to a 17T sprocket either.
With 18T front and stock 45T rear, is the chain still 110 links?
-
Well I gave up and took it to the dealer today. Thanks for all the help but I know when I'm over my head.
What did you find out from the dealer?
Oil drain plug washer type?
in The Garage
Posted
Isn't that's what the oil filter is for?