

dunedain
-
Posts
286 -
Joined
-
Last visited
Content Type
Profiles
Forums
Gallery
Events
Posts posted by dunedain
-
-
Some good tech there. You should get a pressure washer for such a fine write up and photo assay.

-
I'm lookin for an extra grab rail cosmetic condition not that critical. PM if you got one you want to sell. Thanks
-Mark
-
that's where I bought my XX 10 years ago.
I fookin drive there myself dude!
PM sent with Contact info
I just got off the phone with them and they told me that a taxi ride would be very cheap. In my mind and experience, too cheap. What's the old saying, if it's to good to be true then it probably is? My experience with Taxis over a much shorter distance doesn't lend itself to the number they told me. -
Update! I haved been sticking with this, and am proud to report I've lost a total of 70 lbs!!
 :icon_clap: I also broke the 300lb barrier! For the first time in probably 8 years my weight does not start with a 3!!!!! I think I need a new bike reward or something!!
Hell yeah!!!
Just for fun pick up 70 lbs. of weight and walk around for a while, or even climb some stairs as a reminder of how it used to be.
Right on!
I agree. Pick up 70# and remind yourself what it felt like.
I droped out's the 300# range this year too! feels great don't it!?!?!?!?!
-
Dont listen to those scrawny little bastids!
I would not use any pre-load or just enough to put a little tension on it. These spring guys are setting you up for right at perfect. Pre-load should not be needed except to keep it all in place.
-
That may have been me. I posted something like that some time back.
NO WHITE GAS! That will get right passed the o-rings and may hurt them too. Not to mention explode on a whim.
Do what you will but when you got a stuck bolt what do you put on it? WD-40! It's a penetrent!
I have at least 8 cans of WD-40 around my shop as I love the stuff but none of goes on an o-ring chain.
http://wd40.com/Brands/wd40.cfm read the first paragraph......"Penetrent"
Just my opinion here but I would never spray that on my chain.......someone mentioned spraying it on the sock and wiping with it and I would do that but consider what it costs versus kerosene.
this and fie dola gets you a latte at Starbucks...but I heard they upped their game.
-
I'll take it! That's right VFR's are the same. Where did you find one for 31.00? I think the cheapest I've found was 40 something.
Sproket Specialists but they dont have the chewy rubber damper center $30.99
-
Come on fucktards your holding out on me. I know somone has a fromt sprocket they want to donate to the Silverbird foundation.
How about a $31 donation so your cheap ass can buy one! You might try the VFR board as tyhey are the same on some models.
-
Gotta use your big boy muslces. No special tools.
-
Not to brag but myself and a brit XX owner by the name of John Williams helped Mr. Salvisberg spec out the original shift kit in 98'
Mr. Willims has sinced moved on but I've had a detent roller bearing in my XX for almost ten years and have not missed a shift yet. Tops.
The stars a little bit newer but anyone who knows Factory Pro knows they are aces. If I was buy a dyno it would be his. His website has laods of info. I dont think he sleeps as he also is a Mille R guy and has done good stuff with it too!
-
Are you trying to take all the fun out of playing in the garage?

No! You can still wash parts with gas next to the water heater. Firemen need stuff to do too!
OK maybe not a better way but another way!
-
Speigler lines here. They work real well. You can feel them better. The LBS is a bitch to bleed though.
Worth it
-
So, do you all think that the straps would work? I think by the time that you got all your straps on, I could have the tire on. I have had some tough ones though.
Looks like it works on some tires. I did not recognize that tire. If they were thin straps like the $0.99 ones at harbor freight then I dont see why not. I'm gonna try it.
BTW - there is a much better way of getting the tire (any tire) to bead up. once you get the tire on use a ratchet strap arond the middle of the tire circumventionally and tighten it up. It pooches the tire wall out and once you hit it with air the beads will catch. You dont risk blowing yourself up that way. hehehehe
-
O.K so it's a little more complicated than I thought

So with your shim stack, what are your other numbers and how much do you weigh? I only weigh 165 but carry around 30 lbs sometimes. I'll also be getting some 1.0's soon.
No, no no! The point is that this is not that complicated at all. I was just trying to point out that if you are truly "wallowing" due to the damping in your gold valves you have options. That's why I asked about the sag, and oil height and I forgot to mention you must balance the front and rear. A really stiff rear can push the front around madly.
Wallowing comes from the following:
oil level too low
not enough low or high speed compression damping
spring rate too soft
not enough pre-load
dirt in valving, broken, bent or a bur on the piston
damping rod bushing worn out
compression valve o-ring broken
damping rod not attached to cap
I'm a motorcycle racer trapped in a lumberjacks body. 275#, 1.0 kg/mm, 10mm pre-load, spring in the front with 2.5 wt. oil and a 5,3,2 stack on my compression valve, I only added one shim to my rebound valve and I got 27mm sag. I have an Ohlins on the rear and a big nasty spring on it and my damping turned way down soft.
There are some super smart suspension folk out there and they all have one thing in common.......they like to treat this stuff like it's some black art or something. "You can do it!"
Yes I'm on vacation but if you guys want more info than you'd ever care to view on this stuff I'll keep posting.
-
So what I did was just add one more spacer to create yet another level of damping. I've had my forks apart so many times I cant count them.
I did a.
5, spacer, 5 stack
a
2, spacer, 8 stack
a
3, spacer, 7 stack
and then it hit me..........Why must I limit myself to one spacer.....
so then I did a
2,4,4 stack
a
3,3,4 stack
and I finally (currently is more accurate)
run a
2,3,5 stack (oh sh!t or is it a 5,3,2.............oh well I'll have to check the BB log and get back to yas on it)
The point I'd like to make is that there are only 3 forces that act on our suspension (yes 4 if you count gravity)
FRICTION - We hate it so we keep our linkages clean and the oil fresh thus keeping the friction as close to zero as possible.
SPRING - with a straight rate spring this force is constant so easily managible.
DAMPING - This is the force we should be most concerned about as this is ultimately how we get the rubber to stay on the road.
-
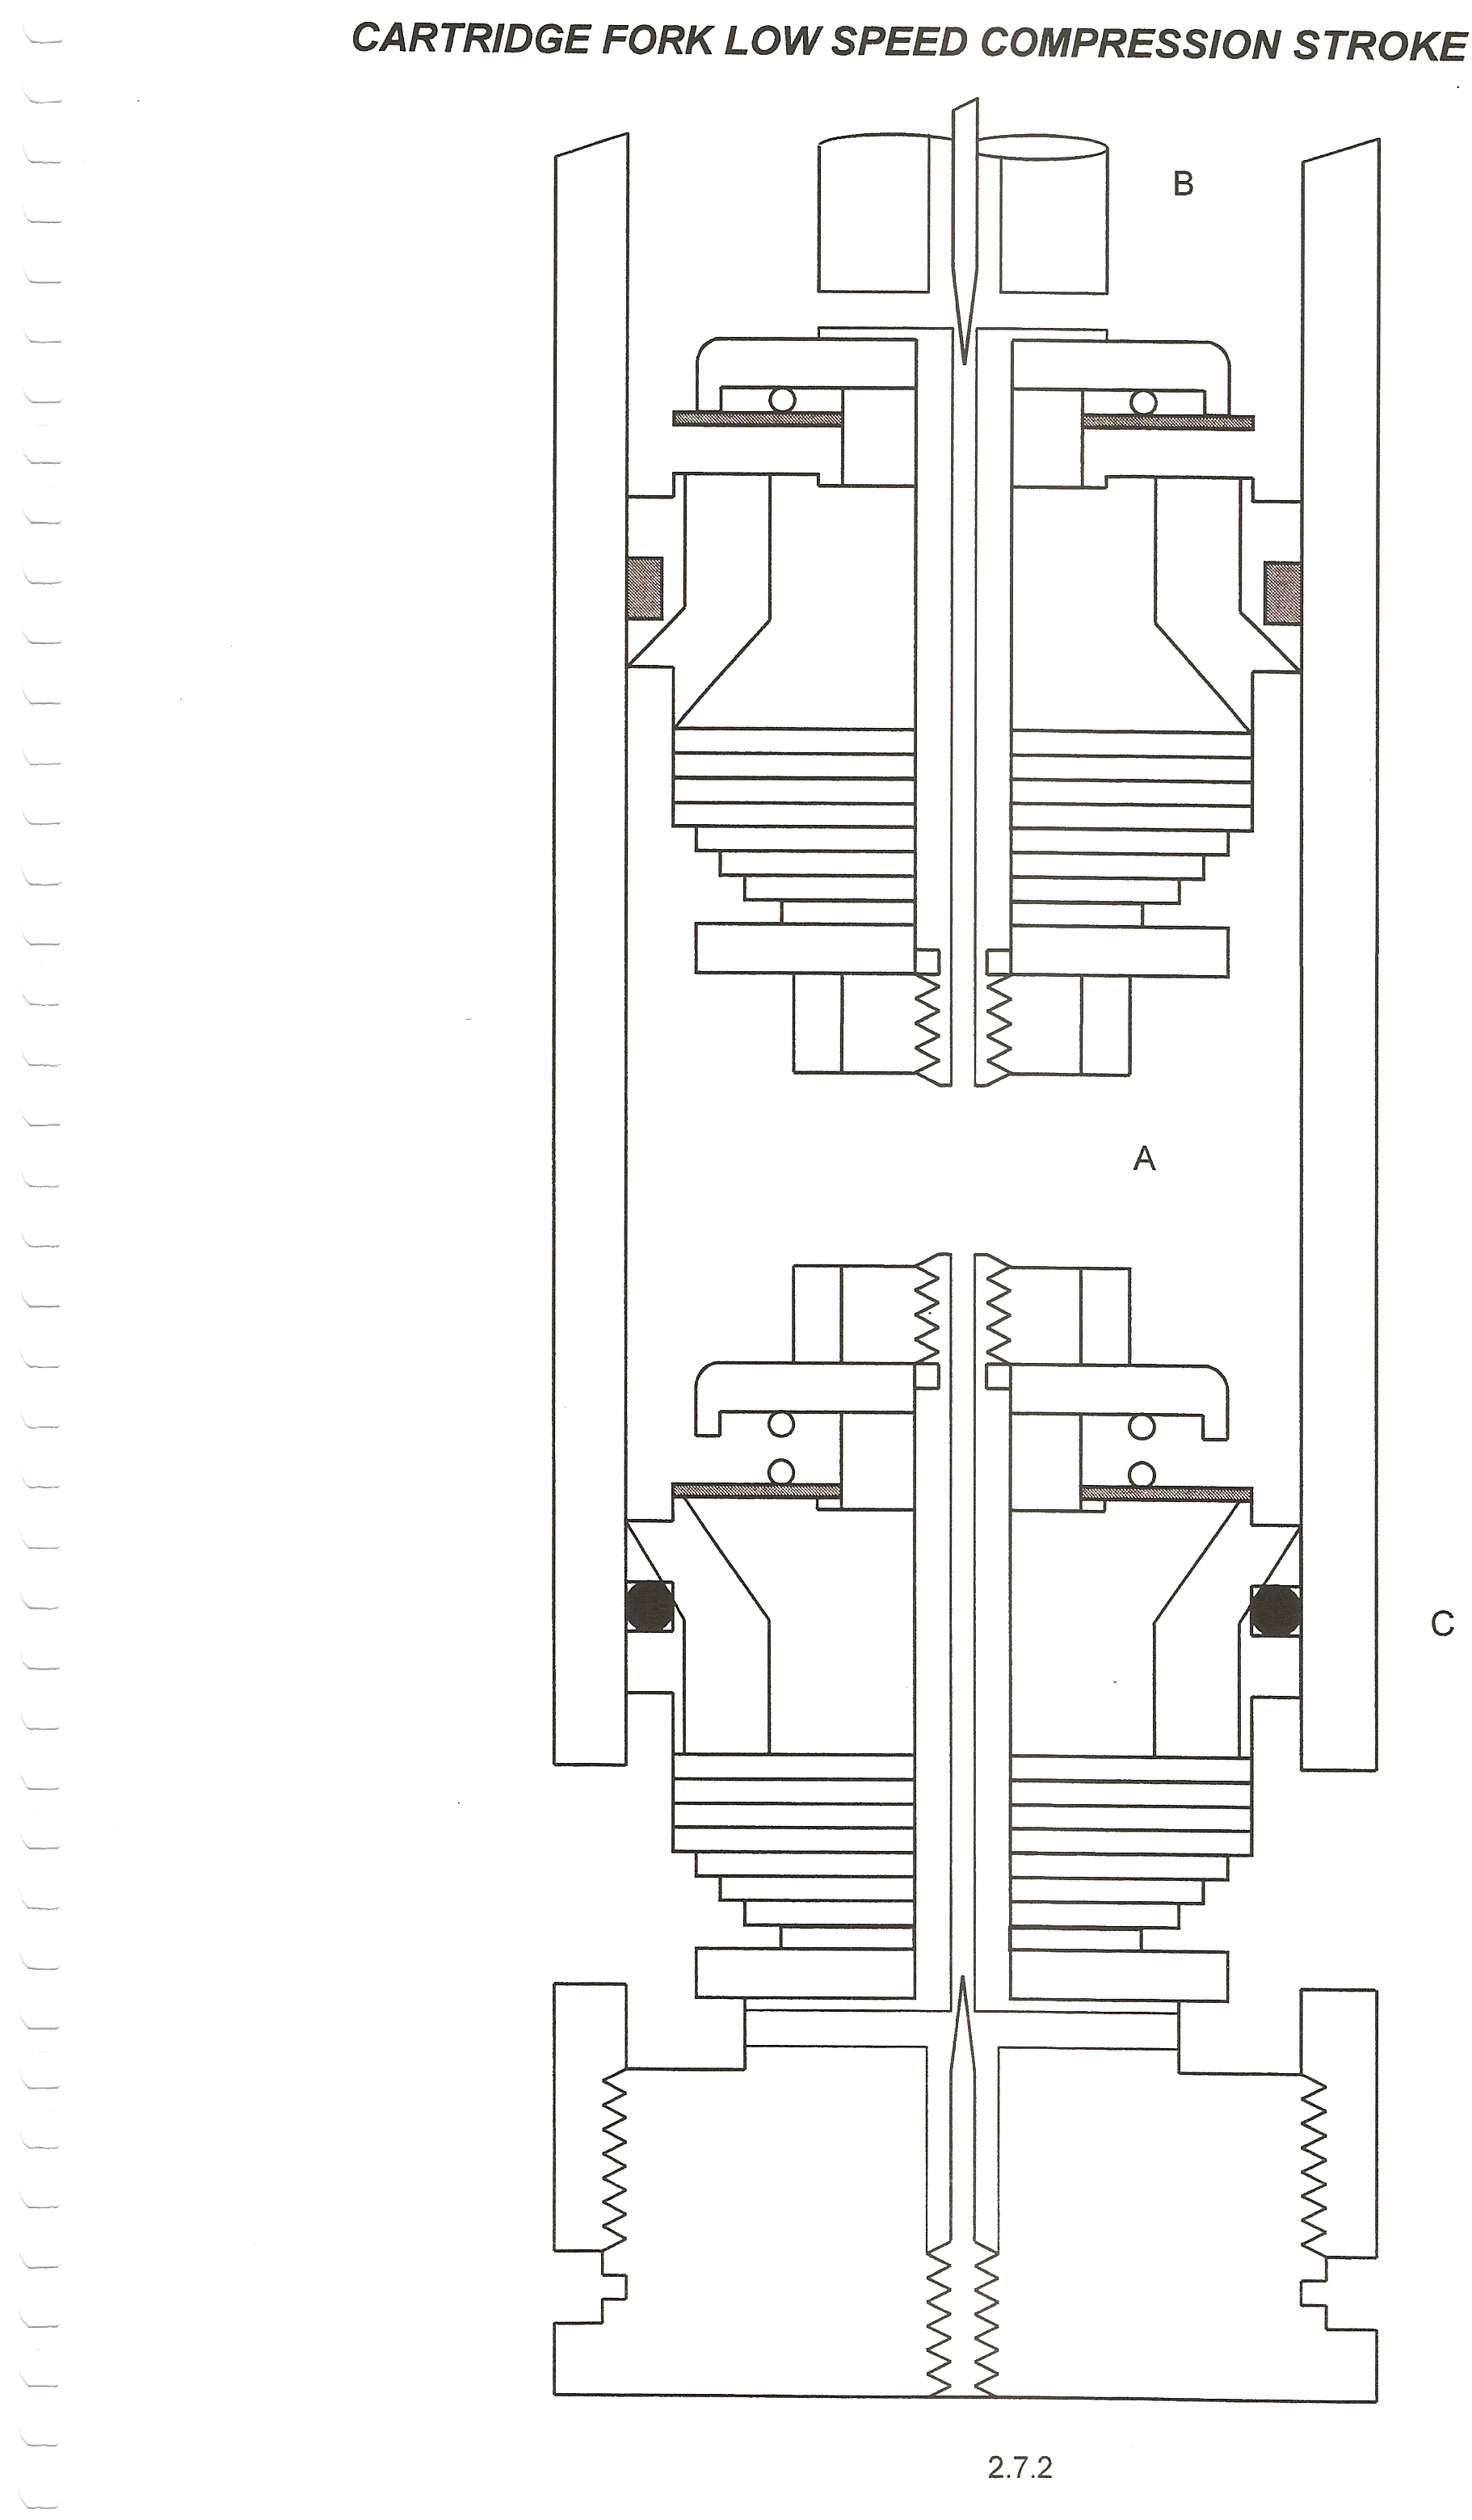
So what if we just threw out Mr. Thede's c## code system for shim stack design as described in the instructions and played a little with it? Lets add a smaller diameter spacer to the compression valve shim stack and create another level of damping.
-
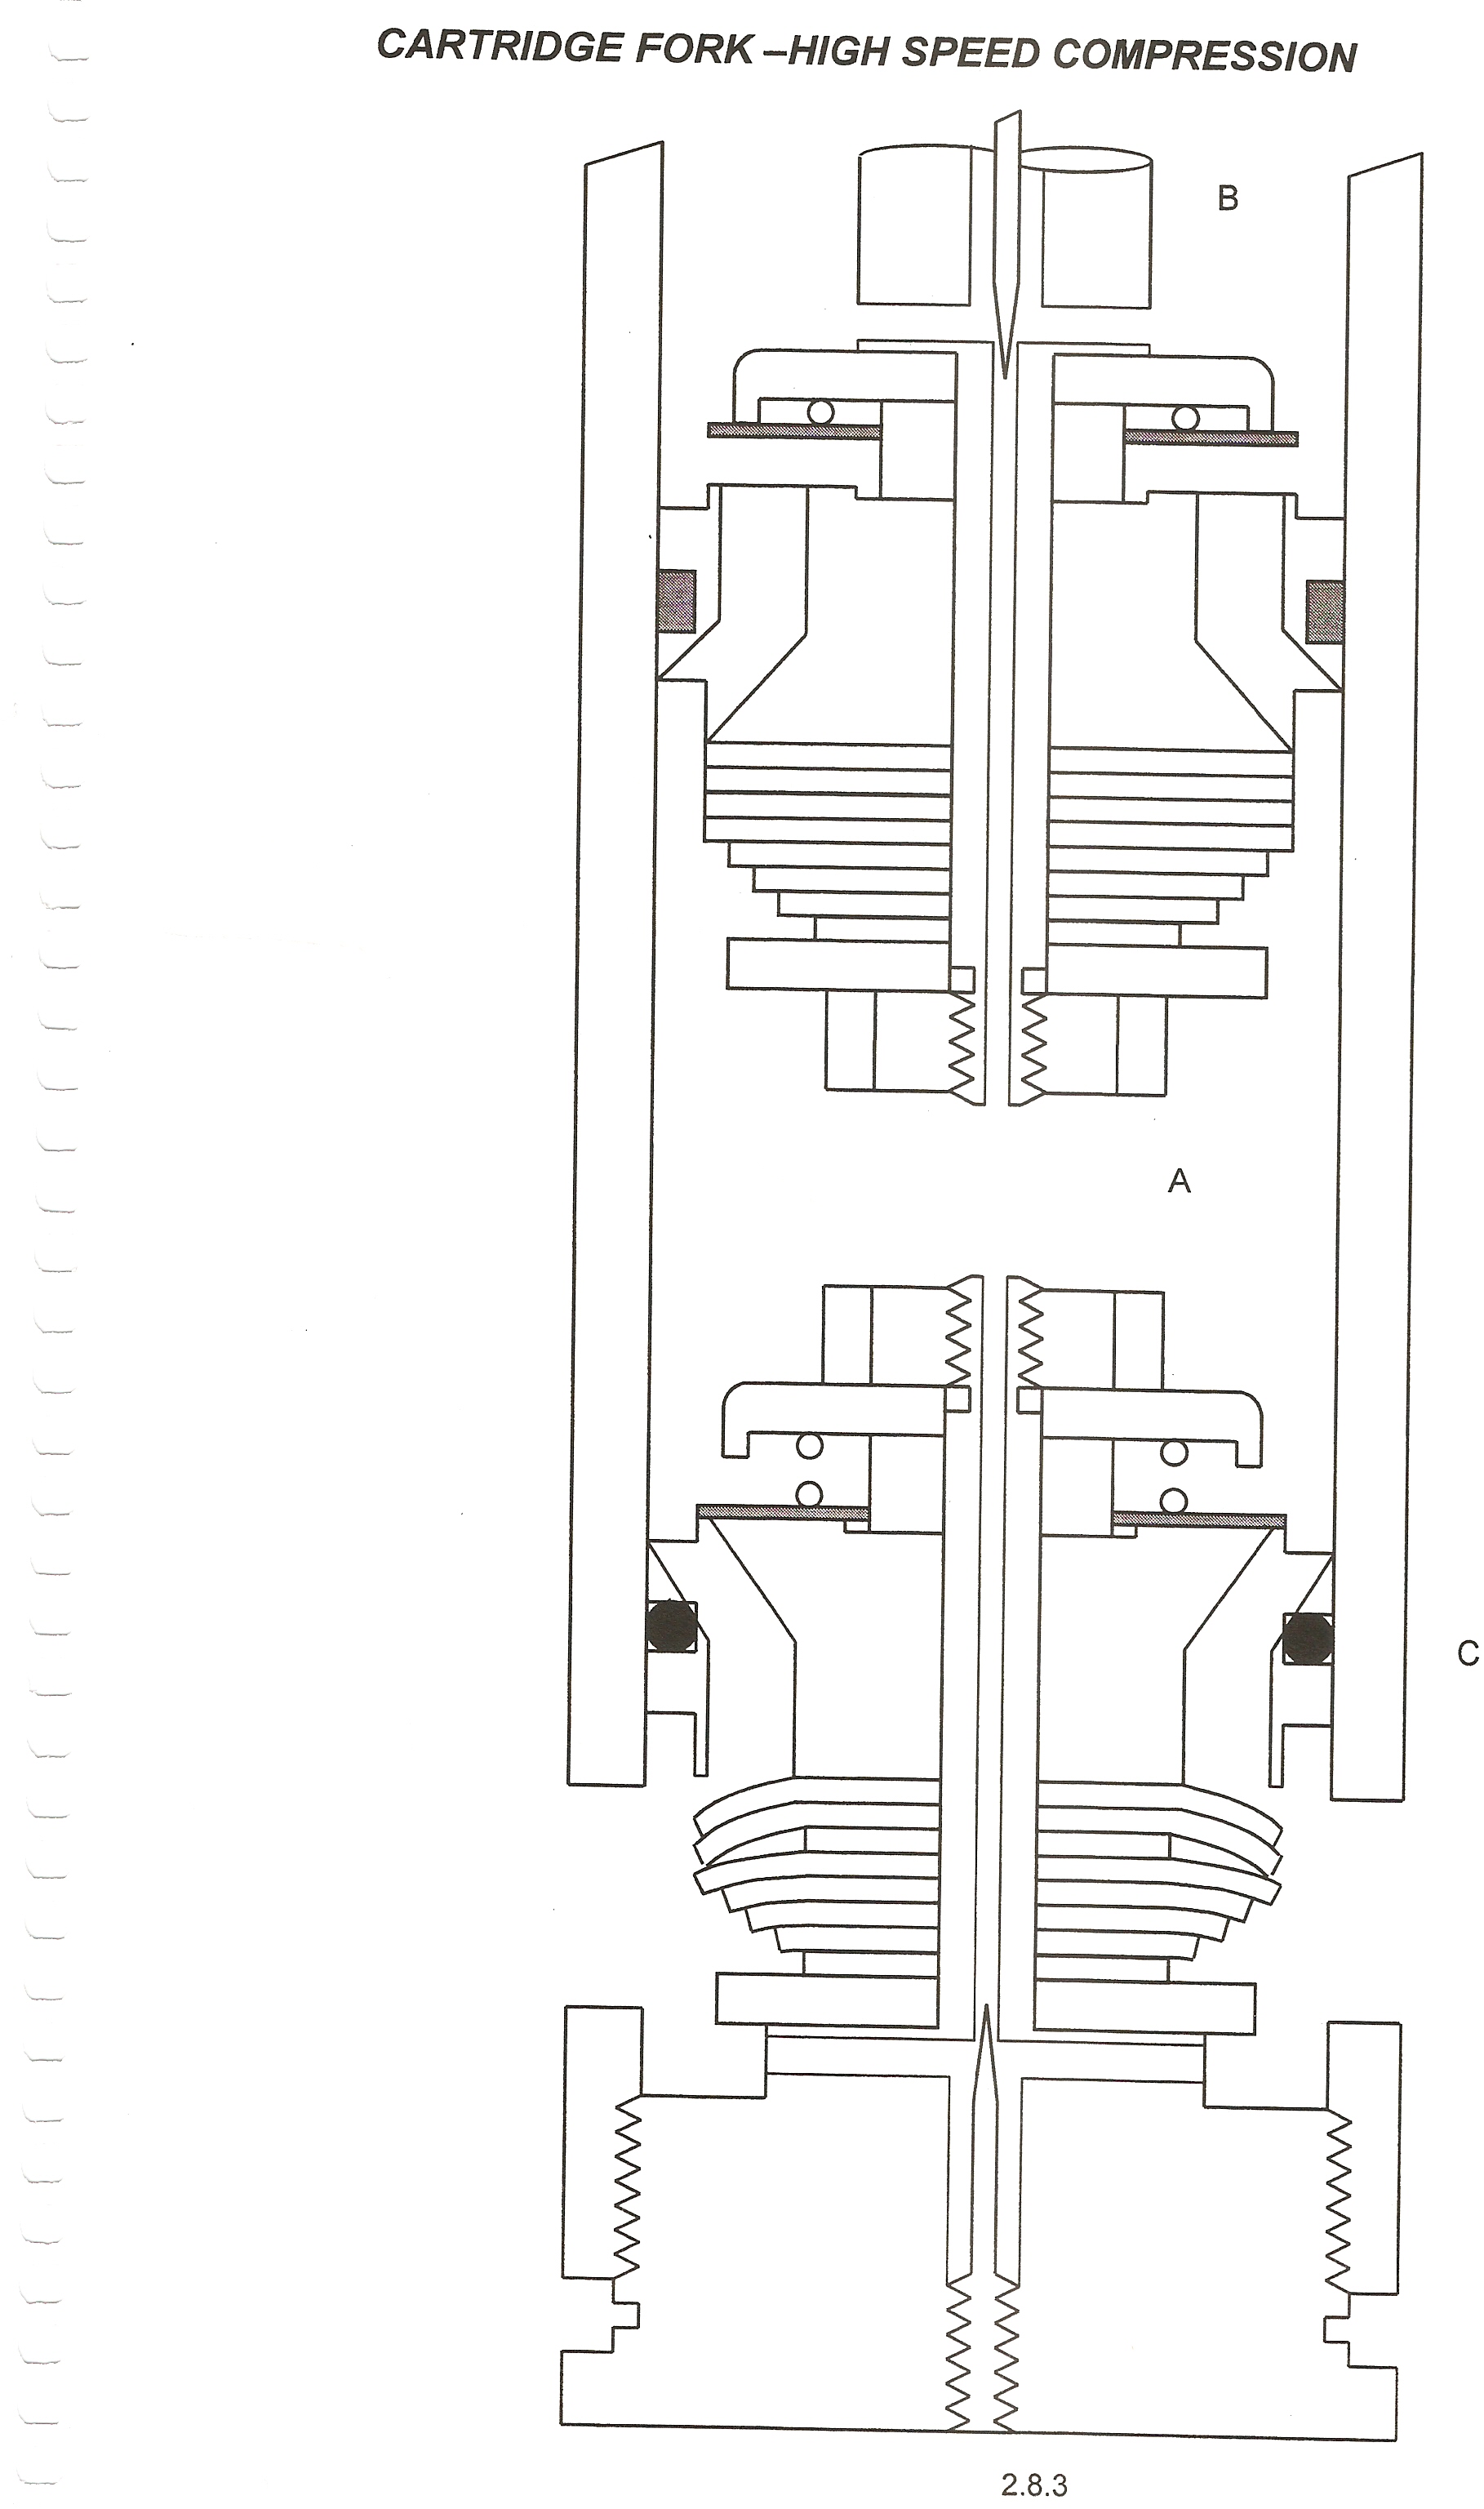
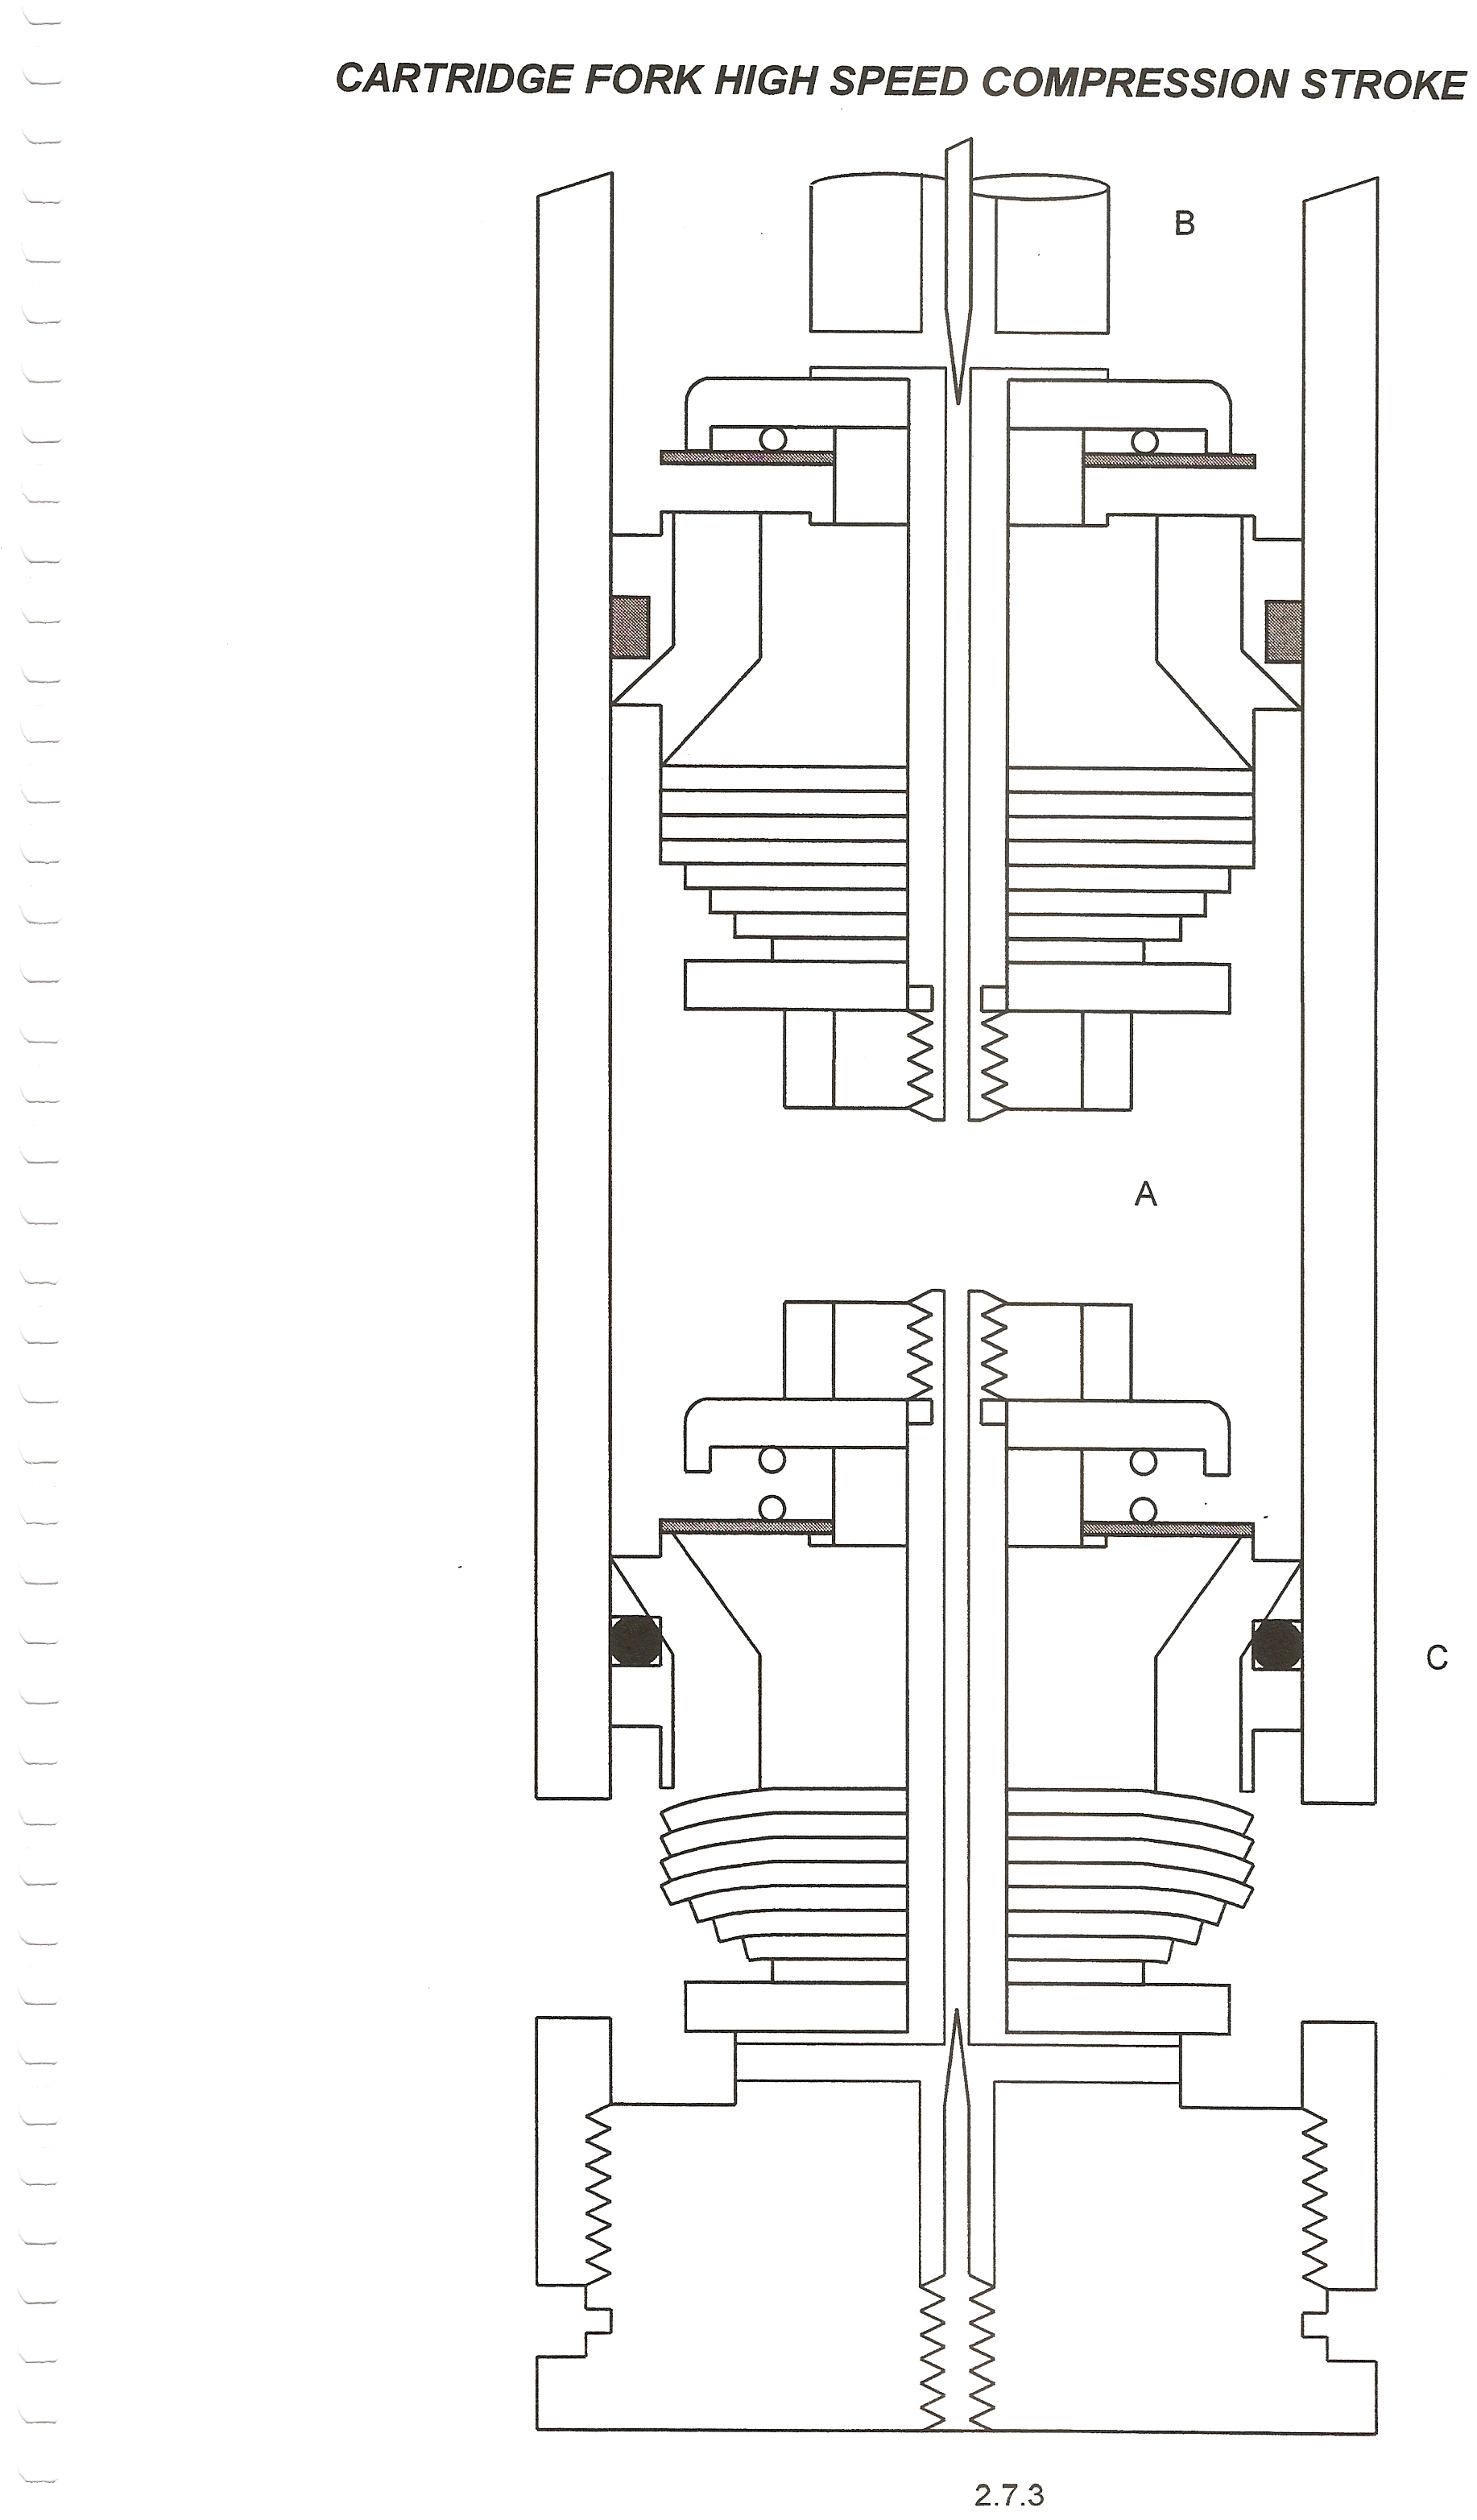
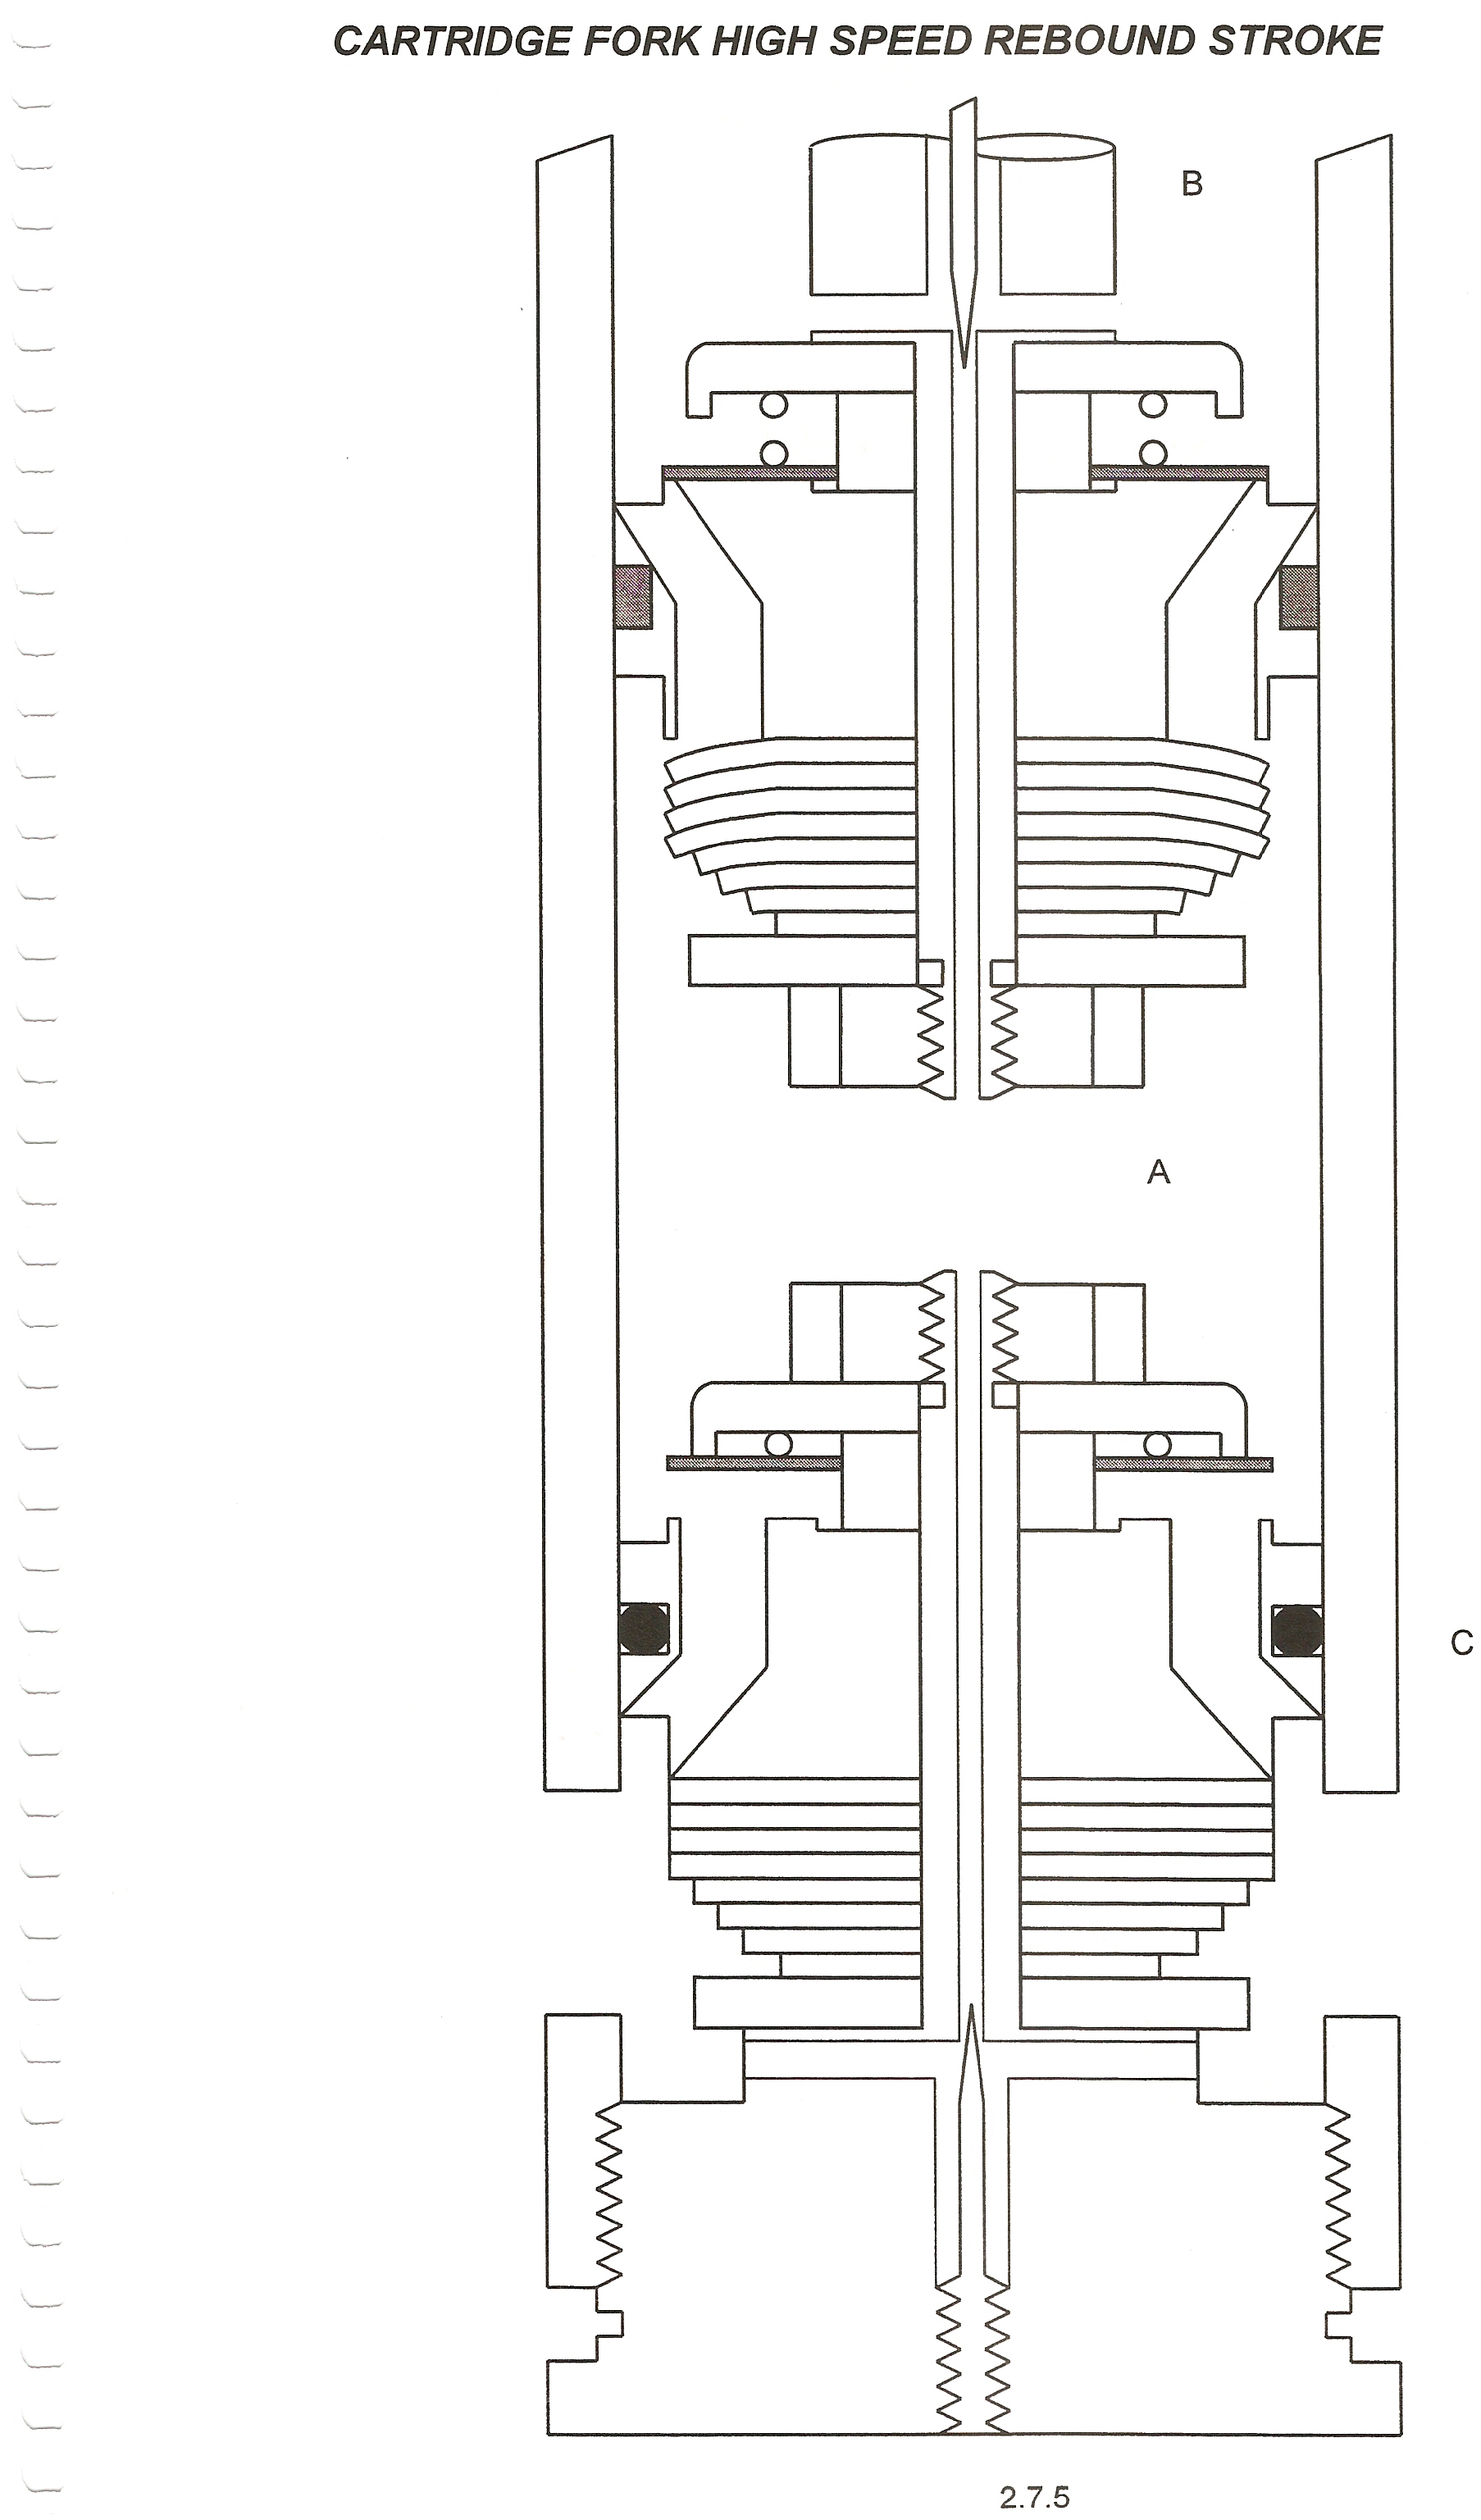
Now if you look at the high speed stroke (big, nasty, square edged bumps) pictures you can see a little more takes place. Note how the shims get tweaked on the highspeed stroke.
-
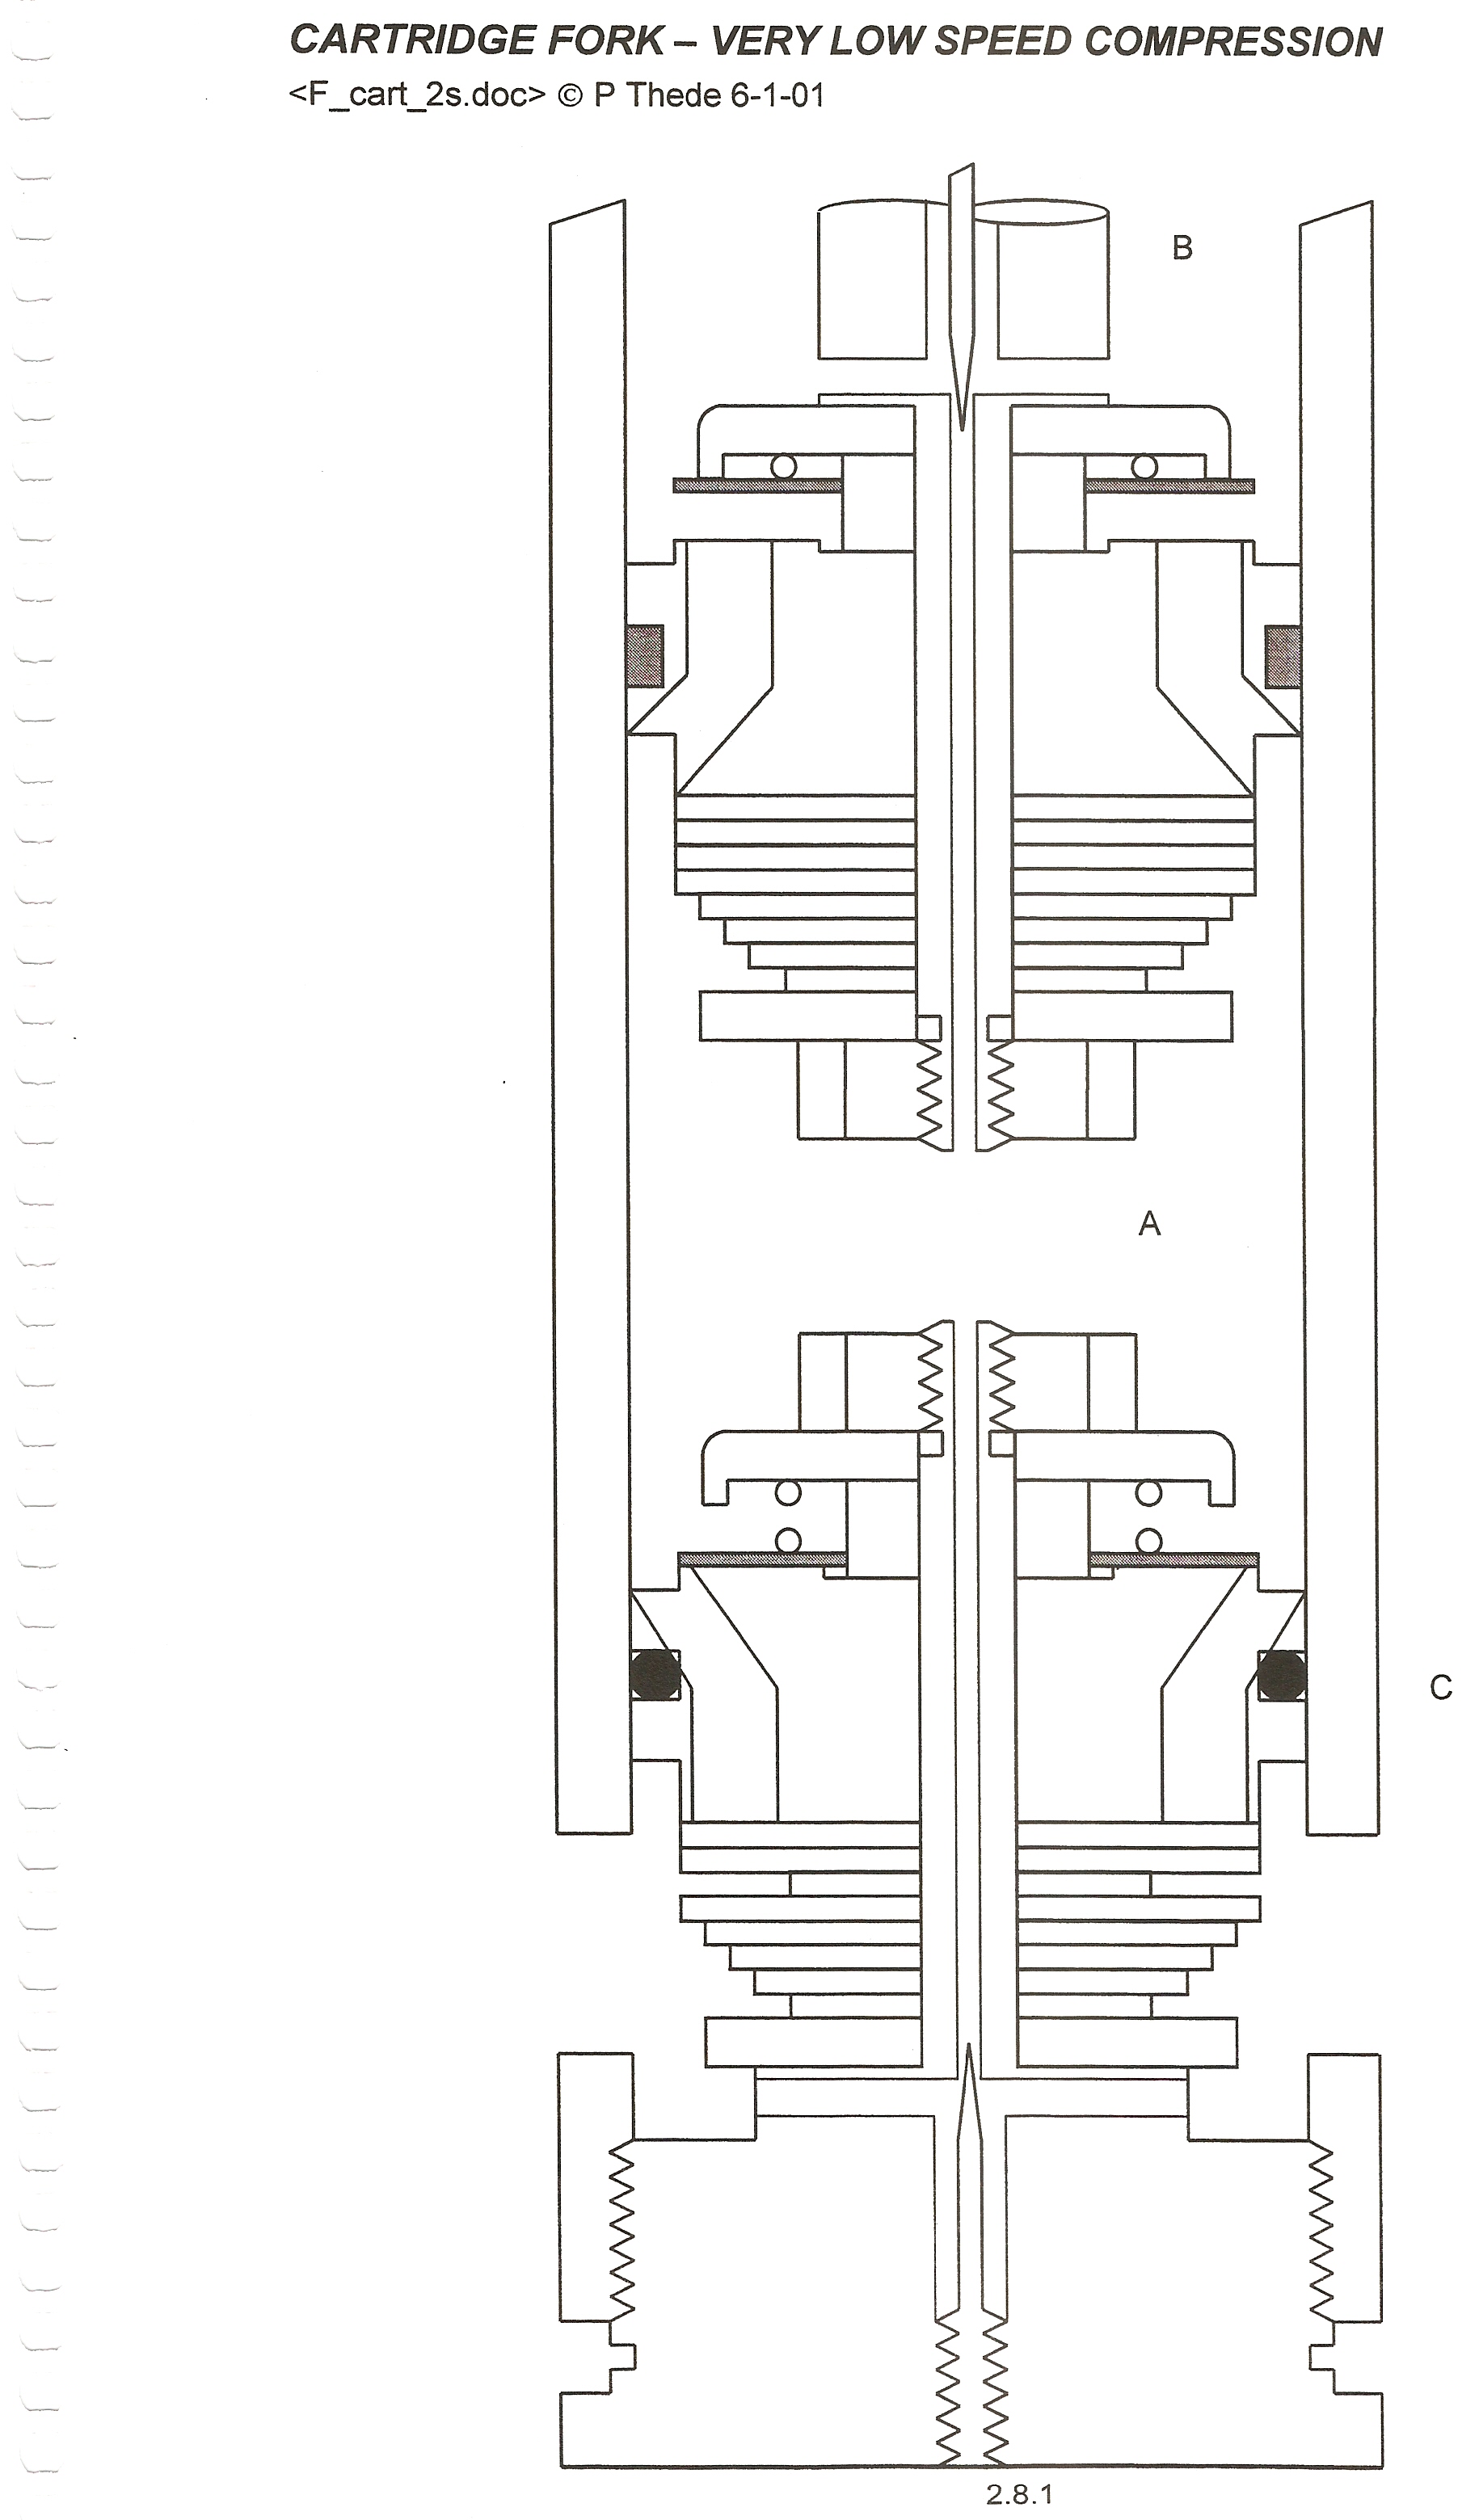
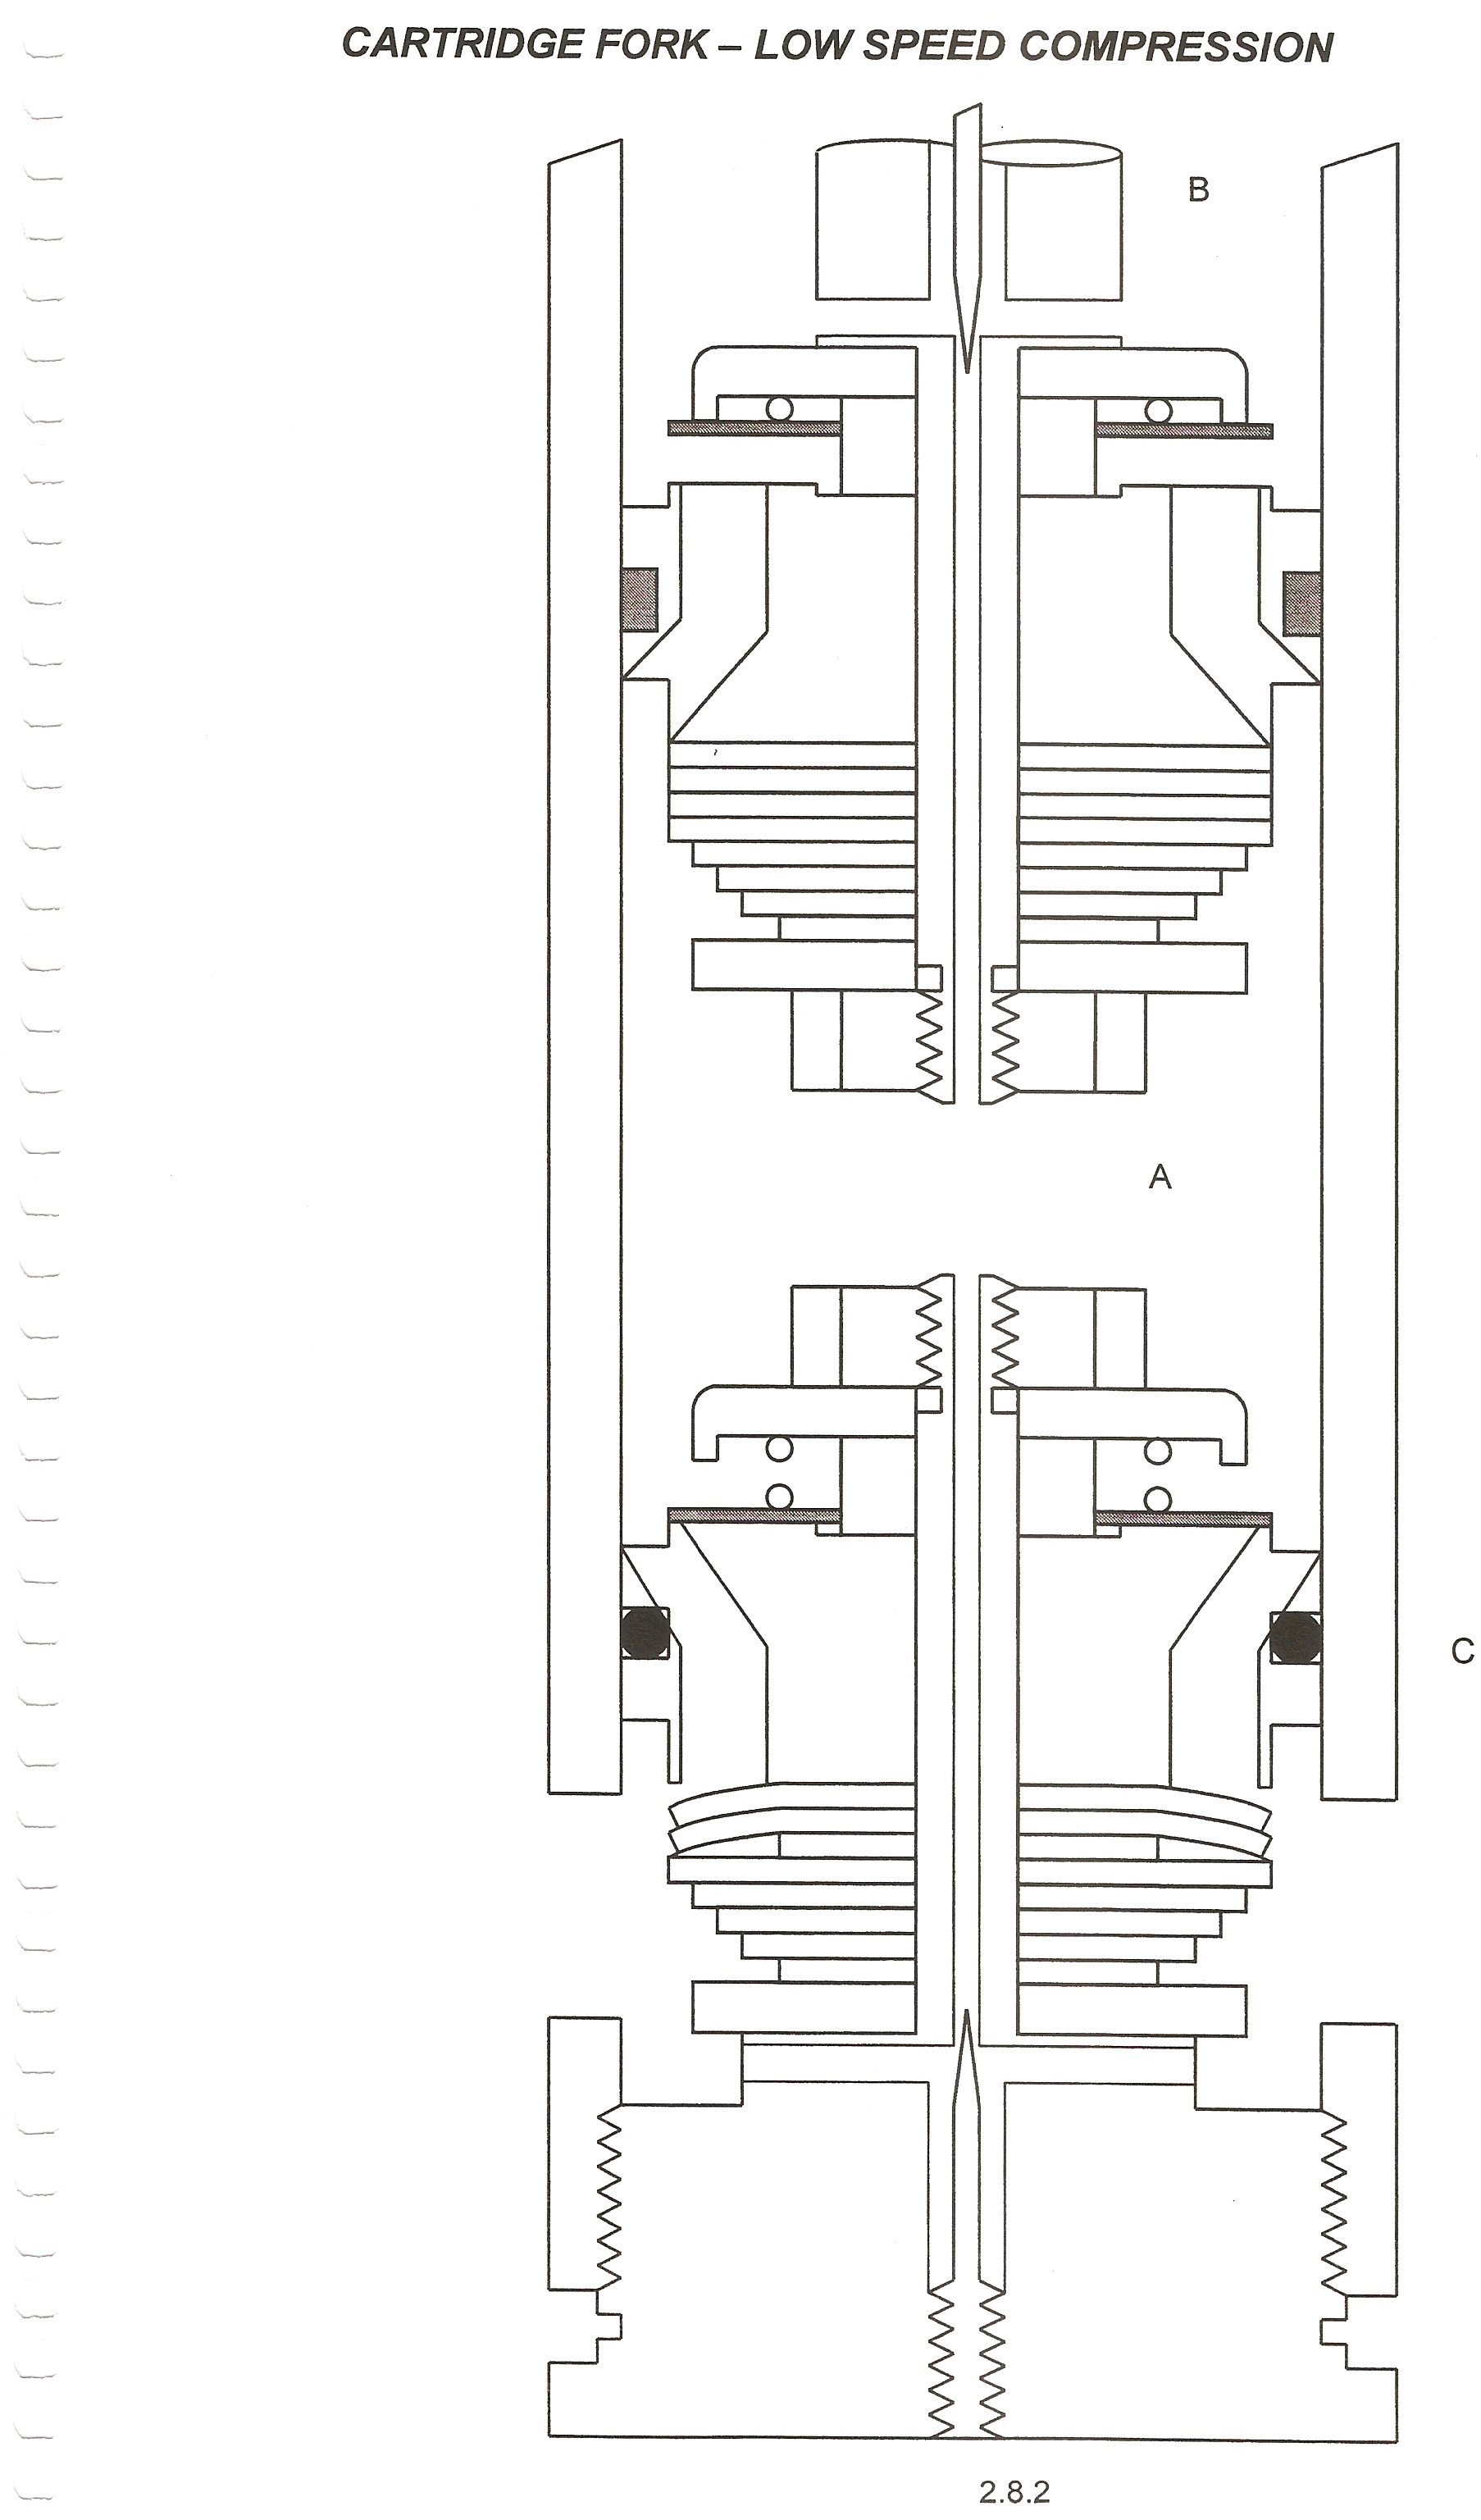
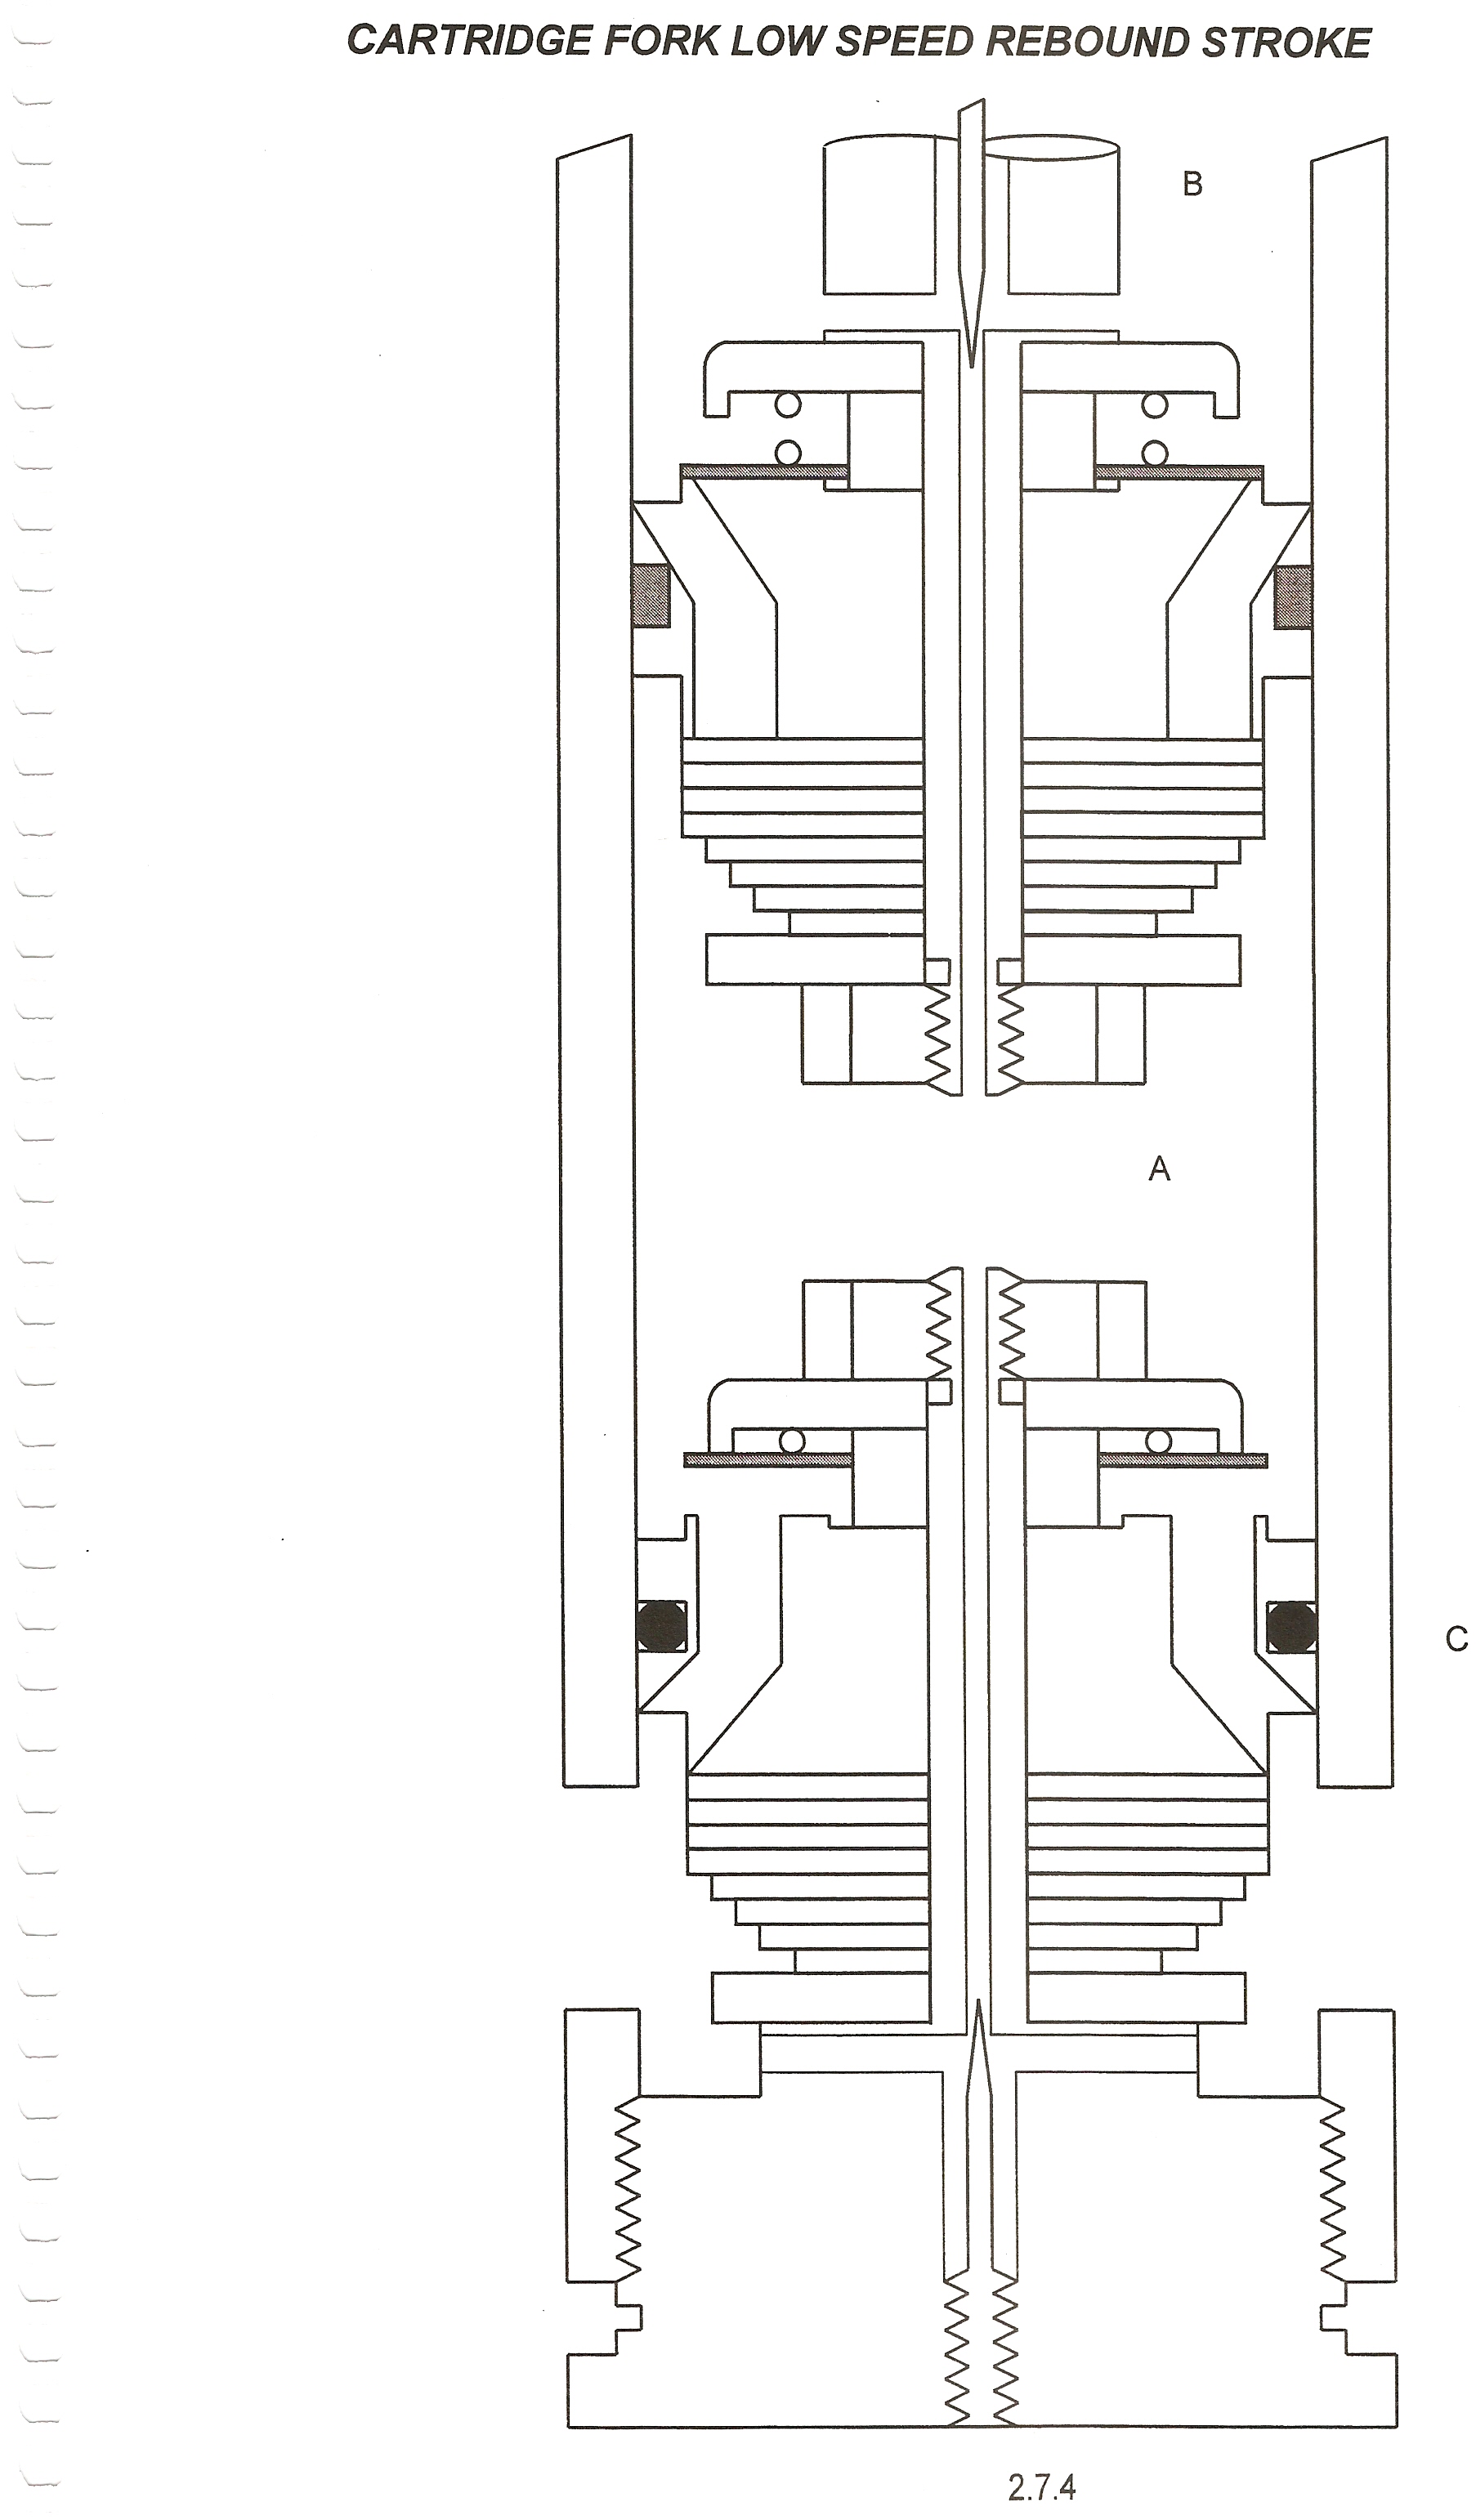
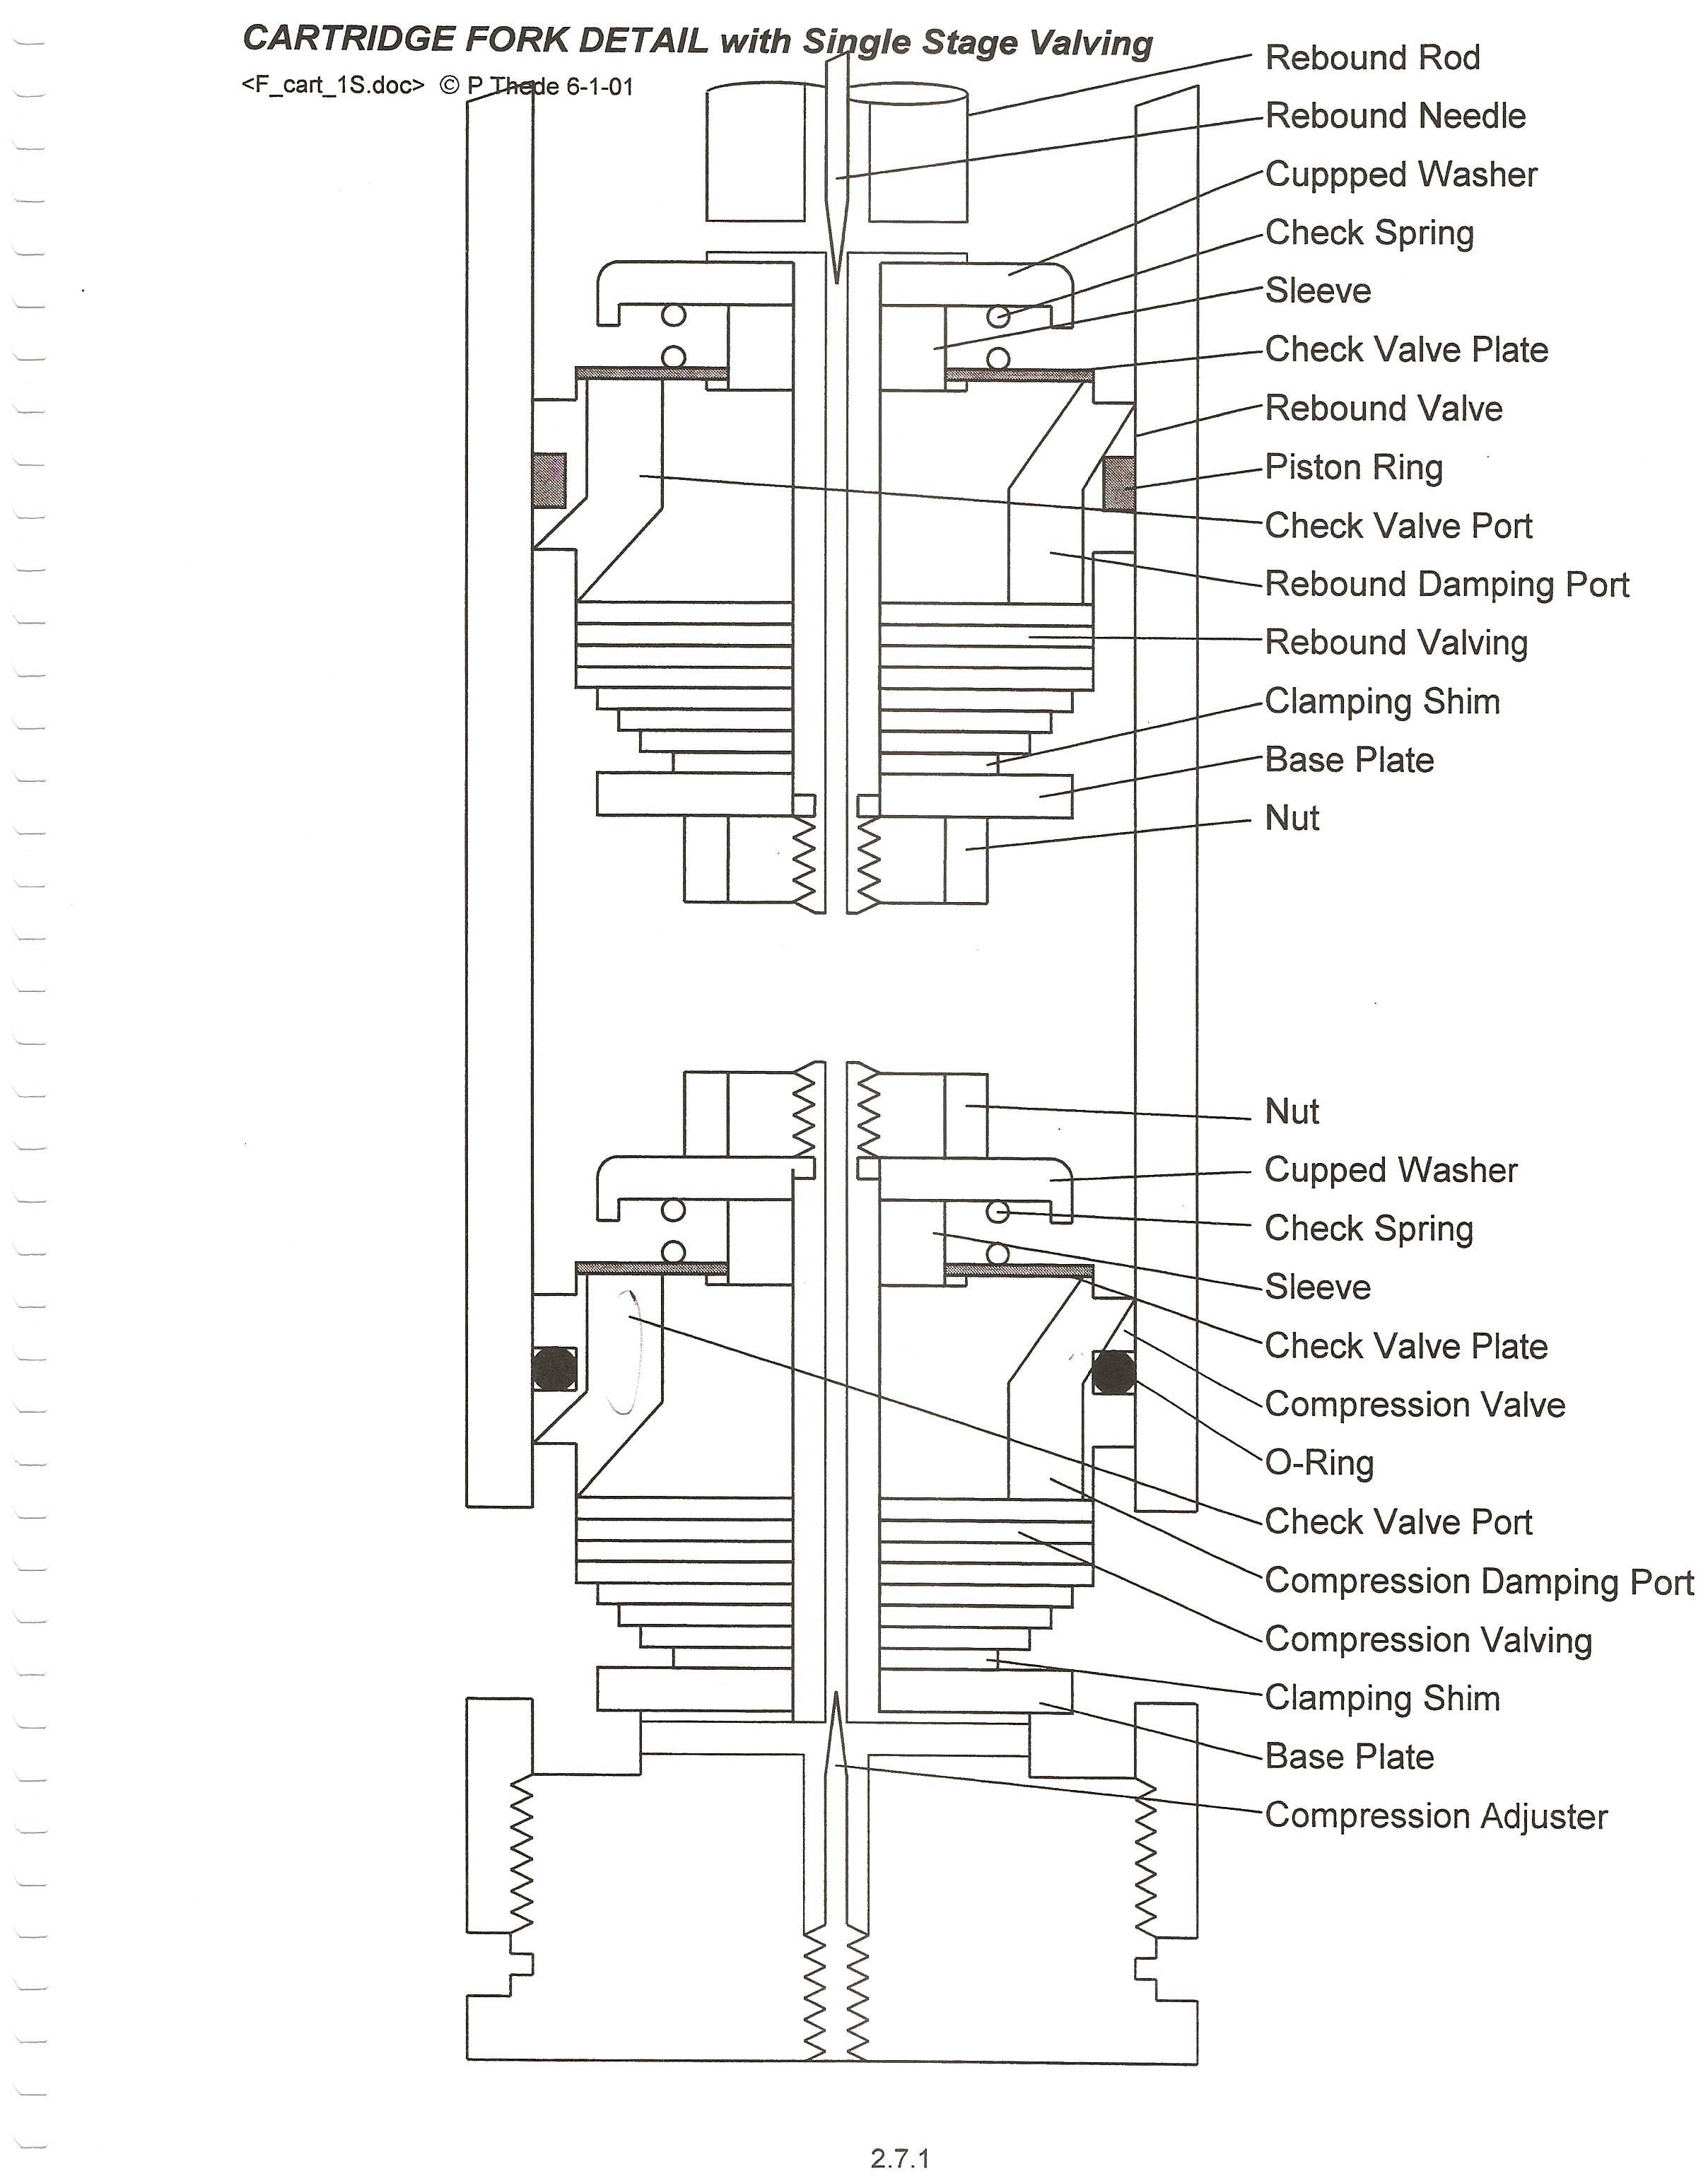
Our stock compression and rebound strokes look similar to these. You my have to look at them for a bit to see what happening as this is the low speed or small bump reaction. But Paul Thede (all honor, glory, and praise be to him for these) has been kind enough to label the oil containing parts.
The Compression Stroke flows from A to B to C to D (D - remember is the portion of the fork above the cartridge where the spring is)
The Rebound Stroke flows from B to D to C to A
-
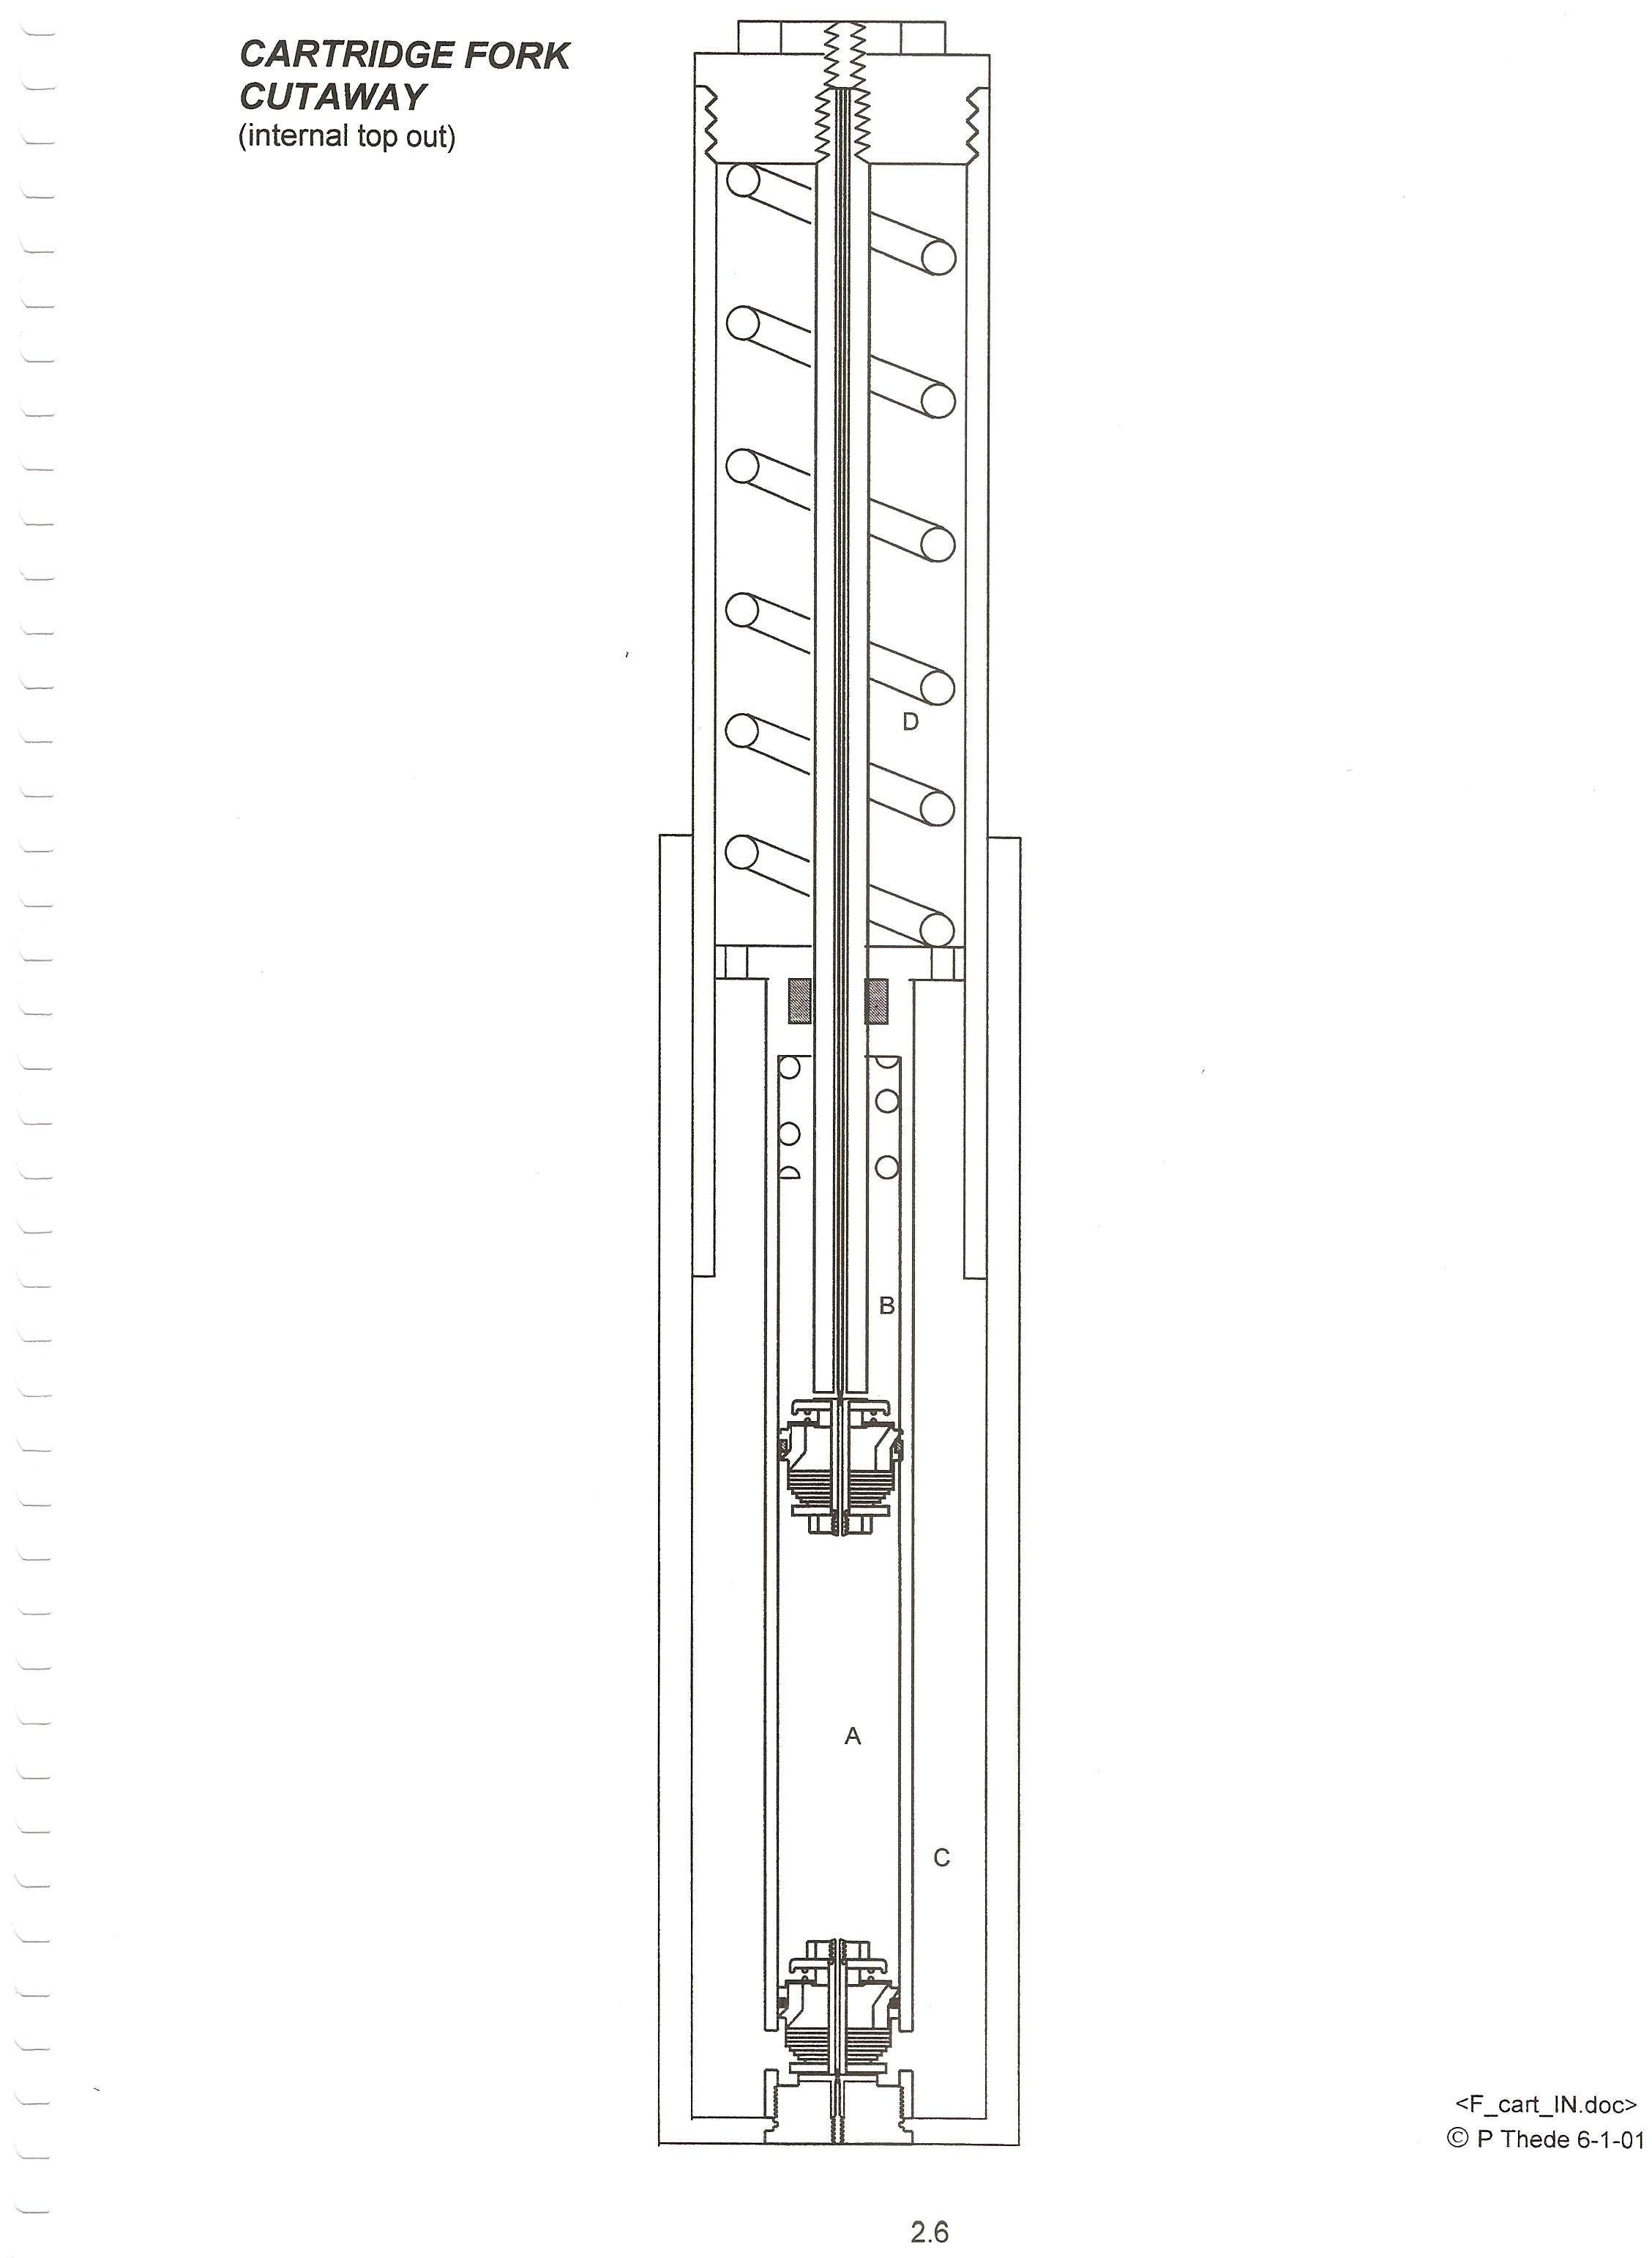
If you bought gold valves then this should look familiar as it is from the instruction sheet. For reference lets look at the overall cutaway too. keep in mind the XX is blessed with comp and reb valves that are not externally adjustable. So here is our Showa typical cartridge fork with compression and rebound valves all parts labeled.

-
Yes I went beyond. I use 2.5 wt oil and shim like so:
(4) .15x17 - Low speed damping
.10x9 - spacer
(2) .15x17 - Med speed damping
.10x9 - spacer
(2) .15x17 - High speed damping
then the:
15
13
12
11
10
9 normal RT stack finish
I used to be fatter and did a 5,3,2, L, M, H shim stack basically a C40 (even though one is not listed in the instructions)
_________________
_________________
_________________ low speed damping for the small bumps (soory my indent did not work)
_________________
_________
_________________
_________________ medium bumps pick up these shims
_________
_________________
_________________ big nasty bumps hit this high speed damping area
______________
____________
__________
_______
What is your fork oil level?
How's your sag look?
How big a pre-load spacer do you have in?
-
No where but the dealer that I know. Decent price???? After buying some corvett intake bolts for $15 each I think they are decent.
-
Honda bond is what I use
-
I may have missed this info in the search feature but which gauges are best for upgrades and more importantly where have you mounted them?
An oil pressure gauge and ammeter/voltmeter sure would be useful.
Where have you found a decent mount ...there's little space in the gauge cluster (obviously).
Thats a good question! I'd like to see some options too. Given the Honda RR issues a voltmeter may yield some info. I've seen someone with an Oil Pressure gage down on an oil line that you could see if you looked down into the fairing (not advised for highspeed monitoring of OP).
-
Sometimes, the price you pay for mistakes, makes you who you are.
And sometimes the price you don't pay, makes you who you are.
You been watchin Dr. Phil again!!!
First rate Stan! 98% (this may more like 99.9%) of us in the same situation would have junked that motor!
About to do Race Tech fork valves on my 99 XX
in The Garage
Posted
I agree w/MBE.
also you should make some big safety pin like thingys out of coat hangers to stack all your shims on and keep them from getting lose or our of order. If you end up using a lot of shims and you fancy yourself a perfectionist then consider shim dishing. The RT shims are punched and have an almost notable concave side and you may want to stack the washers to ensure you're getting them exactly right (perfectionist right). PM me for more info. Did you get compression and rebound valves? You should have but thats big dolla. read all the directions prior to doing this. Have you considered alternate shim stacks? The RT documentation has one setup fits all but there is more than one way to shim the forks. You can actually build in hig, mid and low speed damping with a custom shim stack. PM me for more info on this.
CLEAN, CLEAN, CLEAn make it clean you'll need two cans of automitve contact cleaner and an air compressor. an old cookie sheet woorks good for laying stuff out and catching oil and stuff.
Good luck!