
Toynut
-
Posts
1,669 -
Joined
-
Last visited
Content Type
Profiles
Forums
Gallery
Events
Posts posted by Toynut
-
-
A little chain maintenance might also be in order while your at it!

-
Don't forget to have someone bleed the center piston on the rear caliper by pulling up and pumping the left front caliper which is attached to a brake cylinder. By the same token, the rear brake M/C also sends fluid to the front calipers that need to be bled as well.
-
I am not sure you won't get hypothermia from excessive sweating while wearing this garment. It does not appear to breath at all.
-
Stan,
It would probably be in your best interest for you to figure out how many cover sets you would need to make and sell to make it worthwhile to take on this new project.
-
OK......
All Balls full kit part number is #22-1020
Large Bearing: P/N #32006X Brand appears to be KML. Seal #33-1003
Measurements: 1.178" inside, 2.163" outside, .510" outer race thickness.
Small Bearing: P/N #32005XR/26 Seal number #33-1001
Measurements: 1.020" inside, 1.848" outside, .450" outer race thickness.
No other numbers were present.
Just curious, are there any numbers/manufacturer's name stamped on the seals themselves?
Also, where did you buy them from?
I think I have most of the bearings interchanged to a premium Timken brand, although, I am having a little bit of trouble with the seals.
I will probably order a set, just to make sure.
-
Had noticed something the otherday looking at that picture, the chain. It gets loose when the rear unloads in a wheelie. I knew that it was getting loose as it climbed the rear teeth and jumped over. Rolled the teeth over and had to change the sprocket.
I wonder if you can fabricate a spring loaded chain idler to keep the chain from whipping around like that? :icon_think:
-
I've got their tapered steering head bearings in my XX and don't have a problem with them at all.. they've been there for almost 50k miles. HUGE improvement over the stockers.
Al, could you get something similar to those, too? I'd put them on the Cyclefarkle site and stock them.
Let me see what I can do.
Worse case scenario, I will order a set and send them to Timken or one of my other suppliers to match them up.
-
Let me have the part #s on the bearings, races and seals. I sell $millions in bearings annually in 3-4 brands and may be able to help.
-
Make sure you either remove the headlight assemblies off of the car, or, mask off any area near the lenses, just in case the drill/buffer gets away from you and damages the paint.
-
Thanks for the link. I just ordered a pair for my 2001. I left the old ones in my 1998 when I sold it. Less than half what I paid for the last pair, and half the size!
Why is everything about size with you?

Very cool cant wait to see the blue
It's not about the size........,
it's all about the intensity!

-
Does it still feel a little like Christmas even if you buy your own gifts?
Hmmmmm.............
Not exactly...............
But it does feel like the Fourth of July the first time you light them up at night!!
:icon_shocked:
Ride safe.
-
A couple questions:
1-Will these fit on my '98 XX (assuming I get the garden hose washer?)
2-So you just order 2 of these for the kit? So is the high beam and the low beam the same bulb?
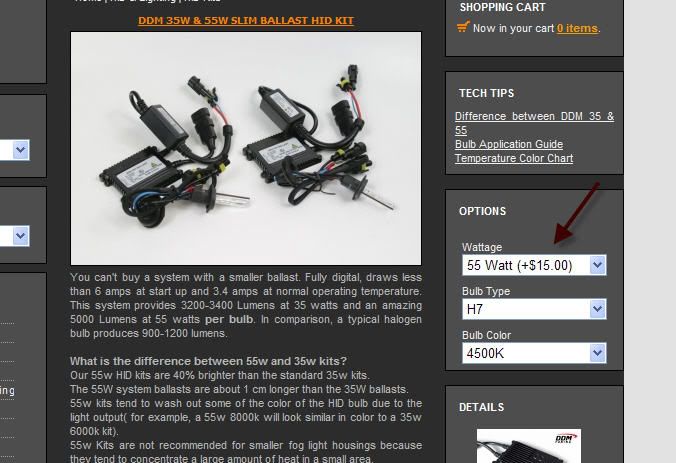
One of the choices on the site is for 2 assemblies...You then order the 55 watt ballasts (if desired) and choose your bulb color...Definitely will fit 97-98
I would not recommend you opt for bulbs with a color temp much higher than 4500K. According to DDM, the color of the light with a 55 watt ballast will be between 4000-4500K with a 4500 -5000K bulb. This is pretty close to optimal for best rider vision in the dark (actually, 3500 works quit well too). They won't be as bothersome to LEOs as well. Forget the 6000K and higher bulb temps if you really want to keep your visual acuity at night at it's optimum level.
-
They are the pillion pegs from my 04ST. They swap out with no mods. I can't give you a answer about factory exhaust but it looks like it could be close to my Yoshi slipon's, but that is just a guess.
Yeah that was all I really wanted/thought myself was your feelings on the clearance as from looking at your pics and pics of my bike they look like they might have clearance issues

These ones of Toynut sound promising
 Are they a readily available lowering bracket Toynut or are they hard to get hold of?
 They sound similar to the MC Larry ones in the pics in as far as his move the legs out as well as down and forward
They are available on line for about $80.00 IIRC. I installed a couple of short button head screws on the ends to allow me to dial in the peg angle a bit more precisely.
I have the package and the slip in my office and I will get the information up shortly (along with pics).
One point that I should mention, by positioning the passenger pegs outboard of the rider, they may become the outermost projection on the bike in case of a low side (other than the bars or side cases). I don't think that should be cause for alarm, but it needs to be noted.
-
I am in the process of installing some passenger peg extenders that might work a bit better than the standard peg lowering brackets.
These were originally designed for the Honda bikes but were adapted quickly by the FJR crowd. The difference is that they not only move the passenger pegs downward,but, they also relocate the pegs outward, too. This allows the passenger more room to get their knees around the riders lower back/waist/ass, and at the same time allow the rider the flexibility of riding on the balls of their feet without hitting the toes of the passenger boots. They also clear the majority of the slip on designs and keep the passenger from melting their boot heels on the exhaust.
I should be installing a slightly modified set on my bird shortly and will post the pics, ASAP. I have installed Kuryakyn adapters and replacement pegs on mine. You can fold them up two different ways.
They do not retain the ball detent feature and use a wave (spring) washer to keep the tension on the hinge points.
I would be happy to loan these to a board member with access to a CNC operator so as to be able to replicate them for the forum members while tweaking them to be a bit more XX specific and keep the ball detent mechanism feature.
-
im gonna have an hid bulb (replacement for an H7) to go with each of the two 35w ballasts too. got two new sets that just came in today, but im only swapping the ballasts for the brighter 55w & they come with the new hid bulbs.
the 35w ballasts will have about 1 hr on them & bulbs will be NIB
I spoke to one of the guys at DDM about their kits (I bought several from them). The 55 watt kit uses the same bulbs as the 35 watt kit.
That being the case, I take it you can upgrade by just swapping the ballasts. The light color will end up being somewhat higher up the Kelvin scale (appear whiter) as the stock bulbs will be overdriven (electrically speaking) by the 55 watt ballasts. Either way, the 55 watt kits are super bright! :icon_shocked:
-
Yeah, looking more and more like I'll be doing the seals. How old was/is his Bandit? Maybe it's a Suzuki thing.
It was an '02 model, the fluid used to go black so quickly, you could hardly see through the sight glass.
-
My brother-in-laws bandit used to do the same thing. I changed the seals on the bike, switched to teflon hoses, and used Wagner 5.1 brake fluid.
No more problems since.
BTW, I got him set back on the right track and picked up an '02 bird for him to ride instead of that Bandit.
Grinning ear to ear now!
-
Their 55 watt HID upgrade is very worthwhile if you are serious about melting the asphalt with your headlight. :icon_thumbsup:
-
+2
:icon_wave:
-
I used to be able to buy them from Bike Johnny, but I believe they are no longer in business.
-
Steve,
I have a fuel hose assembly coming your way as well. At the very least, it should help you test another possibility.
Make sure you install new washers and a fresh gasket.
-
I want a Deka battery for my '02 XX. The local Batteries Plus store has an X2 Xtreme battery that the salesmen says he's 90% sure is made by East Penn./Deka. Anyone know for sure?
The X2 Xtreme is a 12 AH 200 CCA version at about $85 after getting 10% off. If its the same as a Deka, I believe its 5/8" taller than the OEM battery and the Deka ETX12 10 AH 180 CCA battery. Overall dimensions of the Deka ETX14 are 5-7/8" X 3-7/16" X 5-3/4".
Thanks for your help!
I recently took on the Deka line in my warehouses. I will follow up on your question and post up tomorrow.
You can easily upgrade to the size 14 battery by simply removing the rubber spacers below the factory battery. It is an easy and cheap upgrade.
This is the battery that you want and it is made in the USA:
-
Can you adjust it on the fly or do you have to use a tool? I was also wondering what the speed rating is for this screen if there even is one?
MRA is a German company, IIRC. Their products are tested to a much higher safety spec then hours and since the consequences of a high speed detachment can be fatal for the rider.
-
Can't afford the gun, how much for the tire in the background?
I couldn't afford the ammo at about $5.00 per bang but if I had Dave's money, I would be all over it, fun, fun, fun.
You can reload 50 BMG for about a buck and change/round using pulled bullets and around $3 and change for reloads using premium match bullets.
You generally do not sit and blast 10 boxes of rounds at a sitting, (all things being relative).
My 500 Linebaugh pistol/rifles and some of my other large bore rifles will run $2-4/round with factory ammo. Handloads with premium components will run 50-75% of the cost of factory rounds.
Grip Adhesive?
in The Garage
Posted
You don't really to slather on much if any adhesive to get the job done (if at all).
I would recommend you install a piece of heat shrink tubing on the clutch side bar underneath the heating element, otherwise the heat generated by the element will end up migrating to the clip on and the two bars will be two different temperatures. You can also clean the mold release agent from inside the grips to maximize their grip. Finally, a light coating of hair spray or spray trim adhesive is all you need if you want to use something to add a bit more stick to the job (probably not necessary). The only caveat is to install the grips quickly in their final position as you won't have much time to do it right before the adhesive sets up.