

jblackbird2000
-
Posts
851 -
Joined
-
Last visited
Content Type
Profiles
Forums
Gallery
Events
Everything posted by jblackbird2000
-
Well, one solution I've hacked together is to use the longer frankenbolt from the rear of the cowl to attach the rack at the forward mounting point. The collar spacer fits fine, and the threads seem like they have plenty of grip. Am I doing this right? WTF are the shorter bolts for? i'm so confused. :icon_wall:
-
Ok, this is a stupid question I'm sure. I bought the rack used, therefore no instructions. Here's what I've got to work with. 4 collars of the thin light weight variety 4 collars of the thicker variety 2 allen bolts of 3" 2 allen bolts of 1 5/8'. I am assuming the 3" bolts go in the back with no collar. no problem there. The problem I'm having is the 1 5/8 bolts aren't long enough to engage the threads in the front if I use the collar. If I don't use the collar, the rack will be touching the cowl, and I know that's not right. All collars, both thin and thick are 3/4" in length. WTF am i missing???
-
I'm glad it panned out for you. Hope you're getting a good deal!
-
I was in the same boat as you, didn't want to spend a lot, and no one had a set here when I was looking. So someone gave me this advice, so I'm passing it along to you, cause it worked. Go here ->http://www.vfrdiscussion.com/forum/index.php? Post up that you're looking for a stocker set of bars, cause those guys get raised bars for theirs as well. I was able to pick up a set for $40-$50 I believe. They were brand new. Good luck!!! Jay
-
There's a ga-zillion threads on this. Infact, there's one on this page, called "Dead Bird". In that thread, someone posted a link to the diagonostic procedures for the electrial system. Follow those instructions, and if you have any specific questions let us know. There's also lotsa goodies to dowload in the useful threads section that can help with all kinds of things. I just went through a similar issue, so I feel your pain. Good luck Jay edited to add link http://www.cbr1100xx.org/forums/index.php?showtopic=48209
-
Let me preface this by saying I'm by no means an expert on the topic, but I think what Phillip is talking about is the "back flow" of current through the terminals. I read about this when I was doing my electrical, and found out a dioed acts as a one way valve to ensure that the current dosen't start flowing the wrong way, which could potentially blow up your farkles. The back flow of current can happen when the relay is turned off, the instant the contacts open. I did install one. It was pretty easy, I soilder all my connections anyway, and the thin wire of the dioed was easy to incorporate into the connection with my lead wires. Nice work btw Duane, really clean looking. Jay
-
Excellent, thanks for the reply Mike. I was just concerned that I had a few extra wires than I had previously seen posted, and wanted to make sure I wasn't going down a road with the R1 R/R that couldn't be navigated. Based on your reply, it sounds like I too can switch to the R1 Jay
-
Ah. I guess it would be helpful to read into the 2nd and 3rd pages. So I guess I need the same one you're getting. Cool, thanks. I have no idea, but my guess would probably be yes. I'm still trying to get my head around all of this. Jay EDITED TO ADD: Upon further scrutiny, I still don't see all 8 wires like I have in any of the pics in the R/R harness for sale section, but I have a PM into Mike now. You have two green, two red/white and one black wire too? I only see spots for 6 pins in the connector. :icon_think:
-
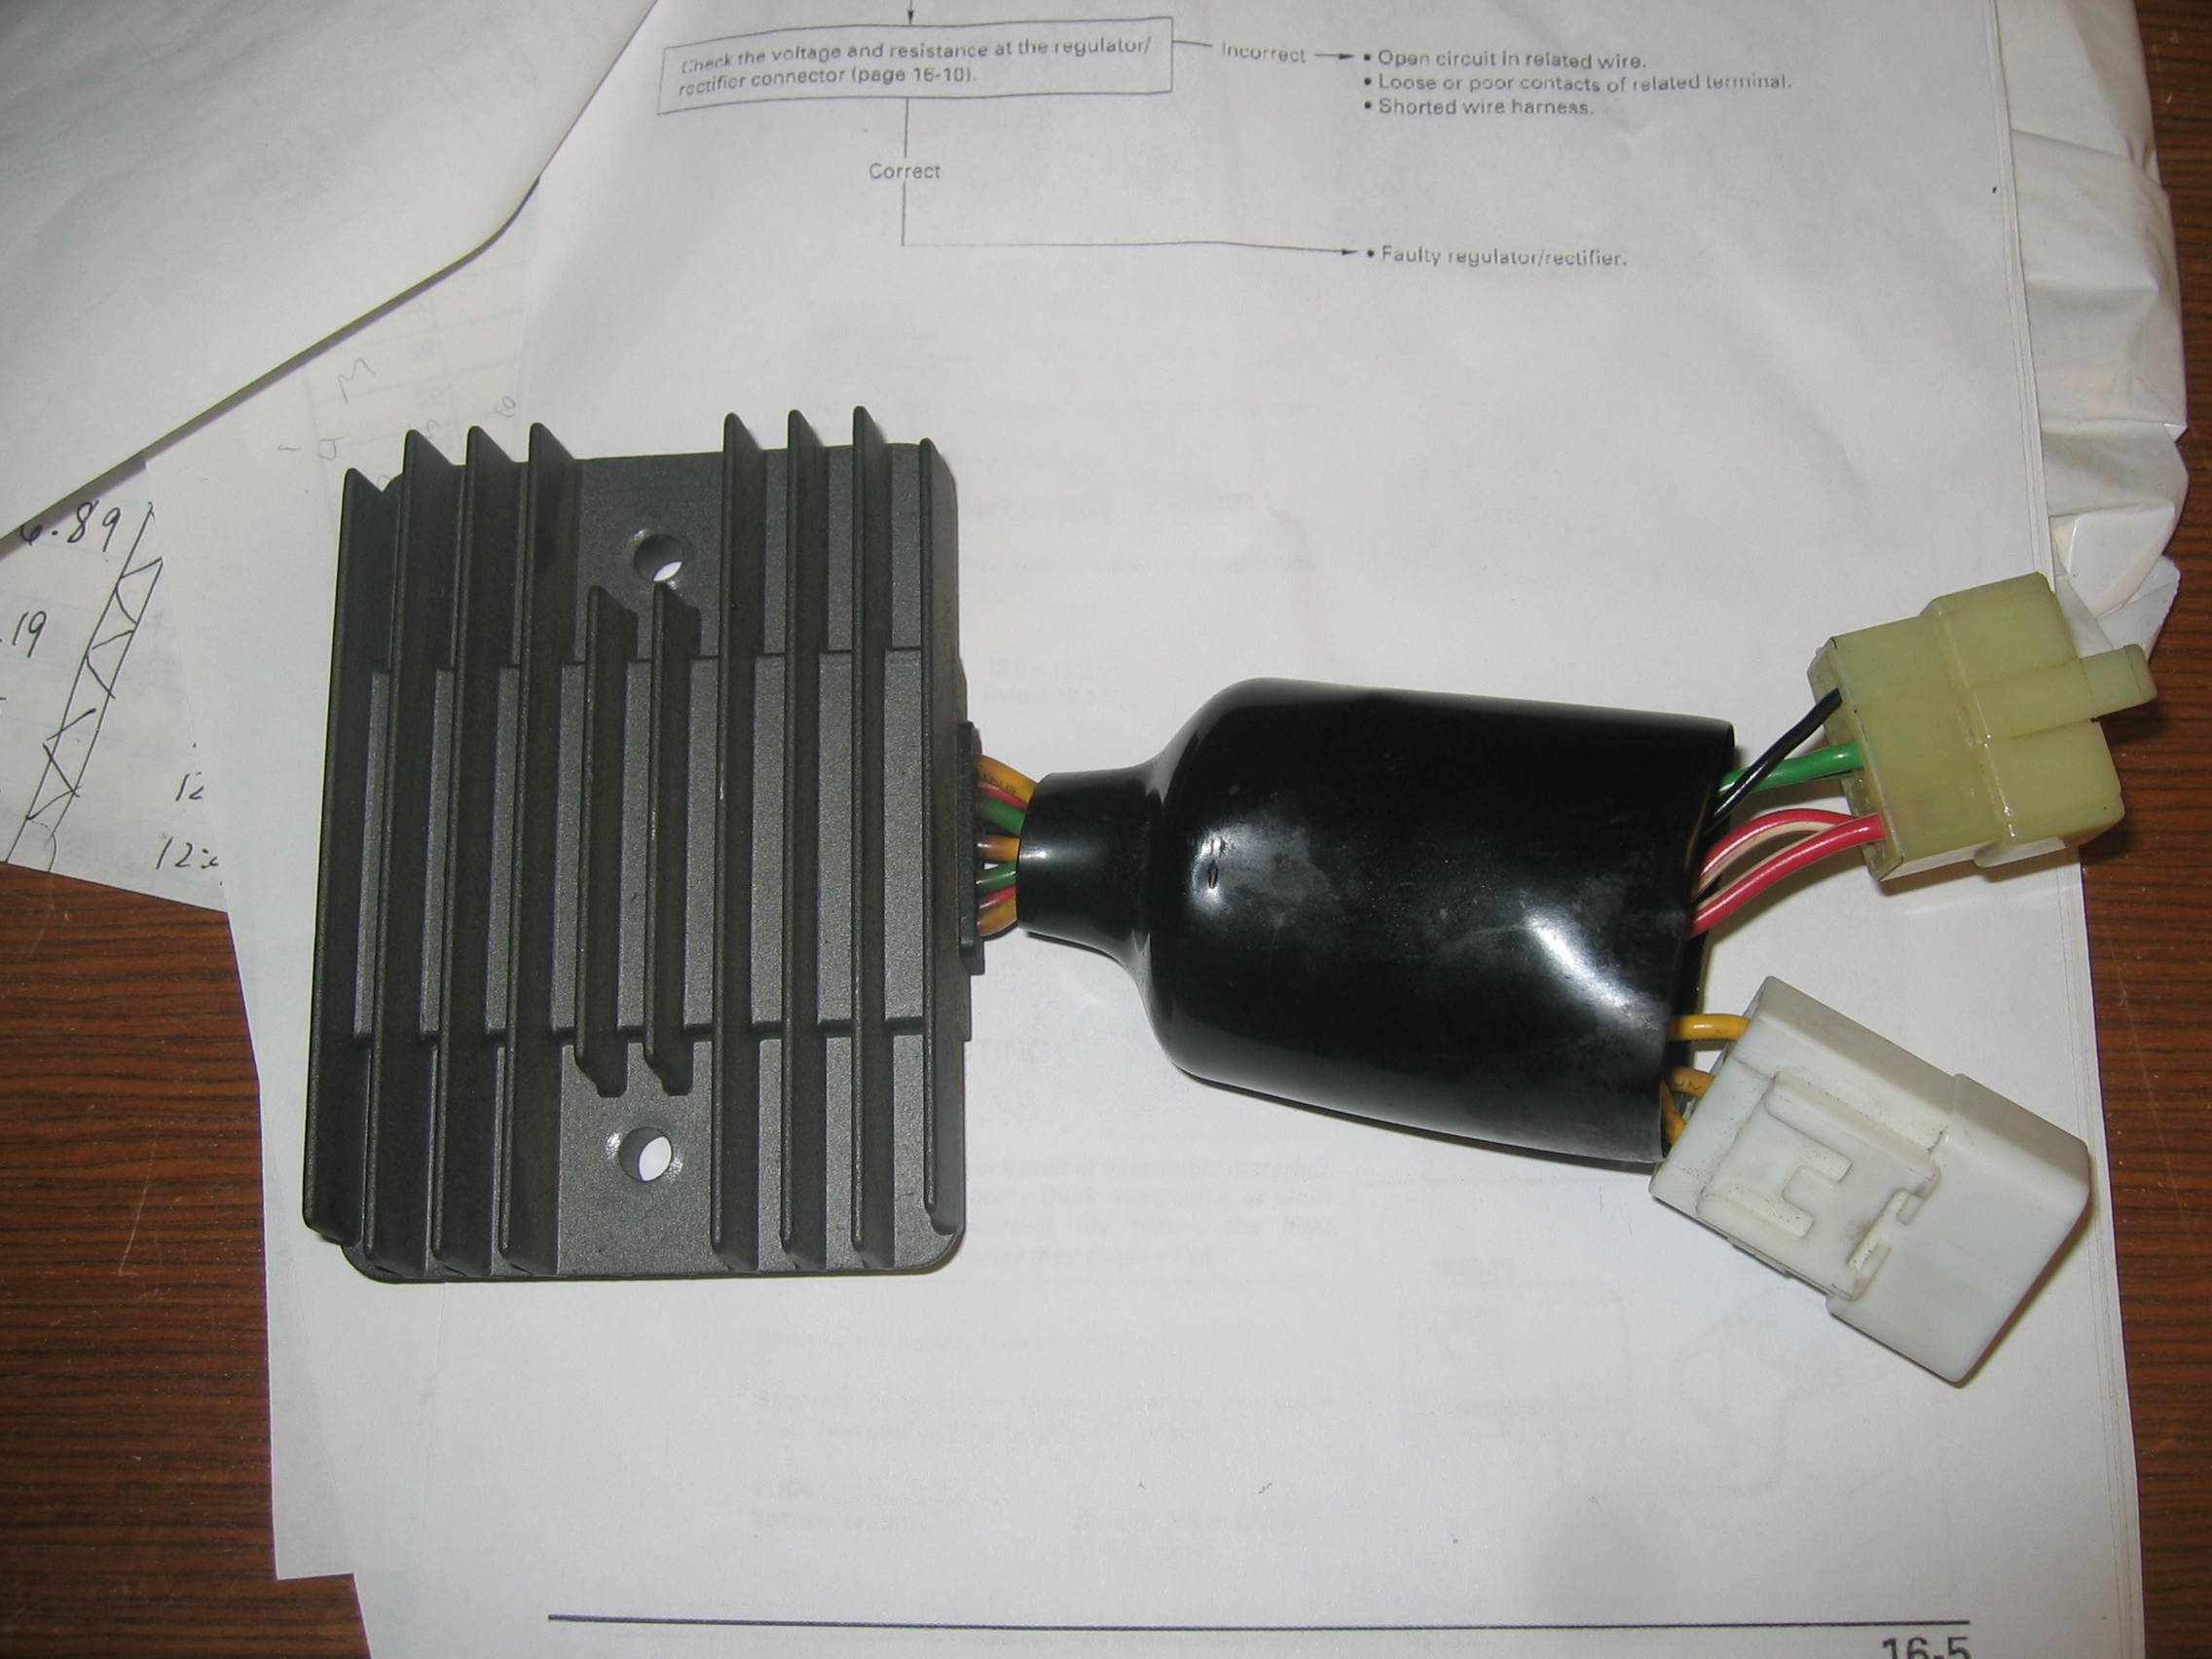
Ok, so I'm back with more charging issues. I've finally had enough, and I'm going to be replacing my R/R. But as you can see from the pic, it's not the standard R/R that some 99/00 birds have, that's why I was so hesitant to replace it. But finally, I'm not getting any charge to the battery, even though the Stator is putting out about 50VAC at 5K rpm. Ok, so take a look at this R/R and tell me I'm not crazy. Everybody else that's posted pics only has one plug, why does mine have two? And more importantly, if I were to go get the 99 R1 R/R and the pigtail from Mike (bartonmd), how the hell would I tell him to wire it? Is that even an option for me? Jay
-
POS Honda. SELL IT!!
-
Smart Man! Good troubleshooting. On both suggestions actually. I jumped it, and it does seem to be the clock or the dash that's drawing the 10amps. Thanks for the sugggestion, that's a HUGE relief that I don't have to replace the entire wireharness. I'm going to dig a little more, then put her back together. I think this is a project that can wait till winter...hopefully So want to help me with your first suggestion and head to Ephrata tomorrow???
-
Checked the path between the fuse block and the clock wire(I think) and got a 0. Checking the resistance between the fuse block and the R/R, it read somewhere like 20. But then when I attached the ground cable and re-measured, the neddle flew off the meter. WTF? Ok, here's where I'm at currently. I've narrowed it down to the red wire going into the wire harness that plugs into the left side of the back of the dash. The clock wire. I can't seem to find this harness represented in the schematic however. The harness that I'm referring to is white in color on my bike, and only has 9 wires in it. The harness on the schematic has something like 15 wires drawn. And my wire colors don't match the schematic. However, it seems to disable the Tach, Fuel gauge, etc, exactly what the schematic shows it connects to. Anyway, I've disconnected only the right most wire, which is Red/Green with gray dots. Now my clock dosen't work, but my fuel gauge and tach work fine. And most importantly, it's not leaking anymore. So here's my questions. What else isn't working that's not obvious from looking at my dash? Is this definately my wire harness? If I install a new wire harness, it should fix this issue, correct? Thanks guys! Jay
-
OK, update on the issue. The loom looked great, not one speck of dirt, corrosion or signs of water. I tested the leak again with the loom apart, and it had no effect, still leaking 10amps. I also disconnected the R/R, and still leaking 10amps. The only way to stop it from leaking is pulling the clock fuse. I really, REALLY don't want to replace the entire wiring harness, that job would kill way too much of my time. I am going to pull the dash next, and see if there's some visible crud around the clock, wires or circuit board. Any other suggestions?
-
So I have some electrical gremlins again. Following the trusty chart, I get to stop at the leak test. 10 AMPS! :icon_shocked: I've got a 2000, and never did the wire loom cleanout. Guess it's time for that. Anyone got any other ideas I might want to consider? Jay
-
I don't know...do I have to have a Goldwing? Ahhhh...sorry missed your thread Dave. I've been not too active as of late, trying to catch up on the goings on here.
-
Damn Ben, good post!! Pretty cool piece of software there. Most comprehensive vehicle log software I've ever seen. Did you know that you were mentioned on the dude's site? (or someone from here anyway) Jay
-

Battery trickle charger / charger recommendations.
jblackbird2000 replied to Texhoss's topic in The Garage
I'm not sure, but I would check more closely with the charger you're talking about. 2 amp hr/10 amp hr? Our batterys are 10amp hour batteries, so setting your charger for 2amp hour for 2 hours might not do too much. I'm not sure about this however. And yes, a trickle charger is the way to go. Just "set it and forget it". Even harbor freight has a cheap one if you don't want to spring for the Battery Tender. However, I've never used it so this is not a recommendation. http://www.harborfreight.com/cpi/ctaf/disp...temnumber=42292 I agree with you in theory. The clock should pull .02mA, and with the 10amp hour battery, it "should" be good for months. But you can do the math if you want. However, I've never had such great luck with this practice. I believe the honda manual says to charge it ever 2 weeks so sulfer dosen't build up in the battery. I don't claim to understand the why's and how's of this, but I've killed a few batteries by letting it sit off a trickle charger for months and as a direct result, killed my stator too. Much more expensive and time consuming to change that, believe me!! Jay -
:icon_clap: :icon_clap: :icon_clap: :icon_clap: :icon_clap: Nice work getting this GB together! I have been traveling a lot recently, and just now noticed this. I've already placed my order, can't wait to get it installed. Jay
-
Approximately 2 years ago, I purchased a pair of er-6 earphones, and about 9 months later, the left earphone became very hard to hear. I attributed it to a partially broken wire since I mainly use them for riding, and those conditions can be pretty tough sometime. I cleaned the inside of the speaker the best I could, but to no avail. I simply upgraded to a new pair of er-6i earphones, and have been using them ever since. They've been great. However, I decided last week I would call Etymotic, and see if my original er-6 earphones could be repaired. I called their toll free customer service number, and spoke to a very helpful woman. She simply asked me how long ago I purchased them, and I told her somewhere around a year ago. She told me to send them back in a small box, and gave me a RMA (Return Authorization Number). She informed me that they might be fixed for free, but if they were too badly damaged, then I would have the option of buying a brand new set for only $60.00. (1/2 price of their MSRP) I just recieved a brand new pair (they appear brand new anyway) of er-6 earphones in the mail. I couldn't have been happier with this outcome obviously. The moral of the story - Don't throw away those old sets of etymotics! Jay
-
Ok, I'll bite. What are we sorry for? Jay
-
Thanks for the replies folks. I like both the seat method and the rear cowl spot. I'll play around with both of those and see what works best for me. Ray(milehi)- Where do you tuck the cord in when not in use? And Damn mrdap! Very nice setup! Thanks for posting the pics. Jay
-
So after my last bout of electrical problems, I've decided that I should start using my battery tender more regularly, especially with the colder weather coming up. But because I'm lazy, I hate taking my seat off and using the clips on my battery terminals. I would like to start using that fused wire that comes ready to install on the terminals. However, I can't seem to find a good spot to route the wire so it's convenient and out of the way. Here's a pic of the wire that I'm talking about. It's the one in the foreground of the pic. Where to put the thing? Anyone have any good suggestion? Thanks, Jay
-
Well, it works. I just got finished cleaning up from this job. I've tested everything I can possibly think of, and this mod works. Brief Summary: With Bike Running or key "on" postion. Euro Switch far left: All lights normal Euro Switch middle: Head light off Euro Switch far right : Head light on, emergency blinkers on With bike off. Euro Switch far left: No effect Euro Switch middle: No effect Euro Switch far right : Emergency blinkers on. I'm not an electrical engineer type, my father-in law is however, and he taught me how to draw this circuit diagram thingy up, and I transfered it to excel so I could read it, and post it here. If anyone is interested in a brief english translation of what that diagram is I posted, let me know, and I'll be happy to try to explain. Jay
-
Battery, R/R, or Stator? Final Update after repair
jblackbird2000 replied to Keith's topic in The Garage
Thanks for the update Keith. I was having similar problems with my bike shortly after you initially posted this thread, and have been watching it as you went through your diagonistics. I ended up with a bad Stator as well, and just got mine in last night. I powered it up, and I too am good, I'm getting ~14.4 now. I didn't replace my R/R though, I sure hope I don't have to. I guess we'll see. When you say the windings of your stator still have the same readings as your old, do you mean the .2 ohm resistance? or you're getting voltages out of them that are unequal and less than 50V? I haven't gone through the entire trouble shooting guide yet with mine, I'm hopefully going to get to that today sometime. Jay -
Search is our friend. Try it sometime! Yes. 2002-2006 VTech VFR bars will fit any year bird. Here's a GREAT thread, way old, but great pics and explainations. http://www.cbr1100xx.org/forums/index.php?...pic=347&hl= It's an easy mod, and should only take an hour or so. Some guys pay upward of $130, others only pay 25-50. It all depends on if you find a motivated seller. Good luck! Jay