

ironmike
-
Posts
2,050 -
Joined
-
Days Won
3
Content Type
Profiles
Forums
Gallery
Events
Posts posted by ironmike
-
-
The thing that gets me is that if we tie the exhaust into the system and it pulls air through the air box and crankcase and into the exhaust flow,,,,,we have excess oxygen in the system that the o2 sensor sees and we think it is lean.
That reminds me of an old hot-rodding trick that some savvy folks still use, if you don't use an O2 sensor... Plumbing the crankcase vent(s) into the exhaust headers, typically 14-18" inches from the ex port face, had a significant scavenging effect via staggered exhaust pulses and maintained a low pressure state in the cases; sometimes a PCV valve was used too - it was even legal in some racing venues... 'don't know if it still is though...
-
If you can make a 2.25" shield work for you, they can be found in any cruiser-oriented aftermarket catalog in many different lengths. Of course, they're all mild steel and usually chromed (rattle can to the rescue..?) but the cost is very reasonable...
-
Yes, but you need an alternate stop. J's centerstand stops were modeled after Chris' (northman), which I think was included with the system.
Regardless, the system will clear the centerstand, which I believe is your main question.
Yep... Thanks Redbird...
-
I can never remember... CRS..?

Does this system allow the retention of the center stand?
-
So there is a 1.8 inch drop from moving the plates. That's a lot. I don't think that you could drop the front by using the triple that much without things hitting.
I agree. Although I have not personally tested it, I understand the maximum the forks can be raised in the trees (thus lowering the front end) and still have sufficient suspension travel clearance is 1"/25.4mm. Of course, the condition of the fork internals will have varying effects on actual suspension travel... (4.3"/10.922cm/109.22mm per factory specs).
-
A number of questions have come up about lowering the Blackbird, but as far as I know the actual (typical) measurements have not been recorded and made available to our members; the following is in reference to lowering the rear only.
The factory seat height is 31.9"/81.026cm/810.26mm...
Rotating the linkage plates (120* clockwise, viewed from sidestand/left side) reduces seat height to 30.125"/76.5175cm/765.175mm...
Use of an aftermarket lowering link (i.e., Pro-Tek, @4.75"/12.065cm/120.65mm, center/center first hole*) without plates rotated reduces seat height to 30.0"/76.2cm/762mm...
*(Second hole @ 5.75"/14.605cm/146.05mm, c/c, is not recommended for XX application, as it gives a drop of 3.0"/7.62cm/76.2mm and will likely have clearance issues on a street bike).
Measurements taken on stock '99 XX with no other suspension alterations; free sag was static/consistent.
Combining the rotated plates with the Pro-Tek lowering link would likely yield a drop of almost 3.7" (No, I didn't try it...), an application that might only be reasonable on the drag strip...
-
-
If the fuse is OK... I'd sure be suspicious of the grounding (the other end of the ground cable - since you've already checked the battery end) and/or the integrity of the negative cable itself...
-
Your speedo healer will need to be reset now that the final gear ratio has changed. Remember the speedometer reading comes from the countershaft of the transmission, and if you change the sprockets, it doesn't know anything about it.
+1
Borrow a GPS unit to calibrate the speedo-healer... You might be surprised how close the factory speedo is with the 18T front sprocket...
-
OK, how about a mildly serious response..?
Lowering the rear via a link without lowering the forks will incrementally alter the trail, modestly enhance high speed stability, and slow turn-in a bit. If the forks are moved up through the "triple-trees" a proportionate amount, thus "lowering the front/neck" so everything is "OEM level", the trail remains as stock - but suspension travel and subsequent interference with the front fender can become an issue. There's not as much "grace space" in lowering the front as many folks think - the suspension travel of the stock forks uses almost all of what's typically available... sometimes even the addition of a fork brace presents interference problems. Consequently, lowering the front by raising the forks is possible, but not generally recommended.
Rear lowering links are typically of three types: Fully adjustable (threaded rod/locknut type), Single-Drop (one position hole), and Double-Drop (two position holes). The fully adjustable type offers the broadest range of lower ride heights, but the onus is on the owner/rider know what they're doing... (Note: a well seasoned, experienced member of this board has recently had a bad experience with a link of this type - threaded rod failure/breakage). The Single-Drop type only offer a single, albeit lower, ride height (typically .75" to 1.5"). Lastly, the Double-Drop type offers two lowered heights settings, typically 1" and 3" (Note: the 3" setting is NOT recommended for XX models -all years- as it will cause rear fender interference; the 1" setting usually presents no issues).
It is also worth noting that lowering links are usually longer in length than OEM links; this changes the mechanical advantage relationship of the swingarm and spring/shock assembly... In short, it makes the spring/shock assembly feel like a heavier duty version (stiffer) of the OEM assembly and slightly diminishes the overall range of rear suspension travel. Of course, some folks like that... OTOH, some like to increase the ride height by adding shims to the top of the shock mount (typically 6mm or about .25") which decreases trail and quickens turn-in a bit... to each his own.
IMHO, the 'Bird is a GT, not a canyon-carver. There are better tools for different jobs. What is important is that you fit
your bike to your riding style and tastes - if lowering it works for you, go for it... After all it's not like you can't change your mind and put it all back the way it was... now is it?
-
Well Done! That'll work for almost any I-4... Print tip - use "landscape" rather than "portrait"

-
An old toothbrush with relatively stiff plastic bristles and some hot soapy water will do a pretty good job (with the radiator still on the bike). Just remember to use vertical strokes so as not to bend the fins... a wooden toothpick can be of assistance with the real grungy lumps (and can help straighten bent fins - just be gentle).
-
Red Lock-Tite is not truely permanent; it will degrade and release with the judicious application of significant heat... but be very careful...

-
Don't sweat the small shit, Barry.... Trial and error is the way most self-taught mechanics learn. The trick is to learn from the foul-up - never make the same mistake twice...

-
You might want to check some other things before your done working on your bike Barry!!
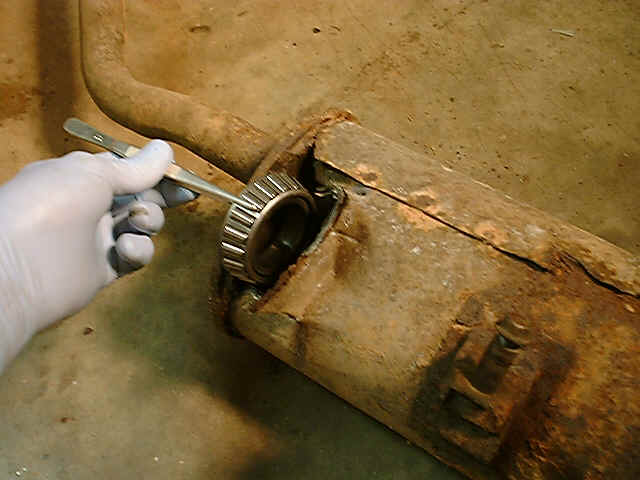
It is a sad, sad thing that not enough attention is paid to the critical muffler bearing... such non-chalant complacency has been the source of frustating mechanical heartache for untold generations... But you can make the difference... Send your donations (cash preferred) to the Mechanics Anonymous Muffler Bearing Organization (MAMBO) through your local FreePlumbers Lodge - they'll see to it that your contribution is used wisely... Don't wait another minute - don't let another forelorn muffler bearing slip into race failure oblivion. :icon_hand:
A muffler bearing is a terrible thing to waste. :icon_nono:
-
I use a Dowco (C-50, Protector II, Sport/Custom) heavyweight cotton cover. It's not waterproof, but it breathes and doesn't promote condensation so it's fine for garage storage. JC Whitney & Co. carry them for $54.99 (part no. CAC014423). There are larger sizes as well, and the prices go up about $5 per size.
-
Yeah, I'd recommend it... I understand he'll put out the word on Monday, Nov. 20th...
-
Kevin, you really need to talk with Warchild... He has a group buy on suspension components in the works that's about to get underway.... not to mention that Dale is very well versed in the suspension logisitics relative to your inquiry... :icon_think:
-
I'll bet you meant to say that your "plug" - not your "piston" had come out...
I'd speculate that you could do a Heli-Coil repair... of course that would entail removing the head to do it right. If you want to chance it, without removing the head, there is an old trick... (screw up any part of it and you'll have to remove the head anyway).
Remove all spark plugs... remove key.... and/or disconnect battery (at least that'll eliminate any chance of an electrical snafu...)
Bring the affeced cylinder's piston to TDC (or slightly before), saturate a round cotton patch (slightly larger diameter than the piston) with a good quality grease. Insert the patch through the buggered hole and use thin bent wires (i.e., coat hanger) to smooth it out on the piston (a bore light and a length of fiber optic will come in handy to assess your work). Tap the appropriate new threads for the Heli-coil; the chips will fall onto the patch and adhere to the grease. You can try to press the chips into the grease a bit if you like with your wire tool, so they'll stick better. Here's the tricky part - using your custom wire tool(s) try to fold the edges of the patch over to the center, the grease will stick to itself... 3-4 opposing folds ought to do it. Now the trick is to remove the folded patch without dumping the chips back into the cylinder - a simple spring-clawed pick up tool works well... although it can be done with some deft manipulation of the wire tools. Install the Heli-coil per instructions. As double-check and a follow-up, take a shop vac and some fuel line (won't collapse under strong vacuum); use duct tape to connect the vac hose to the fuel line (be generous with the tape - it has to seal). Stick the fuel line into the cylinder and activate the vacuum - it should suck up any chips you may have missed with the patch. Rotate the motor just enough to drop the piston in the bore and inspect with the bore light & fiber optic... repeat vacuum trick as necessary. Re-install plugs, tank, etc... and test.
-
TORX
in The Garage
Dave, airborneXX gave you the right answers...
SAE means Society of (American) Automotive Engineers... all tool measurements are in inches or portions thereof...
Obviously metric is... y'know... milimeters, centimeters, meters, etc...
Torx is a copyrighted brand name fo a "security fastener" finding increasing use in the automotive genre...
Anybody who told you that a 6-point box-end wrench is the definition of SAE... well, let's just say you could do better to find an information source. Sales personnel don't always know what they're selling.
For a real explanation, and a free (downloadable) conversion program, visit www.joshmadison.com - it rocks!
-
Here's an old trick...
Remove plastic... thoroughly clean and dry all suspect areas... liberally dust suspect areas with fine white powder (talcum, baby powder, etc.)... start engine and bring to normal operating temp... If your leak/seepage is in a pressurized area it will be readily apparent while running (at normal operating temps); if in a non-presurized area, it will more likely become apparent after the motor is shut down and is in the "cooling off" phase... The fine white powder provides distinct contrast and easily identifies the path and source of any leaks/seepage.
Of course, it makes a bit of a mess... but you knew that already...
-
yes, I think that current DOT law states that all new vehicles must have some sort of daytime running lamp. Some use the indicator lamps, some use high beams at 1/2 voltage, some use dedicated lamps.
It's not a US law or DOT requirement; it's up to the manufacurer. GM & associated manufacturers' products have daylight running lights, but most others do not.
-
This is beginning to sound like a very pragmatic mod... Does the increase of one tooth on the front sprocket have any impact on the required chain length/link count..?
:icon_think:
-
I think that's a home-made tool... maybe...
If the tubing is the same size as your vent lines, I'd speculate that a tech made it as a temporary plug when troubleshooting the vent line system. The plug would be installed on any of the male fittings and the corresponding vent line could be connected to a vacuum gauge. Readings would be taken and recorded from each seperate line; significant discrepancies would indicate and identify any compromised/leaking lines.
If it's the size of your fuel line... a temporary plug for tank removal..?
A tech probably lost or forgot it...
:icon_think:
Would you sit on sheepskin?
in The Garage
Posted
Oh yeah, sheepskin (wool) works surprisingly well... warm in the winter and cooler in the summer (I know that sounds counterintuitive, but it works - the air circulation is the key). The beads work well too although you'll gain a modicum of seat height... and some folks don't care for the sense of multiple "pressure points"... (I just don't care for the "look").