

oldslowguy
-
Posts
114 -
Joined
-
Last visited
-
I suspect that whoever assembled your kit stuffed the spade terminals through the grommet simply to keep things together. That pair of wires should definitely be pulled out of the grommet. I placed the washers behind the lamps. At the time, I did it that way simply because the lamps were already in the housing. But now that I think about it, it seems possible that the light might not be quite as well focused if the lamp is moved back by the thickness of the washers.
-
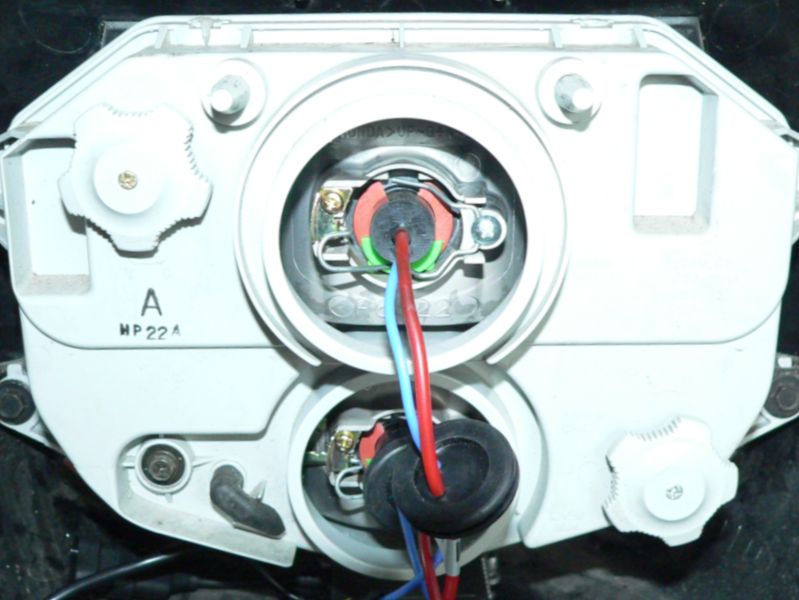
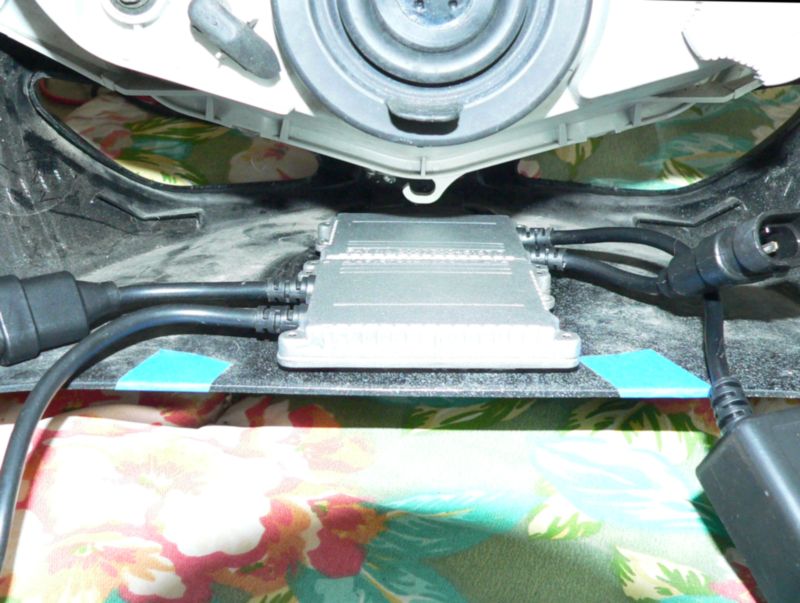
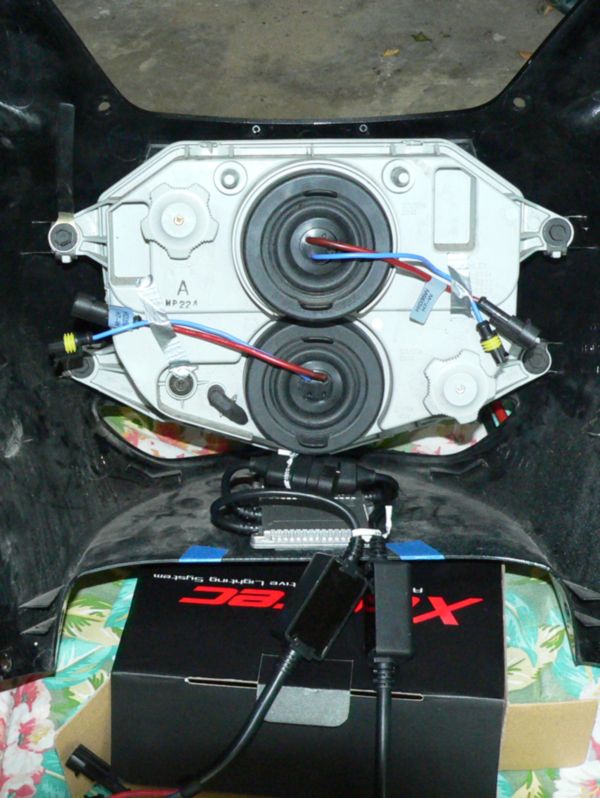
Perhaps this isn't too useful, but here are pix of a Xentec setup. I did use the garden hose washer scheme. In fact, two were required for each headlamp. The wire grommets fit nicely into the boots. At least they did for me. The ballasts are fastened to the fairing with "Industrial Strength" Velcro. Were I doing this over again, the ballasts would be aligned with the edge of the fairing, not a half inch away. That would make the connectors at the ends of the shorter cables more accessible. What you're looking at was taken right after my first attempt at reinstalling the upper fairing. I was working by myself, and quickly discovered that I needed at least four hands to keep wires and cables organized. So duct tape and twist ties were required. Things worth doing or remembering: 1. Take a moment to put the bike on its centerstand around 15 feet from a wall. Turn on the headlight and use masking tape or something similar to mark the top edge of the low beam on the wall. If there's a visible bright spot indicating the center of the low beam in the horizontal direction, mark that too. If you'll be moving the bike to work on it, then mark the location of the centerstand with tape before you move it. Once your HIDs are working, you can easily align the headlight by using your tape reference marks. Looking at the back of the headlamp housing, the upper left knob is for vertical adjustment. You'll need a long arm and a little patience. 2. Presumably you'll reinstall the fairing before making the final connections. You can give yourself additional maneuvering room by placing the rearmost of each pair of fairing holes over the frontmost of the two bosses into which the mirror mounting screws thread. I completed all the wiring with the fairing in this forward position. Once both lights were working satisfactorily, I moved the fairing to its proper position. The very last step was to mount the two transformers (the small black boxes on the longer cables) to the air intake ducts. Once again, Velcro was used.

-
If you're lazy like me, you might try screwing a high wattage halogen lamp (like this: 90W halogen) into that fixture. Also, Home Dee Pot sells a metal halogen fixture for about $10 that takes up to a 150 watt tubular halogen lamp. It can be angled so you can direct the light where it'll do the most good. (For what it's worth: there isn't a tungsten lamp left in our hacienda. Everything is either halogen or CFL. I can't remember the last time I changed a light bulb.)
-
Perfect. I may have to sacrifice a sunny day to make this upgrade, instead of waitng 'til it rains.
-
A question has arisen. Do warmed up HID headlamps dim at the same lethargic pace that they brighten when they're cold? My plan is to install HID lamps for both the low and high beam, then (knowing it'll take many seconds for the high beam to warm up) simply use the starter button to blink the low beam.
-
Thanks, gentlemen. This should make a good rainy day project.
-
I picked up an HID headlight kit on eBay a couple of weeks ago. The aluminum ballast housing is obviously intended to serve as a heat sink. So the thing must get hot. My question is "How hot?" Are we talking warm to the touch, you can fry an egg on it, or thermonuclear? I'm asking because the current plan is to mount the ballasts on the bottom of the upper fairing with some 3M Dual Lock material. But if ballasts heat up much over 200 F, then it's time for Plan B.
-
Roadgear deserves an accolade. Here's the e-mail I sent their customer service on the 12th of this month. "Greetings. In early June, I purchased your Hi-Adventure Sport Saddle Bags, which served admirably on a 2000-mile trip. But three-quarters of the way through that trip, a low speed oops resulted in damage to the left side bag. I was about to pitch the whole outfit in the trash when I discovered that the damaged bag can be separated from the central harness. So my question is whether I can buy a replacement for the damaged piece? Thanks." After I sent the note, I realized I had failed to mention that I had trashed the bag only two weeks after I bought the set. Anyway, here's the response, received yesterday. "Thanks for checking with us. Regret we do not carry the bags separately. As a courtesy we would like to offer you a brand new set for material cost. We can discount a new set for 50% off the retail cost. If you would like to place an order you can order online and put the discount quote in the special instructions field. You can also call us direct at 800-854-4327. Customer care is in the office from 8-5 MST Mon-Fri. Feel free to contact us if we can further assist you. Have a great day." That's a class act, as far I'm concerned. The big problem now is that I'll feel as if I'm stealing from them if I take advantage of their offer. It wasn't their fault I dropped the bike. Those are darned good saddlebags, too. They're not as stylish as some, but they're just about indestructible, assuming you don't use them to polish the pavement. The nylon on mine was a bit frayed and dirty after it slid down the road, but the material was quite intact otherwise. That bag was stuffed so full of laundry that it actually prevented the left muffler from contacting the pavement when I goofed.
-
Here's a contrary viewpoint. Sportbike Track Gear? Feh! Brrrrap! On 26 August, I ordered a pair of Pilot Road 2s via their website. A couple of days later, I checked the order on the website and its status was "shipped". Great! Since Labor Day would hold things up, I expected the tires on Thursday, 4 September. But Thursday rolled around, and--no tires. I called my wife from NeXXT Friday night. No tires. Nor did they arrive on Monday. I called STG late that day , and was told "we expect the truck Tuesday or Wednesday. and we'll ship your tires out right away." I asked the obvious question. "Why does the order status say 'shipped' if you haven't sent anything ?" The response? "'Shipped' doesn't mean 'shipped'. It means 'processed'." Oh. Of course. How silly of me not to have realized. Which brings us to this aftenroon. I'm still, uh, tireless, so I called STG again. This time, the weasel who answered the 'phone (I believe it was the same weasel who misled me last week) went away for two or three minutes, then returned to inform me that "the front tire is on backorder until the 26th." When I asked why he didn't tell me that last week, it grew quite quiet. Another thing: STG dinged my Visa card for the $305 cost of the tires on 30 August--despite the fact that they had no intention of shipping anything for quite some time. So forget about a thumbs up. It's another digit entirely.
-
You've sparked a thought. I have a Fuji HVLP outfit, to date used mostly for painting garden furniture. With the current setup, it'll blow latex paint (Rustoleum and such) if I cut the paint about 30% with water and Floetrol. Perhaps the right air cap and needle would allow me to spray automotive enamel, if it's cut with lots of lacquer thinner--or whatever the correct solvent is. I even have a bruised front fender to practice on.
-
Oh, I agree about the cost of a respray. But no one hereabouts seems to have purchased one of these eBay sets, so the quality of the plastic and the paint is a mystery. And I'll point out that not one of these Far East fairings appears to include mirror cowls. The new paint job is chiefly driven by the fact that I want a non-OEM color. I'm leaning toward Ferrari red with gold rims. I'm a traditionalist.
-
I just noticed that I haven't asked an ignorant question in at least three weeks. That's not good. A couple of, uh, incidents have resulted in a 'Bird that could really use some fresh paint. After the most recent one, I solved the immediate problem by having a local collision shop repair and respray the upper fairing and the left lower. They did a nice job, I'll admit; the new paint matches the old perfectly. But it cost $500 plus tax to fill less than a square foot of abraded ABS, sand it, then paint and clearcoat the two pieces. I winced when I paid the collision shop. But conversations with a couple of people at NeXXT persuaded me that I may have to be prepared to bid quite high for a complete paint job. My question is how high? At the $1000 level, I'm interested. But by the time the number reaches $2000, apathy sets in. So would any of you care to admit how much you paid to have your XX repainted, why it cost so much or so little, how happy you are with the result, and what you'll do differently if you have it painted again?
-

2003 cbr1100xx CDI needed
oldslowguy replied to d00769's topic in The Sales Floor -- For Sale/Wanted
If you're out west, you might try Cycle Parts Warehouse , which is based in Albuquerque, I believe. Their prices are a trifle lower than Direct Line's, too. -
Yikes! What ungodly pressure was that tire inflated to? Now that I have my Slime pump, and the plug gun I bought about 10 years ago--well, I almost wish I would have a flat, just so I could see if I've purchased the right stuff. Well, just a little flat, in the garage, if possible. Not one of those flats where I scratch yet another handlebar weight. That's no fun. For what it's worth: the latest TP numbers are 36 in the front, 38 in the rear. In particular, the lower number in back almost completely eliminates the bike's tendency to slither around on the ()*)(&^* tar squiggles New York's DOT thinks is OK for patching highways.
-
Thanks, gentlemen. It's good to know I wasn't off base when I decided to try lower pressures. But when I saw the 19 PSI rear tire pressure, all I could visualize is someone watching the light turn green, then letting out the clutch lever--and going nowhere, because the rear wheel is spinning inside the tire. For what it's worth: I was in the local AutoZone today, and persuaded myself to part with $30 to acquire one of these. I was pleased to discover that the box included a pencil type tire gauge that's just over three inches long! It's so small that it readily fits on the front wheel's valve stem, without me having to use a lot of bad language, like I do with all my other gauges. It appears to be accurate, too.